Do-It-Yourself: Merida Wig (from Brave)
 Merida is the high-spirited new princess from Disney/Pixar's new movie, Brave. One of her defining features is her amazing curly red hair. It took Pixar artists over three years to perfect the program that created Merida's trademark locks. It's the single most identifiable part of any Merida costume, and a huge challenge to create.
The biggest challenges for the wig were the specific shape and size, color and highlights, varied textures, and movement. After doing lots of internet shopping I decided that a single, store-bought wig would never achieve the look I wanted. As always, cost was a factor and I was not willing to buy a custom wig for my Merida cosplay, so I started researching and figuring out how to make one of my own.
I decided that combining multiple wigs would be the best course of action. I specifically bought three different wigs so that the hair wouldn't match perfectly. Normal hair has different texture and coloration throughout, and I hoped to mimic this look. In the end this was very successful and the final product ended up looking much more lifelike (other than it's crazy size) due to the variety in it. One was a very high quality wig (they will usually cost between $40 and $60 depending on where you shop) and the other two were cheaper costume wigs (usually around $20). Look for sales, used wigs, or outlet stores to save more money. You want the colors to match very closely, but if there is a shade or two difference between them it will still appear natural. ")
Step 1: Take the cheaper wigs apart. This is a mind-numbingly repetitive and slow process. Basically you use a seam ripper to carefully detach the strands of hair from the headpiece. As you can see in the picture to the right, the hair in most wigs is attached in rows. Clip most of the wig up on top of the foam head and start removing these rows from the back neckline. Be careful to keep these rows as intact as possible so it is easier to restitch them back onto the main wig. You just want to remove the stitches that attach the rows to the elastic/skull cap, not the stitches that keep the row of hair together.
PRO TIP: Start at the bottom back and stack the rows of hair neatly as you go. Then you will be able to sew them onto the same area on the new wig and the will be about the right size row and length.
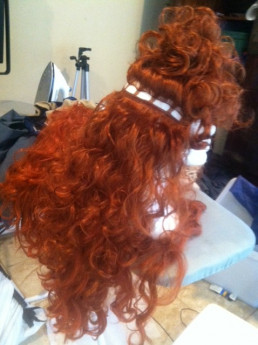
") Step 2: Sew the hair, by hand, onto the higher quality wig. It's important to use a higher quality wig for the base so it is comfortable and fits well. It will stay on your head more easily and look more realistic. The cheaper hair will look better if it is mixed in with high quality hair. Sewing hair to a wig is very similar to removing it. Use a hair clip to pile most of the hair on top of the foam head, and start reattaching hair at the back neckline. As you can see in the picture to the right, the higher quality wigs have more elastic in them so they can adjust more precisely. You want the hair to be straight between each strip of elastic, but don't pull it tight. If it's too tight, the wig will not stretch properly to fit on your head. Just stitch it where it lays naturally on the foam head. You will stitch the hair to the elastic strands in the wig, NOT TO THE OTHER HAIR!
Step 2: Sew the hair, by hand, onto the higher quality wig. It's important to use a higher quality wig for the base so it is comfortable and fits well. It will stay on your head more easily and look more realistic. The cheaper hair will look better if it is mixed in with high quality hair. Sewing hair to a wig is very similar to removing it. Use a hair clip to pile most of the hair on top of the foam head, and start reattaching hair at the back neckline. As you can see in the picture to the right, the higher quality wigs have more elastic in them so they can adjust more precisely. You want the hair to be straight between each strip of elastic, but don't pull it tight. If it's too tight, the wig will not stretch properly to fit on your head. Just stitch it where it lays naturally on the foam head. You will stitch the hair to the elastic strands in the wig, NOT TO THE OTHER HAIR!
When you are done stitching, try it on to make sure that it still fits. If it doesn't, you will have to remove the hair you added and try again. Seriously, don't sew it on too tight.
Step 3: Styling the huge wig. This is the most stressful part because you can really mess up wigs if you aren't careful. NEVER STRAIGHT BRUSH A CURLY WIG. You can really mess it up. Carefully shake it or bounce it up and down to give it life or use your fingers to remove tangles carefully. Wig spray can be very helpful to keep tangles down since it reproduces the natural oils that we make for our hair. It also makes the hair look more shiny and real.
 To get the volume and shape of Merida's hair, I had to do a lot of teasing around the sides of the head. Teasing hair is very counter-intuitive, because you are basically creating strategic tangles in the hair to make it stand farther from the scalp. Again, clip the hair at the very crown of the wig up and out of the way, you only want to tease hair that will be hidden by it later. Take a small section of the remaining and pull it straight up from the wig, then brush BACKWARDS from the about half way up the strand towards the roots. Use a round bristle brush and lots of hairspray to make it easier. Short, quick strokes are best. This obnoxious YouTube video can show you much better than I can describe it, but just watch the first 30-40 seconds of it to get the idea. With a curly wig, the most important thing is to make sure you put the teased areas UNDER non-teased hair, so plan well! You don't want it to show and you can't just brush the hair smooth like you can with real hair. You might want to practice on a cheap wig or your own hair before you try on your main wig.
Curling wigs is a pain. If possible, always buy wigs already curled the proper amount. You cannot use curling irons or any heated hair styling tools on most wigs. The wigs I purchased were pretty curly, but there were a few strands that were sticking out oddly when I finished teasing. To amend this, I used old-fashioned plastic curlers (the ones that have foam and then clip shut) to wrap these strands and then CAREFULLY dipped them in boiling water for about thirty seconds. Be very careful to not dip non-curler hair in the water because it will straighten it, and don't burn yourself! After dipping them, carefully run just the curler hair under cold water. Having a second  person to hold the wig head and extra hair is very helpful if you try this method of curling. Once the curlers have been dipped in cold water, carefully unwind them from the curlers and let them dry. Once they are dry, hairspray the heck out of them! I chose to use a few different sizes of curlers to give the same variety of curl size that Merida's hair has, and you may want to use the same trick if you are trying to recreate natural curls.
Step 4: Wear it! I was very happy with the final product, but I may add even more hair to it before next time! I saw a LOT of Merida cosplayers at San Diego Comic-Con and the wigs were what really set the good ones apart. In cosplay, size does matter.