Debut of Sif & WonderCon
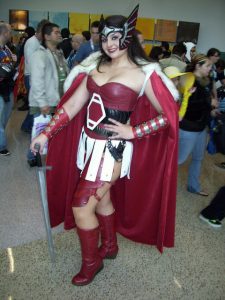 What a crazy weekend! I am still recovering and it's Thursday. Seriously, who's idea was it to have my Irish music persona and cosplay persona collide? Two days of cosplaying at a convention with a concert and night of heavy drinking in between is not the best idea. Fun, but not the best idea.
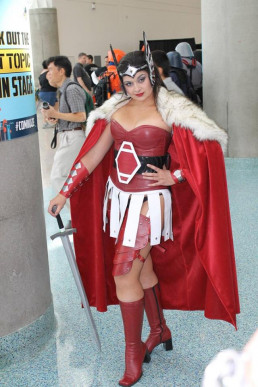
Sif debuted at WonderCon and was a huge success. I was asked to pose for more pictures than ever before and got more complements than ever before, despite the fact that most people couldn't identify my character. Oh well, they still appreciated the craftsmanship and the overall impact. I consider this to be my most successful cosplay to date.
There are many reasons for this, but here is a list of the biggest differences between Sif and my previous cosplays:
- I was the only Sif at WonderCon (I'm pretty sure) and this made me stand out. It also helps that I was nearly 6ft of bright red woman warrior. I did not blend in.
- I finally invested in a good quality makeup kit. It made a huge difference in the photos and the quality of the images that were taken at this convention. I felt a little ridiculous putting it on the first day, but the impact it had on my cosplay was undeniable. I looked good the morning after St. Patrick's Day! I can't even begin to explain how amazing that is!
- I'm getting better at posing and working the convention floor. Despite my experience working at Renaissance Faire and performing on stage, it's taken me a while to get comfortable as a cosplayer at conventions. I still have things to work on, but I'm getting much more comfortable.
- I picked a character very suited to my body type and physical features. This is always a smart move with cosplayers. A woman as tall as I am can look awkward in group pictures, but when you're supposed to be a Norse goddess it makes more sense. I'm working on some cosplays for San Diego ComicCon that are not in my body type, we will see how that goes...
- My outfit is friggin' leather. That's just stinkin' impressive and badass. Not to brag, but it is!
I still have improvements to make to this outfit, but overall I am incredibly pleased with how everything turned out. I'm hoping to have a photo shoot with this outfit very soon and will be posting a gallery once I finish collecting all the images off the internet. If you have a good picture, please email it to me! I'd love to see it!
I did discover that this is the best cosplay to wear in cold or rainy weather. It was POURING rain on Saturday. The cloak is very resistant to water and isn't harmed by the rain! The hood flips up to protect my leather headpiece and makeup. Even the boots are actually pleather rain boots! It was unplanned, but it worked out very well on this stormy WonderCon weekend.

WonderCon was a very fun convention, and I hope it returns to Anaheim again next year. There is a bigger variety of vendors at this show since the booths are probably much cheaper than at SDCC. The crowds are also much smaller. Everyone says it's like SDCC was 10 years ago, but I wouldn't know. I love the current Comic-Con for all it's crazy size and commercialism, but I really enjoyed WonderCon as well. The parking was a mess. The traffic in the whole area was terrible and the shuttle buses were a mess because of it. We spent a very large percent of Sat dealing with that situation. Not fun. I highly recommend getting a hotel in walking distance, or if you wait until the last minute like I did, get a hotel with a shuttle. Sunday was very much improved because of my Saturday night hotel stay and the parking/shuttle it provided. That was my only real problem with this convention, and it was made worse by the rain. I hope they can come up with some productive solutions for next year to keep the traffic flowing more smoothly.
Overall, it was an amazing weekend that I will never forget! I met and got to spend time with so many incredible people and revel in my two favorite pastimes, performing (cosplaying and an MWOW concert) and drinking. What could be better?
WonderCon Countdown: Sif's Belt and Skirt
WonderCon has arrived in Southern California! While this has caused many Northern California people sorrow, I am happy to have an event before SDCC to debut my Sif cosplay! There is only one problem... it's not done yet. I have made a lot of progress and will be able to finish tonight, but sleep may be sacrificed. Everything is looking great and I am very excited!
Belt
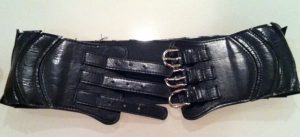
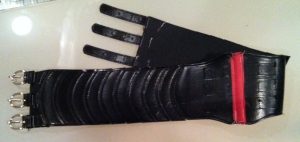
Sif's belt is a trademark of her costume. No matter how many times she is redesigned, she almost always has a prominent, geometric belt buckle in the center of her abdomen. I started with a faux leather corset belt that I got on Ebay for $6.99. I really liked the pattern the sections made and how it added texture. Plus, it's stretchy without being spandex. Bonus points! The biggest problem is that I wanted the pattern in the belt to accent and frame the Sif buckle, which meant I had to move the buckles already on the belt. I removed them with a seam ripper and restitched them on the opposite side of the belt which would be on my back. I stitched the front together to prep it for the Sif buckle.
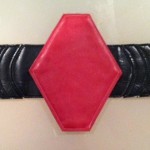 The buckle was actually much easier than I expected. I measured and cut the basic shape out of an old teaching poster I had. It was stronger than poster board, but not as thick as cardboard... plus I already had it. I'm not planning on teaching Kindergarten again anytime soon, so it's not a huge loss. I cut up the rest of the red leather purse that I used to make straps for my leg armor, and covered the polygon (see? I'm such a teacher...) by gluing it and then stitching the edges. I was happy that my new sewing machine could handle the laminated poster board and leather.
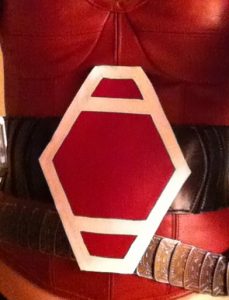
The white boarders on the belt were the most time consuming piece, just because they needed to be perfect. I traced the finished, red leather polygon on the back of my white leather hide and measured out the designs. Then I carefully cut out each section so the lines would be perfect and keep the geometric look. Once it was cut I sewed white stitches 1/8th inches from the edges of the white. These served no structural purpose, but added texture and gave the illusion that the white was stitched onto the red. Then I carefully used barge cement to glue the white onto the red. This was the most stressful part, because if I messed up I'd have to start ALL over again. I also had to glue the white leather on perfectly so the lines and angles would stay straight. Luckily, non of the leather had stretched, and it ended up looking great.
Skirt
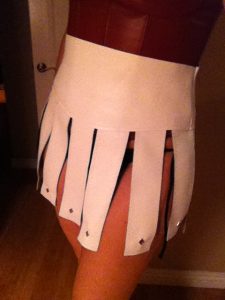
The skirt was fairly simple, but time consuming. Lots of measuring and cutting very straight lines. I had it basically put together, but realized that it looked like cheap plastic from even just a few feet away. I decided that adding metal studs would give the leather a little more weight and help give it more texture. I carefully added them to each strip of the skirt. This is pretty challenging since the leather was very prone to wrinkling under the studs and the wrinkles showed up a lot on the white. Once this was finished, I put the waist band on over my corset, inside out. I than taped (you don't want to use pins on leather because they leave holes) each strip in place to get the desired look. It's important to do this with the corset on, because the measurements will be very off otherwise. Finally, I sewed everything down and added Velcro to close it at the top. I'd usually use laces to close a leather skirt, but it's not going to show and I wanted it to stay as flat as possible under the corset.
To Do
I still need to finish the garter belt that will hold up my leg armor, and my sword belt tonight. My first try at making a cosplay sword ended in a very unremarkable, heavy sword that flakes paint at every turn, so I will be wearing my backup LARP sword this weekend. It's very lightweight and doesn't distract from the outfit. The armor will be the most difficult part, so I hope the concept for the garter belt works. Wish me luck!
I'll be posting pictures from WonderCon and from the Merry Wives' St. Patrick's Day concert this weekend, so check out my facebook page or twitter feed to see them!
Lady Sif's Cape
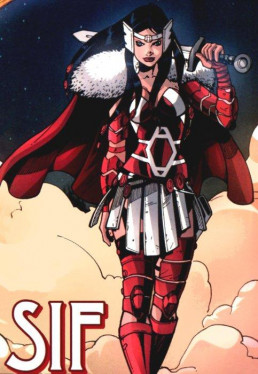
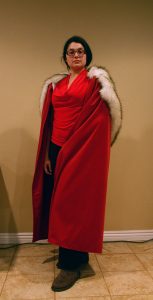
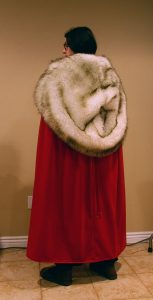
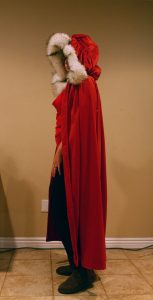
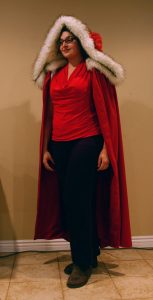
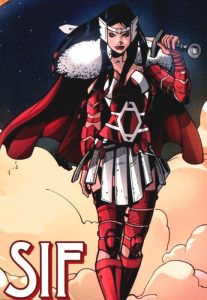 Sif is an Asgardian goddess in Marvel comics, and is based on a beautiful (blond!) goddess in Norse myth. Her current costume pays tribute to this with a red cape adorned with large amounts of white fur.
As with all my cosplays, I wanted to make her cape as realistic and functional as possible. This meant changing it into a cloak so that it could actually do some good in the frigid Norse climate where her myth originated. It also meant finding a use for the furry shoulder pads, which seem very functional but would keep the wearer much warmer if they were located on the inside of the cloak. Once again, I fell back on historical costuming for the answer.
The Kinsale Cloak is a traditional design that originated in Ireland. It is very popular with historical reenactors because of it is a very attractive garment and is incredibly functional. It is a lined cloak that will keep you very warm, but its trademark piece is the hood that hangs down around the shoulders when not covering the wearer's head. I decided that I'd get the desired Sif look by lining the Kinsale cloak hood with fur, then wearing it around my shoulders.Plus, I already had the pattern. Huzzah!
I am very happy with the results... ignore my exhausted face and pajama pants.
This was the first time I had worked with (fake) fur. It was challenging, but I was lucky enough to get some pointers from very experience friends.
- Cutting - Don't cut through all the hair! It will ruin the texture and make your edges look bad. Flip it over and make shallow cuts to the fabric at the base of the hairs.
- When sewing, pin the hairs flat away from your seam allowances before you pin pieces together. Yes, this takes a LOT of pins, but it keeps you from sewing the hairs into your seams and messing up the cool look of your fur. It may seem time consuming, but it will save you a lot of time later and really improve the look of the whole garment.
The fur will get EVERYWHERE, but once you finish off your garment it *should* stop shedding since it should only be losing hair around the edges where you cut. Be sure you have a good quality lint roller on hand to clean up your garment after you finish.
I have about a month until WonderCon, and I still have to finish Sif's belt, skirt, and sword. Those are all fairly simple pieces that are very similar to previous projects, so I might actually be done early. Amazing!
Sif Update
 MY HEADPIECE ARRIVED!!!! WOOHOO! Ahem... but more on that at the end of this post...
My Sif cosplay project is coming along nicely. It seems there are never enough hours in the day, but I'm checking things off my list whenever I can. I am getting more and more excited about this project as I see it coming together. I really resemble Sif physically and think this could really be an attention getter at WonderCon and ComicCon.
The leg armor is still being reshaped, slowly but surely. I have a few adjustments to make on it, but it's looking better and better! I'm still deciding what buckle design to go with, there are so many choices!
I have all of my fabrics and have started cutting. I'm very happy with my choices, but again, I'm stumped. I love the fabric that I got for Sif's cape, but I can't decide if I want to line it with white or red. The red is more accurate for the character, but the white will make the rest of the outfit stand out more. The comic geek and the costumer inside me are at war over this. Right now the comic geek is winning. We will see...
Top to bottom: Fur for Sif's cape, red yummy fabric for Sif's cape, white leather for Sif's skirt, red imitation leather for different cosplay
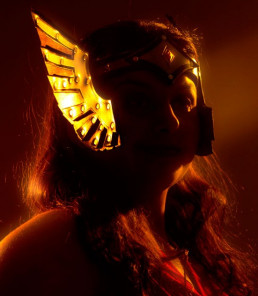
The big news is that my Sif headpiece arrived!! I'm so excited! It's always very nerve-wracking for me to have pieces commissioned. I'm a huge perfectionist and don't like handing control and money over to someone else. I procrastinated for months before I finally bit the bullet and got in touch with a leather craftsman from the SCA. I originally asked for white because I assumed it would be easier to get than silver. WRONG. Evidently, silver leather paint is easier and lasts longer than white. So with very specific directions and many emails in the last few weeks I signed the most important piece of this cosplay off to a total stranger.
And damn am I happy with the results!
An Asgardian goddess is born!
I'm taking pictures as I tackle the cloak/cape. I'll post info on that when there is more to see.
Sif's Leg Armor
My first cosplay of 2012 is going to be Lady Sif, lover of Thor in the Marvel Universe. Although I'm a DC fangirl usually, I've always liked the concept of Sif and am very similar to her physically. Also, Jaimie Alexander (who played Sif in the Thor movie) was at my house for a photo shoot a few months ago. I took it as a sign from the Asgardian gods that I should cosplay Sif this year.
I will be using the red leather corset that I made for my Wonder Woman outfit. The most challenging piece is the leg armor, so I started on that first. I bought a pair of dirt-cheap, $30 tassets from an online store. For anyone who doesn't know what a tasset is, they are worn like this:
and here is what Sif looks like:

Not exactly what I needed, but a good start. The first thing I needed to fix was the color. The tassets I got were imitation (CHEAP) leather with many imperfections and this horrible cherry red color. That is not the Sif I'm going for. I want to make a realistic, leather clad warrior, not a cherry red snow bunny with a sword.
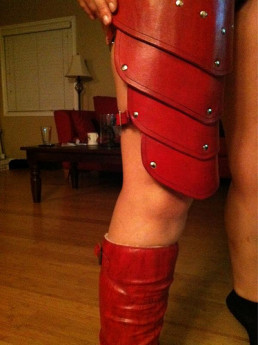
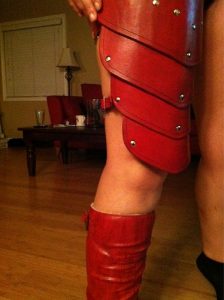
Step 1: Fix the color. I used shoe dye to change the color and then used shoe polish to bring out the imperfections and darken the edges. This aged the material and made it shine like real leather. The original color is on the right and the new look is on the left. I have since done another coat of the shoe polish, so they are even darker now.

Step 2: Add straps and remold the "leather" so they will strap to my legs like Sif's armor. Tassets are flat, but I needed mine to strap to my legs and be form fitting. First thing I did was visit my friendly local Goodwill store and buy a leather purse that matched my re-purposed tassets. This purse's straps and buckles became the straps that will hook around the back of my leg and hold the armor on me. Not bad for $4.99. To remold the leather I sprayed it with rubbing alcohol (best thing to stretch or change the shape of colored leather) and wrapped them closed with strips of fabric. Then I shoved them between my couch cushions for the night to make sure they stayed curled in a leg shape. I sprayed them about 3 times before I went to bed.

And... DONE!
Ok, not totally done, but very close. I think I will have to use the rest of the purse to create a garter belt to help support their weight before I finish the costume.

