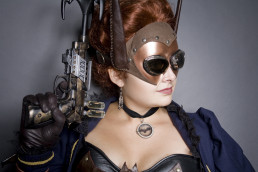
Steampunk Batgirl Mask
I am creating an unnamed (*cough*) steampunk superhero costume for San Diego Comic-Con. I have never attempted a steampunk outfit before, so I knew there would be a bit of a learning curve. The mask was going to be the most difficult piece of the outfit for me, and a make-it or break-it piece for the cosplay, so I started off my project with that piece. It was a major lesson in patience for me. While not all of my costumes go perfectly, this is the first time that something has gotten ruined and I had to restart from scratch.
Plan A:
 My plan was very simple, I would create the mask out of InstaMorph, then paint and cover parts of it with leather. Easy right? Nope.
The formation of the mask went well enough. InstaMorph is my go-to substance when I have to create something from scratch. It's very easy to work with, but also very strong. Fiberglass will be a big step up, but for now, this works very well. The only drawback is the low melting point, which is around 150 degrees. Do not make something out of this material and then leave it in the car.
Anyway, the formation went very well and I was thrilled with the initial fit and look of the mask. It had amazing potential, but the edges were a little uneven. I sanded these down to get a flatter edge since I eventually wanted it to resemble metal. It sanded easily, but ended up getting a fuzzy texture on the areas I sanded it. Here is the turning point. What I should have done was boil the plastic one more time to smooth this out. Opps. Instead I thought the paint would cover the fuzz and it would end up with a rough metal look. This didn't happen. My mask ended up looking almost furry, and since it had already been painted, I couldn't go back an reform the Instamorph into another shape. Bye bye Plan A!
Plan B:
I was not going to spend hours forming a mask from scratch again, especially because I now doubted that I could get the finished texture that I wanted, so Plan B started with a trip to Michael's. I found surprisingly sturdy white all-face masks for around $5. They were plastic, but had texture and thickness enough to be the base for my alterations. I brought one home and started creating my masterpiece. Plan A was a black mask with leather accents, but my plan changed a lot after the initial failure.
 The shape was actually very easy to get. I simply drew the shape I wanted on the back (just in case the pencil would leave marks), and then cut it with strong scissors. I then rubbed it down with mineral spirits to remove any excess oils or anti-mold coating on the plastic, and sprayed a few base coats of black Krylon Fusion spray paint. I always use the Fusion as a base coat on plastics because it (supposedly) bonds with plastics. It seems to work pretty well for all my projects so far. I used black because it gives a great base to metallic paints, and it looks better than white if the metallic chips for some reason. I used Krylon Copper Metallic spray paint after letting the black dry for a few days. (I've been testing a lot of metal-imitating spray paints and will be doing a blog post to compare them in the future!)
I wanted the mask to look like molded metal, so it was a VERY slow process. To get it smooth you have to do lots of thin layers, but not too thin or you never get rid of the texture. If you spray too thickly, you will start getting drips. PRO TIP: Let each layer dry COMPLETELY before you add on the next one.
Once again, I was too enthusiastic and handled the mask after only a few hours of drying. There are now a few TINY marks on it, but nobody can see them unless they are less than a foot away. Please, don't make my mistake! Let your creation dry for a few days before you move on to  adding rivets, leather, goggles etc. I knew better, but just got too excited!
Next I measured and cut the leather. I glued the edges under so that it would appear smooth and then glued the leather to the mask. After that I used a leather punch to make holes through the leather and mask. The rivets are purely decoration, and were glued in place through those holes. Actually setting the rivets with a hammer (like I did on my Sif costume) would have damaged the mask.
Finally, I added the ears and strap. I cut the ears from Plan A's mask and wrapped them in leather, gluing them in place and using a whip stitch to close the edge. This also added a cool steampunk look to them. I sewed and glued them and the strap in place. All of the leather and straps were taken from a $4 purse that I bought at the thrift store. The last thing I did to the mask was glue on the goggles, which were purchased on Amazon for $7 and dismantled so I could attach them correctly.
 (The ears will lay flat against my head when I wear it.)
Overall, I am much happier with the final outcome than I was with my original design. I think this looks much more "steampunk" and will actually be more comfortable to wear, mostly because of its lighter weight.
Stay tuned for more updates on this very educational cosplay experience!