Do-It-Yourself: Merida Wig (from Brave)
 Merida is the high-spirited new princess from Disney/Pixar's new movie, Brave. One of her defining features is her amazing curly red hair. It took Pixar artists over three years to perfect the program that created Merida's trademark locks. It's the single most identifiable part of any Merida costume, and a huge challenge to create.
The biggest challenges for the wig were the specific shape and size, color and highlights, varied textures, and movement. After doing lots of internet shopping I decided that a single, store-bought wig would never achieve the look I wanted. As always, cost was a factor and I was not willing to buy a custom wig for my Merida cosplay, so I started researching and figuring out how to make one of my own.
I decided that combining multiple wigs would be the best course of action. I specifically bought three different wigs so that the hair wouldn't match perfectly. Normal hair has different texture and coloration throughout, and I hoped to mimic this look. In the end this was very successful and the final product ended up looking much more lifelike (other than it's crazy size) due to the variety in it. One was a very high quality wig (they will usually cost between $40 and $60 depending on where you shop) and the other two were cheaper costume wigs (usually around $20). Look for sales, used wigs, or outlet stores to save more money. You want the colors to match very closely, but if there is a shade or two difference between them it will still appear natural. ")
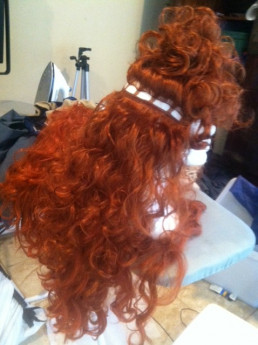
Step 1: Take the cheaper wigs apart. This is a mind-numbingly repetitive and slow process. Basically you use a seam ripper to carefully detach the strands of hair from the headpiece. As you can see in the picture to the right, the hair in most wigs is attached in rows. Clip most of the wig up on top of the foam head and start removing these rows from the back neckline. Be careful to keep these rows as intact as possible so it is easier to restitch them back onto the main wig. You just want to remove the stitches that attach the rows to the elastic/skull cap, not the stitches that keep the row of hair together.
PRO TIP: Start at the bottom back and stack the rows of hair neatly as you go. Then you will be able to sew them onto the same area on the new wig and the will be about the right size row and length.
") Step 2: Sew the hair, by hand, onto the higher quality wig. It's important to use a higher quality wig for the base so it is comfortable and fits well. It will stay on your head more easily and look more realistic. The cheaper hair will look better if it is mixed in with high quality hair. Sewing hair to a wig is very similar to removing it. Use a hair clip to pile most of the hair on top of the foam head, and start reattaching hair at the back neckline. As you can see in the picture to the right, the higher quality wigs have more elastic in them so they can adjust more precisely. You want the hair to be straight between each strip of elastic, but don't pull it tight. If it's too tight, the wig will not stretch properly to fit on your head. Just stitch it where it lays naturally on the foam head. You will stitch the hair to the elastic strands in the wig, NOT TO THE OTHER HAIR!
Step 2: Sew the hair, by hand, onto the higher quality wig. It's important to use a higher quality wig for the base so it is comfortable and fits well. It will stay on your head more easily and look more realistic. The cheaper hair will look better if it is mixed in with high quality hair. Sewing hair to a wig is very similar to removing it. Use a hair clip to pile most of the hair on top of the foam head, and start reattaching hair at the back neckline. As you can see in the picture to the right, the higher quality wigs have more elastic in them so they can adjust more precisely. You want the hair to be straight between each strip of elastic, but don't pull it tight. If it's too tight, the wig will not stretch properly to fit on your head. Just stitch it where it lays naturally on the foam head. You will stitch the hair to the elastic strands in the wig, NOT TO THE OTHER HAIR!
When you are done stitching, try it on to make sure that it still fits. If it doesn't, you will have to remove the hair you added and try again. Seriously, don't sew it on too tight.
Step 3: Styling the huge wig. This is the most stressful part because you can really mess up wigs if you aren't careful. NEVER STRAIGHT BRUSH A CURLY WIG. You can really mess it up. Carefully shake it or bounce it up and down to give it life or use your fingers to remove tangles carefully. Wig spray can be very helpful to keep tangles down since it reproduces the natural oils that we make for our hair. It also makes the hair look more shiny and real.
 To get the volume and shape of Merida's hair, I had to do a lot of teasing around the sides of the head. Teasing hair is very counter-intuitive, because you are basically creating strategic tangles in the hair to make it stand farther from the scalp. Again, clip the hair at the very crown of the wig up and out of the way, you only want to tease hair that will be hidden by it later. Take a small section of the remaining and pull it straight up from the wig, then brush BACKWARDS from the about half way up the strand towards the roots. Use a round bristle brush and lots of hairspray to make it easier. Short, quick strokes are best. This obnoxious YouTube video can show you much better than I can describe it, but just watch the first 30-40 seconds of it to get the idea. With a curly wig, the most important thing is to make sure you put the teased areas UNDER non-teased hair, so plan well! You don't want it to show and you can't just brush the hair smooth like you can with real hair. You might want to practice on a cheap wig or your own hair before you try on your main wig.
Curling wigs is a pain. If possible, always buy wigs already curled the proper amount. You cannot use curling irons or any heated hair styling tools on most wigs. The wigs I purchased were pretty curly, but there were a few strands that were sticking out oddly when I finished teasing. To amend this, I used old-fashioned plastic curlers (the ones that have foam and then clip shut) to wrap these strands and then CAREFULLY dipped them in boiling water for about thirty seconds. Be very careful to not dip non-curler hair in the water because it will straighten it, and don't burn yourself! After dipping them, carefully run just the curler hair under cold water. Having a second  person to hold the wig head and extra hair is very helpful if you try this method of curling. Once the curlers have been dipped in cold water, carefully unwind them from the curlers and let them dry. Once they are dry, hairspray the heck out of them! I chose to use a few different sizes of curlers to give the same variety of curl size that Merida's hair has, and you may want to use the same trick if you are trying to recreate natural curls.
Step 4: Wear it! I was very happy with the final product, but I may add even more hair to it before next time! I saw a LOT of Merida cosplayers at San Diego Comic-Con and the wigs were what really set the good ones apart. In cosplay, size does matter.
RPG Podcast Listener Survey
 The 2012 RPG Podcast Lister Survey is up! Please visit rpgpolls.com to fill it out. This information is very useful to podcast hosts and gives great information on the demographics of our audience members. It should take you less than 5 minutes to fill out and doesn't ask for any personal contact information.
The 2011 survey gave us some very interesting information about RPG podcast listeners. According to last year's statistics, RPG podcast listeners are between the ages of 26 and 29. 51% of them are married and over 66% use iTunes to download their podcasts. D&D was still the most popular gaming system of listeners, but had dropped 2.3% while other systems such as Savage Worlds and GURPS gained ground. Overall, listeners spent an average of $621.92 on RPGs and gaming in 2011. Women made up only 6% of respondents in last years survey, however the actual number of women who took the survey increased.
Happy Jacks RPG Podcast did very well in the 2011 survey. Over 27% of the gamers surveyed listened to our podcast!! We actually ranked 3rd in the list of top 20 RPG podcasts! Most surprising of all, Happy Jack's was the favorite RPG podcast of women who took the survey. Over 33% of the women who completed the survey listened to our podcast! This makes me very happy, since I am a huge proponent of women in gaming.
I am eagerly looking forward to the results of the 2012 survey! Please share this info with your gamer friends! The more respondents, the more accurate the data will be!
Debut of Sif & WonderCon
 What a crazy weekend! I am still recovering and it's Thursday. Seriously, who's idea was it to have my Irish music persona and cosplay persona collide? Two days of cosplaying at a convention with a concert and night of heavy drinking in between is not the best idea. Fun, but not the best idea.
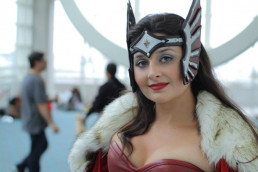
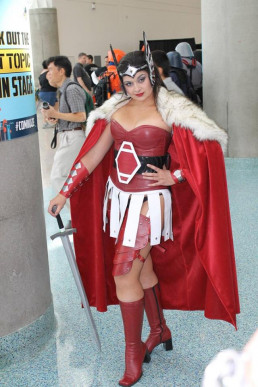
Sif debuted at WonderCon and was a huge success. I was asked to pose for more pictures than ever before and got more complements than ever before, despite the fact that most people couldn't identify my character. Oh well, they still appreciated the craftsmanship and the overall impact. I consider this to be my most successful cosplay to date.
There are many reasons for this, but here is a list of the biggest differences between Sif and my previous cosplays:
- I was the only Sif at WonderCon (I'm pretty sure) and this made me stand out. It also helps that I was nearly 6ft of bright red woman warrior. I did not blend in.
- I finally invested in a good quality makeup kit. It made a huge difference in the photos and the quality of the images that were taken at this convention. I felt a little ridiculous putting it on the first day, but the impact it had on my cosplay was undeniable. I looked good the morning after St. Patrick's Day! I can't even begin to explain how amazing that is!
- I'm getting better at posing and working the convention floor. Despite my experience working at Renaissance Faire and performing on stage, it's taken me a while to get comfortable as a cosplayer at conventions. I still have things to work on, but I'm getting much more comfortable.
- I picked a character very suited to my body type and physical features. This is always a smart move with cosplayers. A woman as tall as I am can look awkward in group pictures, but when you're supposed to be a Norse goddess it makes more sense. I'm working on some cosplays for San Diego ComicCon that are not in my body type, we will see how that goes...
- My outfit is friggin' leather. That's just stinkin' impressive and badass. Not to brag, but it is!
I still have improvements to make to this outfit, but overall I am incredibly pleased with how everything turned out. I'm hoping to have a photo shoot with this outfit very soon and will be posting a gallery once I finish collecting all the images off the internet. If you have a good picture, please email it to me! I'd love to see it!
I did discover that this is the best cosplay to wear in cold or rainy weather. It was POURING rain on Saturday. The cloak is very resistant to water and isn't harmed by the rain! The hood flips up to protect my leather headpiece and makeup. Even the boots are actually pleather rain boots! It was unplanned, but it worked out very well on this stormy WonderCon weekend.

WonderCon was a very fun convention, and I hope it returns to Anaheim again next year. There is a bigger variety of vendors at this show since the booths are probably much cheaper than at SDCC. The crowds are also much smaller. Everyone says it's like SDCC was 10 years ago, but I wouldn't know. I love the current Comic-Con for all it's crazy size and commercialism, but I really enjoyed WonderCon as well. The parking was a mess. The traffic in the whole area was terrible and the shuttle buses were a mess because of it. We spent a very large percent of Sat dealing with that situation. Not fun. I highly recommend getting a hotel in walking distance, or if you wait until the last minute like I did, get a hotel with a shuttle. Sunday was very much improved because of my Saturday night hotel stay and the parking/shuttle it provided. That was my only real problem with this convention, and it was made worse by the rain. I hope they can come up with some productive solutions for next year to keep the traffic flowing more smoothly.
Overall, it was an amazing weekend that I will never forget! I met and got to spend time with so many incredible people and revel in my two favorite pastimes, performing (cosplaying and an MWOW concert) and drinking. What could be better?
WonderCon Countdown: Sif's Belt and Skirt
WonderCon has arrived in Southern California! While this has caused many Northern California people sorrow, I am happy to have an event before SDCC to debut my Sif cosplay! There is only one problem... it's not done yet. I have made a lot of progress and will be able to finish tonight, but sleep may be sacrificed. Everything is looking great and I am very excited!
Belt
Sif's belt is a trademark of her costume. No matter how many times she is redesigned, she almost always has a prominent, geometric belt buckle in the center of her abdomen. I started with a faux leather corset belt that I got on Ebay for $6.99. I really liked the pattern the sections made and how it added texture. Plus, it's stretchy without being spandex. Bonus points! The biggest problem is that I wanted the pattern in the belt to accent and frame the Sif buckle, which meant I had to move the buckles already on the belt. I removed them with a seam ripper and restitched them on the opposite side of the belt which would be on my back. I stitched the front together to prep it for the Sif buckle.


 The buckle was actually much easier than I expected. I measured and cut the basic shape out of an old teaching poster I had. It was stronger than poster board, but not as thick as cardboard... plus I already had it. I'm not planning on teaching Kindergarten again anytime soon, so it's not a huge loss. I cut up the rest of the red leather purse that I used to make straps for my leg armor, and covered the polygon (see? I'm such a teacher...) by gluing it and then stitching the edges. I was happy that my new sewing machine could handle the laminated poster board and leather.

The white boarders on the belt were the most time consuming piece, just because they needed to be perfect. I traced the finished, red leather polygon on the back of my white leather hide and measured out the designs. Then I carefully cut out each section so the lines would be perfect and keep the geometric look. Once it was cut I sewed white stitches 1/8th inches from the edges of the white. These served no structural purpose, but added texture and gave the illusion that the white was stitched onto the red. Then I carefully used barge cement to glue the white onto the red. This was the most stressful part, because if I messed up I'd have to start ALL over again. I also had to glue the white leather on perfectly so the lines and angles would stay straight. Luckily, non of the leather had stretched, and it ended up looking great.
Skirt

The skirt was fairly simple, but time consuming. Lots of measuring and cutting very straight lines. I had it basically put together, but realized that it looked like cheap plastic from even just a few feet away. I decided that adding metal studs would give the leather a little more weight and help give it more texture. I carefully added them to each strip of the skirt. This is pretty challenging since the leather was very prone to wrinkling under the studs and the wrinkles showed up a lot on the white. Once this was finished, I put the waist band on over my corset, inside out. I than taped (you don't want to use pins on leather because they leave holes) each strip in place to get the desired look. It's important to do this with the corset on, because the measurements will be very off otherwise. Finally, I sewed everything down and added Velcro to close it at the top. I'd usually use laces to close a leather skirt, but it's not going to show and I wanted it to stay as flat as possible under the corset.
To Do
I still need to finish the garter belt that will hold up my leg armor, and my sword belt tonight. My first try at making a cosplay sword ended in a very unremarkable, heavy sword that flakes paint at every turn, so I will be wearing my backup LARP sword this weekend. It's very lightweight and doesn't distract from the outfit. The armor will be the most difficult part, so I hope the concept for the garter belt works. Wish me luck!
I'll be posting pictures from WonderCon and from the Merry Wives' St. Patrick's Day concert this weekend, so check out my facebook page or twitter feed to see them!

Lady Sif's Cape
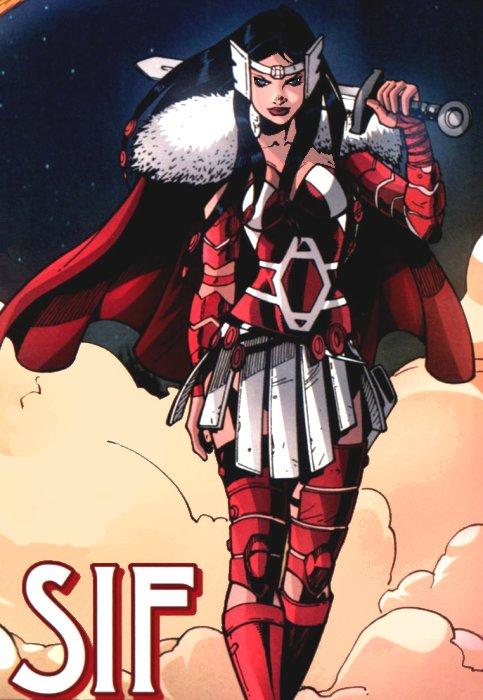 Sif is an Asgardian goddess in Marvel comics, and is based on a beautiful (blond!) goddess in Norse myth. Her current costume pays tribute to this with a red cape adorned with large amounts of white fur.
As with all my cosplays, I wanted to make her cape as realistic and functional as possible. This meant changing it into a cloak so that it could actually do some good in the frigid Norse climate where her myth originated. It also meant finding a use for the furry shoulder pads, which seem very functional but would keep the wearer much warmer if they were located on the inside of the cloak. Once again, I fell back on historical costuming for the answer.
The Kinsale Cloak is a traditional design that originated in Ireland. It is very popular with historical reenactors because of it is a very attractive garment and is incredibly functional. It is a lined cloak that will keep you very warm, but its trademark piece is the hood that hangs down around the shoulders when not covering the wearer's head. I decided that I'd get the desired Sif look by lining the Kinsale cloak hood with fur, then wearing it around my shoulders.Plus, I already had the pattern. Huzzah!
I am very happy with the results... ignore my exhausted face and pajama pants.


This was the first time I had worked with (fake) fur. It was challenging, but I was lucky enough to get some pointers from very experience friends.
- Cutting - Don't cut through all the hair! It will ruin the texture and make your edges look bad. Flip it over and make shallow cuts to the fabric at the base of the hairs.
- When sewing, pin the hairs flat away from your seam allowances before you pin pieces together. Yes, this takes a LOT of pins, but it keeps you from sewing the hairs into your seams and messing up the cool look of your fur. It may seem time consuming, but it will save you a lot of time later and really improve the look of the whole garment.
The fur will get EVERYWHERE, but once you finish off your garment it *should* stop shedding since it should only be losing hair around the edges where you cut. Be sure you have a good quality lint roller on hand to clean up your garment after you finish.
I have about a month until WonderCon, and I still have to finish Sif's belt, skirt, and sword. Those are all fairly simple pieces that are very similar to previous projects, so I might actually be done early. Amazing!
Middle School History RPG
It is a constant challenge to keep students engaged in middle school. You know the age, spring has sprung and suddenly girls no longer have cooties. In fact, they are darn attractive. Suddenly, school is the last thing on your mind when you are sitting in class. It's Mother Nature herself that I am fighting against each day when I try to keep my 7th graders interested. What weapon can a teacher use in this battle against hormones?

Dice of course! Don't tell me you are surprised...
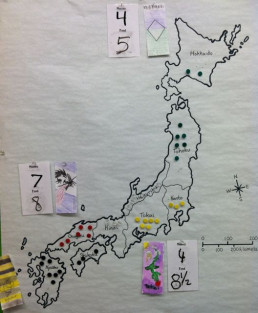
I've designed a class RPG/Risk inspired simulation to bring Medieval Japan to life in my classroom. Each group of students is responsible for maintaining their feudal state, including the earning of food and money to upkeep their armies. They can declare war and battle against other feudal states, and face the twists and turns that fate can bring upon any civilization. Once my students figured out they could conquer and become the feudal Lords of Japan, their hormones didn't stand a chance. Score one for gaming!
It started with a map. I did research and created battle maps that showed the actual feudal boundaries in Medieval Japan. I then broke my class into 4 small groups and each group was given a feudal state. They created a "nobori" (Japanese for banner) and a symbol to represent their state. I was really impressed by their banners, and they are showing so much team spirit and loyalty to their own states.

Each state started with 3 armies, 2 food, and 1 money, which are marked on the battle map with notes and push-pins for the armies. Each day, they can earn more armies, food, and money by completing their assignments. They need to maintain a minimum level of money for their armies to continue fighting. They also must have 1 food for every 2 armies each day, or their armies start starving to death. The students can trade amongst themselves for food, money, or armies. They can also attack other feudal states, and if they win a war they get to take over the armies, food, and money of the other state. They also take all the students from the conquered group and become one larger group, so nobody gets left out if their group loses a war.

Wars are where the dice come in. For every push-pin army a group has, they get to roll 1d6. I thought this was a fair way to resolve battles. A group with 5 armies is still capable of defending themselves against a group with 7 armies, but the odds are not in their favor. They can have one battle a day, and a group must win 3 battles in order to win a war. If a group runs out of money during a war, their armies go on strike and they are left defenseless. If they run out of food, their armies will die and be pulled off the battle map. Groups that lose a war are absorbed into the victorious group and get to continue participating in this new larger group. Eventually, one feudal state may conquer all of Japan... but maybe not!
But as always, fate plays a hand in the success or failure of nations. This is represented by the Wheel of Fate in my classroom. The groups spin the wheel each day, and luck decides if something beneficial or detrimental happens. Examples:

- Extra rain falls in your feudal state. +2 food
- Bandits attack local farming villages. - 2 food
- Your Lords give you gifts for a holiday. +1 money
- You give an inspirational speech to your troops. +2 armies
- Your armies need new armor. -1 money for each army
This seems to be the biggest piece of excitement each day. The students all hold their breaths when their state spins the wheel. It is a game changing event each day. As with real life (and RPGs), a well placed famine or flood can cause real damage to an otherwise successful civilization.
So far, this has been a very successful experiment with my students. It has really increased their interest in history. It's also increased their interest in math as they figure out their chances of success for winning a war, and make long term plans to sustain their armies during their campaigns. We will see if it lures any students into the RPG hobby.
OrcCon 2012 - Laser Ponies Game for Adults
I didn't know what to expect when I ran my adult-theme Laser Ponies convention game at OrcCon 2012. Convention games are an unpredictable beast. You never know who will show up at your table, or if they will buy the concept that you have spent endless hours prepping. This concept was especially risky with Laser Ponies, but I hoped that anyone who signed up for a twisted game of alien ponies would show up ready for anything.

I love having an amazing setup for my players when they arrive. I also like the players to be surprised by the characters that they get. Usually, my players have little clues when they arrive at the table, but nobody gets to see their character sheets until everyone is seated and we get started. For this game, each player had a bag waiting for them that contained their character sheet, a map, a set of My Little Pony stickers (just because they were fun!), and a customized toy version of their character. On each bag was a picture that represented the character inside, and that was their only clue.
The customized ponies were the biggest part of my prep time for this game. Lots of people were very excited because of the crazy description and because we'd been talking about the game on the Happy Jack's RPG podcast for months. EIGHT people were signed up, so I had to make a lot of ponies! They took about two weeks to complete, but I loved the challenge and the creativity involved. I sanded small toy horses that I bought at the Dollar Tree. Then painted each one with spray paint and puffy paint to make them look unique. I was thrilled that the players were so excited to get them.


I was supposed to co-GM this game with my friend Casey, however he fell ill about 10 minutes into the game intro. Things went smoothly and the players bought into the crazy concept that we had created. Basically, the home of the Laser Ponies is being overrun by a drug cartel. The only ponies who can take a stand against this threat are the P-Team. Yes, we ripped off the A-Team, but damn did it make for a funny game. Each character had weaknesses, like uncontrollable lust, war flashbacks, drug addiction, fear of flying, and more. These weaknesses have to be rolled so the players never know when they will kick in. It made for a very adult, but very funny addition to the game.The players got so into it they started rolling their weaknesses, even when I hadn't asked!

The game went incredibly well, and was one of the most fun games with which I have been involved. The players were what really made it magical. They were incredibly creative and energetic. The started making creative props of their own and kept acting out scenes using their toy horses. The insane plot ideas that they came up with were so unexpected, but it really made the game. Multiple times in our 4 hour game we had to stop because we were all laughing too hard to speak. I feel bad for the other Happy Jacks games that shared the room with us, but holy cow was it fun! The 4 hours flew by, and the game timed out perfectly, ending 10 minutes before the cut off time.
The one thing that I wasn't prepared for was combat. I had planned to co-GM, and Casey is a numbers guy. I had read the rules a few days before, but I couldn't recall the exact damage rules once it was obvious that Casey wasn't coming back. I was subtly trying to look up damage rules while I started the first scene. It didn't impact the game for the players (as far as I could tell!) but it made those first few moments stressful for me. Lesson: Always have the book/PDF with you (huzzah! I did that!) and always read the combat rules before the players show up if its a new system to you.
This was a REALLY amazing game. REALLY. I won't be sharing any plot points here since I may have to run this game again. I might have to retire from adult Laser Ponies forever though, because I doubt any game could live up to the original P-Team.