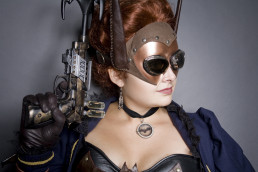
Steampunk Batgirl Mask
I am creating an unnamed (*cough*) steampunk superhero costume for San Diego Comic-Con. I have never attempted a steampunk outfit before, so I knew there would be a bit of a learning curve. The mask was going to be the most difficult piece of the outfit for me, and a make-it or break-it piece for the cosplay, so I started off my project with that piece. It was a major lesson in patience for me. While not all of my costumes go perfectly, this is the first time that something has gotten ruined and I had to restart from scratch.
Plan A:
 My plan was very simple, I would create the mask out of InstaMorph, then paint and cover parts of it with leather. Easy right? Nope.
The formation of the mask went well enough. InstaMorph is my go-to substance when I have to create something from scratch. It's very easy to work with, but also very strong. Fiberglass will be a big step up, but for now, this works very well. The only drawback is the low melting point, which is around 150 degrees. Do not make something out of this material and then leave it in the car.
Anyway, the formation went very well and I was thrilled with the initial fit and look of the mask. It had amazing potential, but the edges were a little uneven. I sanded these down to get a flatter edge since I eventually wanted it to resemble metal. It sanded easily, but ended up getting a fuzzy texture on the areas I sanded it. Here is the turning point. What I should have done was boil the plastic one more time to smooth this out. Opps. Instead I thought the paint would cover the fuzz and it would end up with a rough metal look. This didn't happen. My mask ended up looking almost furry, and since it had already been painted, I couldn't go back an reform the Instamorph into another shape. Bye bye Plan A!
Plan B:
I was not going to spend hours forming a mask from scratch again, especially because I now doubted that I could get the finished texture that I wanted, so Plan B started with a trip to Michael's. I found surprisingly sturdy white all-face masks for around $5. They were plastic, but had texture and thickness enough to be the base for my alterations. I brought one home and started creating my masterpiece. Plan A was a black mask with leather accents, but my plan changed a lot after the initial failure.
 The shape was actually very easy to get. I simply drew the shape I wanted on the back (just in case the pencil would leave marks), and then cut it with strong scissors. I then rubbed it down with mineral spirits to remove any excess oils or anti-mold coating on the plastic, and sprayed a few base coats of black Krylon Fusion spray paint. I always use the Fusion as a base coat on plastics because it (supposedly) bonds with plastics. It seems to work pretty well for all my projects so far. I used black because it gives a great base to metallic paints, and it looks better than white if the metallic chips for some reason. I used Krylon Copper Metallic spray paint after letting the black dry for a few days. (I've been testing a lot of metal-imitating spray paints and will be doing a blog post to compare them in the future!)
I wanted the mask to look like molded metal, so it was a VERY slow process. To get it smooth you have to do lots of thin layers, but not too thin or you never get rid of the texture. If you spray too thickly, you will start getting drips. PRO TIP: Let each layer dry COMPLETELY before you add on the next one.
Once again, I was too enthusiastic and handled the mask after only a few hours of drying. There are now a few TINY marks on it, but nobody can see them unless they are less than a foot away. Please, don't make my mistake! Let your creation dry for a few days before you move on to  adding rivets, leather, goggles etc. I knew better, but just got too excited!
Next I measured and cut the leather. I glued the edges under so that it would appear smooth and then glued the leather to the mask. After that I used a leather punch to make holes through the leather and mask. The rivets are purely decoration, and were glued in place through those holes. Actually setting the rivets with a hammer (like I did on my Sif costume) would have damaged the mask.
Finally, I added the ears and strap. I cut the ears from Plan A's mask and wrapped them in leather, gluing them in place and using a whip stitch to close the edge. This also added a cool steampunk look to them. I sewed and glued them and the strap in place. All of the leather and straps were taken from a $4 purse that I bought at the thrift store. The last thing I did to the mask was glue on the goggles, which were purchased on Amazon for $7 and dismantled so I could attach them correctly.
 (The ears will lay flat against my head when I wear it.)
Overall, I am much happier with the final outcome than I was with my original design. I think this looks much more "steampunk" and will actually be more comfortable to wear, mostly because of its lighter weight.
Stay tuned for more updates on this very educational cosplay experience!
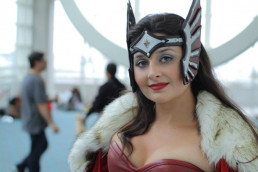
Debut of Sif & WonderCon
 What a crazy weekend! I am still recovering and it's Thursday. Seriously, who's idea was it to have my Irish music persona and cosplay persona collide? Two days of cosplaying at a convention with a concert and night of heavy drinking in between is not the best idea. Fun, but not the best idea.
Sif debuted at WonderCon and was a huge success. I was asked to pose for more pictures than ever before and got more complements than ever before, despite the fact that most people couldn't identify my character. Oh well, they still appreciated the craftsmanship and the overall impact. I consider this to be my most successful cosplay to date.
There are many reasons for this, but here is a list of the biggest differences between Sif and my previous cosplays:
- I was the only Sif at WonderCon (I'm pretty sure) and this made me stand out. It also helps that I was nearly 6ft of bright red woman warrior. I did not blend in.
- I finally invested in a good quality makeup kit. It made a huge difference in the photos and the quality of the images that were taken at this convention. I felt a little ridiculous putting it on the first day, but the impact it had on my cosplay was undeniable. I looked good the morning after St. Patrick's Day! I can't even begin to explain how amazing that is!
- I'm getting better at posing and working the convention floor. Despite my experience working at Renaissance Faire and performing on stage, it's taken me a while to get comfortable as a cosplayer at conventions. I still have things to work on, but I'm getting much more comfortable.
- I picked a character very suited to my body type and physical features. This is always a smart move with cosplayers. A woman as tall as I am can look awkward in group pictures, but when you're supposed to be a Norse goddess it makes more sense. I'm working on some cosplays for San Diego ComicCon that are not in my body type, we will see how that goes...
- My outfit is friggin' leather. That's just stinkin' impressive and badass. Not to brag, but it is!
I still have improvements to make to this outfit, but overall I am incredibly pleased with how everything turned out. I'm hoping to have a photo shoot with this outfit very soon and will be posting a gallery once I finish collecting all the images off the internet. If you have a good picture, please email it to me! I'd love to see it!
I did discover that this is the best cosplay to wear in cold or rainy weather. It was POURING rain on Saturday. The cloak is very resistant to water and isn't harmed by the rain! The hood flips up to protect my leather headpiece and makeup. Even the boots are actually pleather rain boots! It was unplanned, but it worked out very well on this stormy WonderCon weekend.

WonderCon was a very fun convention, and I hope it returns to Anaheim again next year. There is a bigger variety of vendors at this show since the booths are probably much cheaper than at SDCC. The crowds are also much smaller. Everyone says it's like SDCC was 10 years ago, but I wouldn't know. I love the current Comic-Con for all it's crazy size and commercialism, but I really enjoyed WonderCon as well. The parking was a mess. The traffic in the whole area was terrible and the shuttle buses were a mess because of it. We spent a very large percent of Sat dealing with that situation. Not fun. I highly recommend getting a hotel in walking distance, or if you wait until the last minute like I did, get a hotel with a shuttle. Sunday was very much improved because of my Saturday night hotel stay and the parking/shuttle it provided. That was my only real problem with this convention, and it was made worse by the rain. I hope they can come up with some productive solutions for next year to keep the traffic flowing more smoothly.
Overall, it was an amazing weekend that I will never forget! I met and got to spend time with so many incredible people and revel in my two favorite pastimes, performing (cosplaying and an MWOW concert) and drinking. What could be better?
Wonder Woman Armor
The most difficult part of making a good Wonder Woman outfit is the armor. It can make or break the whole outfit. No matter how much time and effort you put into the corset and star-spangled-underwear, if your armor is obviously spray-painted cardboard nobody will be impressed. Being the over-achiever that I am, I wanted my armor to be made of real metal. This would be impossible for most first-time cosplayers, however I have worked at Renaissance Faires in California for over 10 years. I know more than my fair share of blacksmiths, leather workers, and armorers. So I put word out on the dust filled streets of Faire in 2011 that I wanted Wonder Woman armor made...
 These are the people I choose to spend time with...
... and the amazing Jacques Louis David answered my call. Jacques is an artist and should become very, very famous someday. He makes armor at fair, but his most recent passion is for metal sculpture and installation pieces. He also happens to be a comic and Wonder Woman fan. We met a bunch of times to discuss "the plan" and he was kind enough to hold my hand through the whole process. I know a lot more about armor than your normal (late) 20's California girl. I own a collection of swords and used to train horses for a jousting company, but Jacques' knowledge blew my mind and made me consider things I hadn't even realized were possible. Over beers and burgers, we came up with our design. I had bought a belt at a Thrift store, so that was not something we needed to worry about. We figured out that I needed the tiara, eagle chest piece, bracers, and greaves. If you ever want to commission metal work, talk to Jacques.
For my gladiator type Wonder Woman, I chose to replace the boots with greaves which are basically metal shin guards. They would be much more functional than knee-high boots in an actual battle. I could also lace them on and get a similar look to the era where Wonder Woman wore sandals.


50s Wonder Woman and the greaves for my Wonder Woman
I went with the eagle design for the chest piece because it made the most sense for a real warrior to wear an animal symbol. Although I love the W design, it didn't really fit with the image I was going for in this costume. This was easily the hardest piece of the project.
We needed the eagle to be fitted to my...ahem... chest. That meant that Jacques needed something the shape of my chest that was hard enough to bang... I mean hammer against. We made a plaster mold of me wearing a corset (the same corset I patterned the Wonder Woman corset from). Jacques then took this shell and made a body-double of me made out of really hard plaster. That gave him the surface he needed to hammer out an eagle in the shape of my boobs.


Wrapped up in getting plastered...

The eagle (upside down) in process
After forming the steel (which is armor grade), brass was added to give a hint of the traditional Wonder Woman costume. The same was added to the grieves and the tiara. The only pieces that are only polished steel are the bracers, which are such thick steel the could probably really deflect bullets. I added laces on those to continue with the theme.
 The power of the DC Universe - SDCC 2011
I am incredibly happy with how everything turned out. The metal pieces look amazing and really wow the crowed when I wear them. I really hope that SOMEONE in a film studio sees this someday and realizes that if a middle school teacher can do this in her spare time, they can do an even better job for a feature film.
Bringing an Amazon to Life
When I put my mind to something, very little can stop me. Common sense and logic were completely forgotten with this intense labor of love. I spent way too much money, way too much time, called in a lot of favors, and had a few near-breakdowns, all in the name of bringing an Amazon to life.
For months I studied Wonder Woman cosplay pictures online. Many of them were very, very good. However, I noticed that most were based on the 4-color comic book idea of Diana. While I love that image, I wanted to bring a Christopher Nolan-style Wonder Woman to life. I wanted a REAL amazon, with REAL armor. This would be outside the realm of most first-time cosplayers, but (lucky for me) I'm a nerd. After working at Renaissance Faires for over a decade (fuck, has it really been that long???) I've made some really talented friends.
The first thing I needed was a concept. I've always thought that the bathing suit look was fine in the comics, but I can't really picture anyone wearing it to fight crime in the real world. I have always liked the skirt option for Wonder Woman, and there are many renditions of her in Gladiator-style Roman skirts. Since these actually functioned as clothing for real warriors in centuries past, that's the option I went with. To do it right, I'd need real dyed leather and real molded steel. This was going to become a much larger project than I had ever planned for...
... but damn am I proud of the results...

Debuted at Comic-Con San Diego 2011
I will be posting specific breakdowns of the creation of the armor and sewing the leather pieces another night.
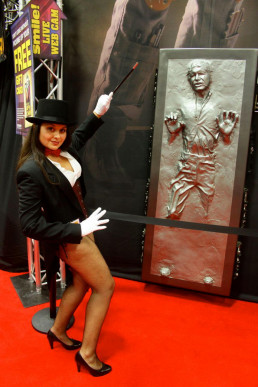
Zatanna Cosplay


Like many Zatanna cosplays, this outfit was more an adventure in finding pieces and altering them, rather than creating things from scratch. I had already begun work on my Wonder Woman cosplay for San Diego Comic-Con 2011, but was worried that my intricate design may not be finished in time. Zatanna was my Plan B, although I ended up so pleased with it that I wore it in addition to Wonder Woman. I love this character and have plans for continued improvements on this look.
I found the frock coat for $12 at my local Goodwill store and tailored it to fit me well. I adjusted a shirt and corset that I already owned to give the proper look. The hat was the most difficult part, and I am not completely happy with how it looked. I will be looking for a good quality replacement before I wear this cosplay again.
**This costume was created before I started my blog. Sorry that I didn’t document its creation! Please feel free to email me if you have any questions!**