Do-It-Yourself: Steampunk Weapon
Prop making is one of the most challenging aspects of cosplay and costume making. For this tutorial, I will be showing you how to modify a plastic toy gun into a Steampunk grapple gun. I wanted to do something very specific for my Steampunk Batgirl costume, but you can use many of these techniques to modify other plastic weapons. It also happens to be my favorite part of any costume, and something that I don't get to do nearly enough. The details of a prop can really push a costume to the next level, especially when it comes to Steampunk!
Step one: Choose your Weapon
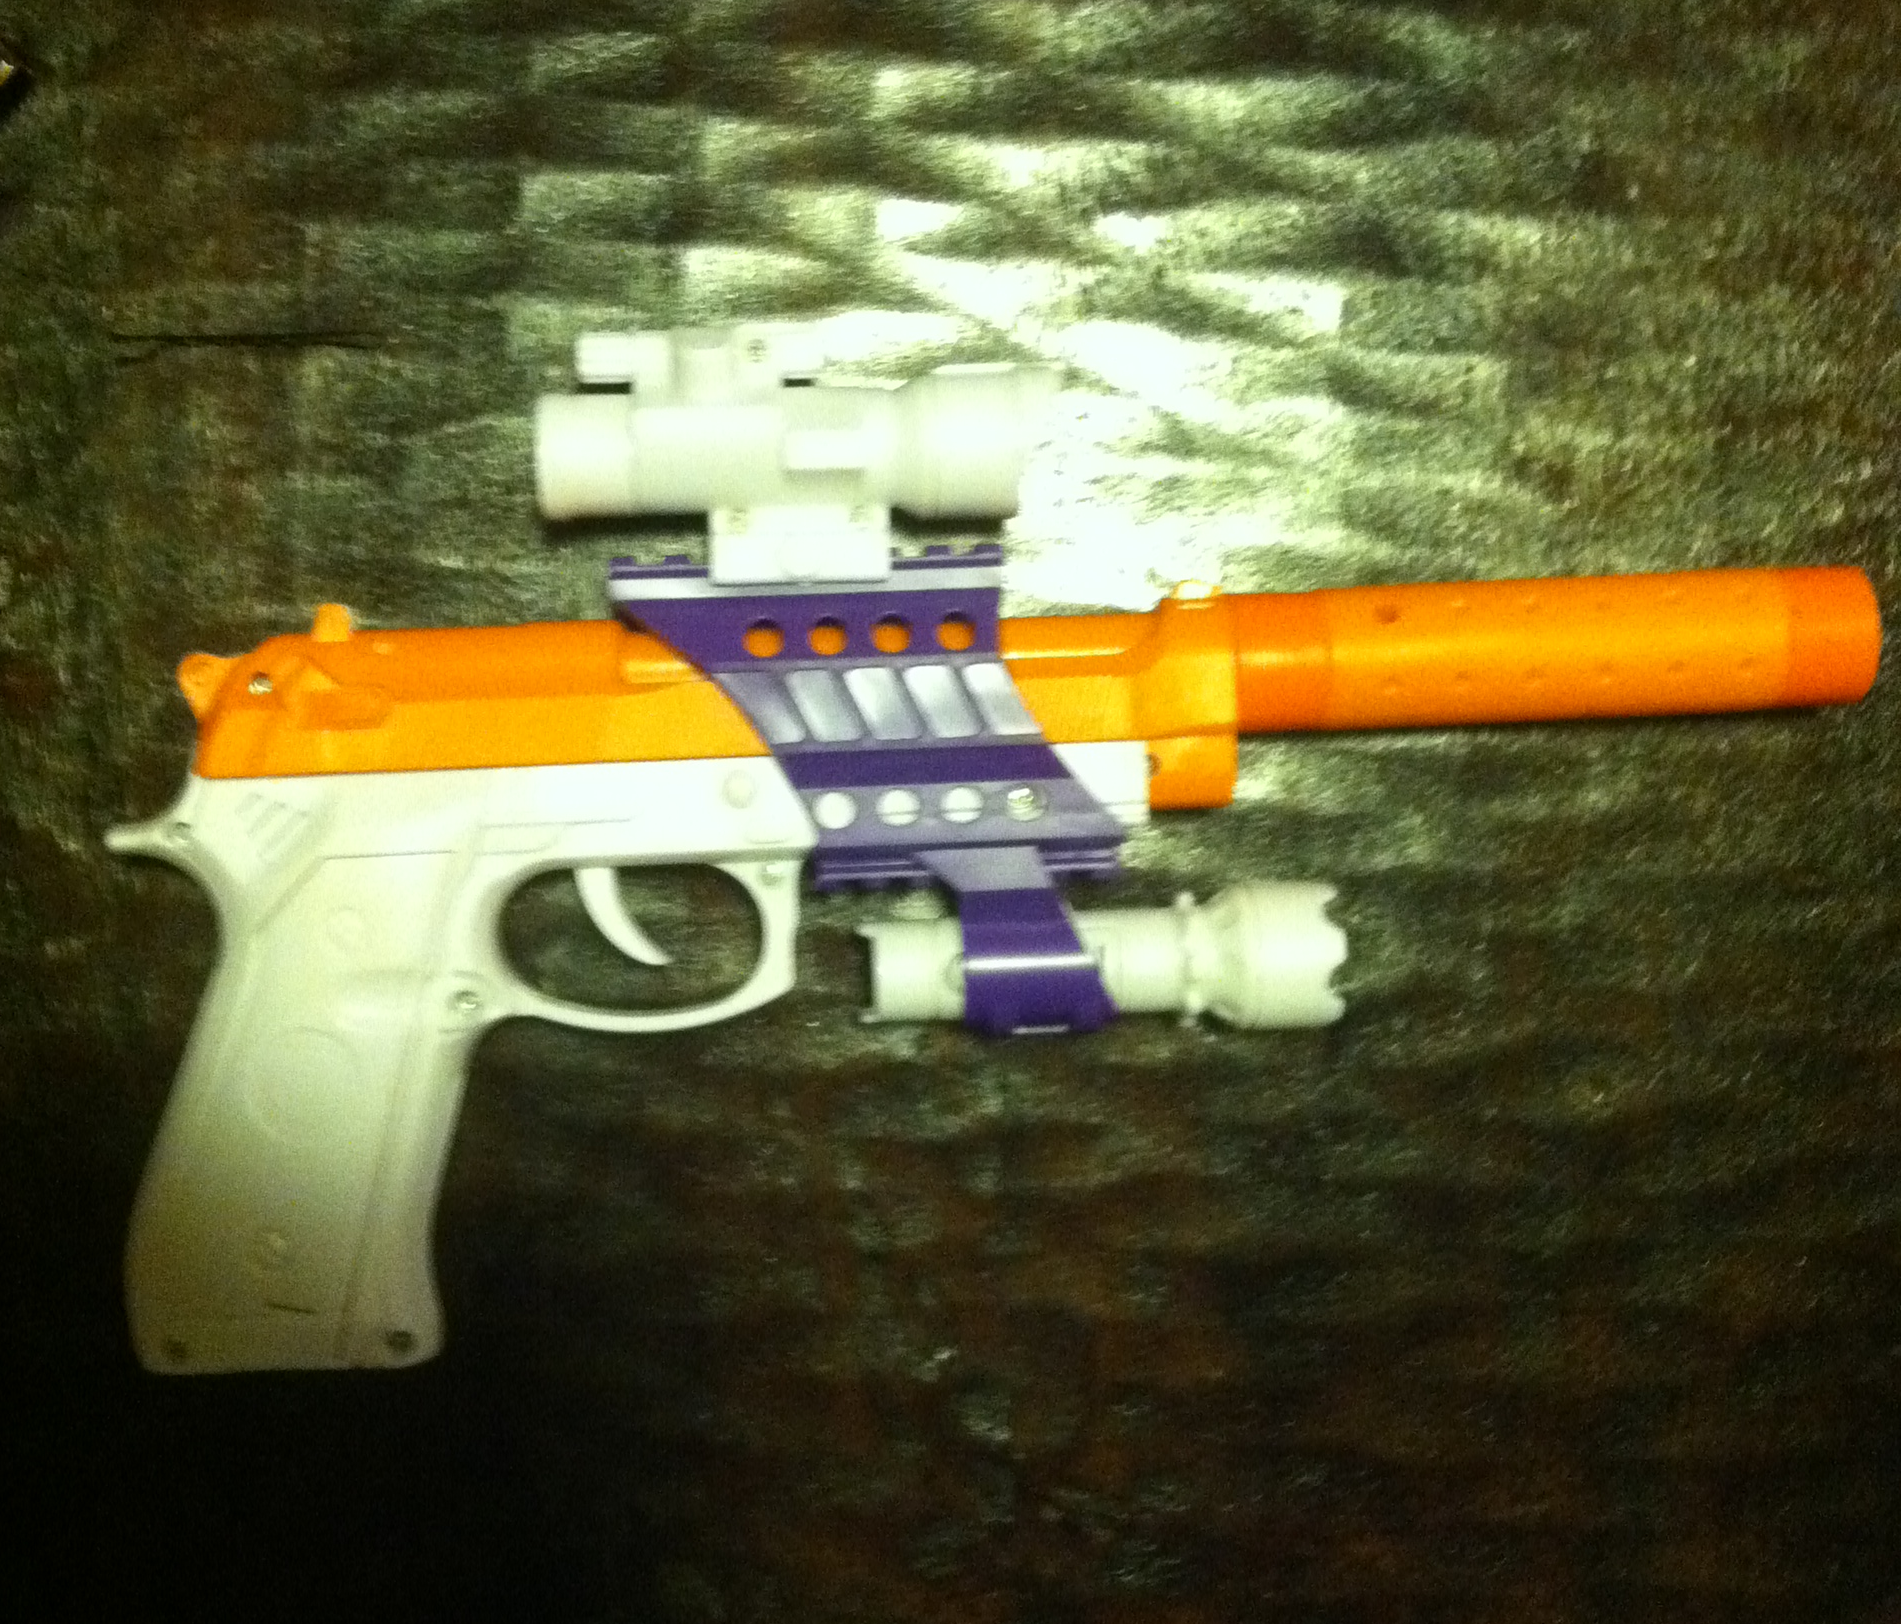 The first, and most important step of making a steampunk weapon is choosing the toy weapon you are going to modify. Take your time. Plan out exactly what you want and don't give up until you find it! Walk around the toy isles, shop online, and check out local Goodwill stores until you find the perfect toy. Don't worry about the color, focus on the shape and how it's built. Avoid guns that are easily recognizable as a specific model, unless that's the look you want (Oops). Make sure the toy is sturdy, that it's made of all plastic (rubber and metal will change how you have to modify it), and if it will be easy to disassemble or mask with tape for the painting process.
The gun pictured is the one I chose. I ended up not using the sights or the silencer that came with it, but the purple details ended up looking pretty cool by the end. Again, color doesn't matter at all.
Step Two: Prep for Paint
This is the most boring step, but it's vital if you want a good looking product by the end of this process. You will need fine grain sandpaper and dish soap. Carefully sand away any imperfections on the gun, without taking away too much or leaving scratches in the plastic. The goal is to make the gun as smooth and realistic as possible. Again, don't worry about the color of the gun, just focus on the texture of its surface.
When you have finished sanding the gun, wash it in normal water and dish washing liquid. You will have to wash your gun with damp rags if it has electronic parts and can't get totally wet. Be sure to rinse the gun thoroughly so soap residue doesn't mess up your painting later. Dry it with a rag and wait a few hours to insure it's completely dry before moving on to Step Three.
Step Three: Primer
 Be careful not to handle the gun too much before you paint it. Oils from your hands can impact the paint. I always use Krylon Fusion spray paint for plastics. For this project, I used black paint with a satin finish.
Take care to keep the spray can at least a foot from the gun and spray a thin layer of the paint, don't worry if you still see the original color through this first layer. Let the layer dry completely, and then add another. Keep adding thin layers until the gun is completely covered. MAKE SURE that each layer dries completely before adding the next, and that the layers stay thin, or you will get drips that ruin the look of your gun.
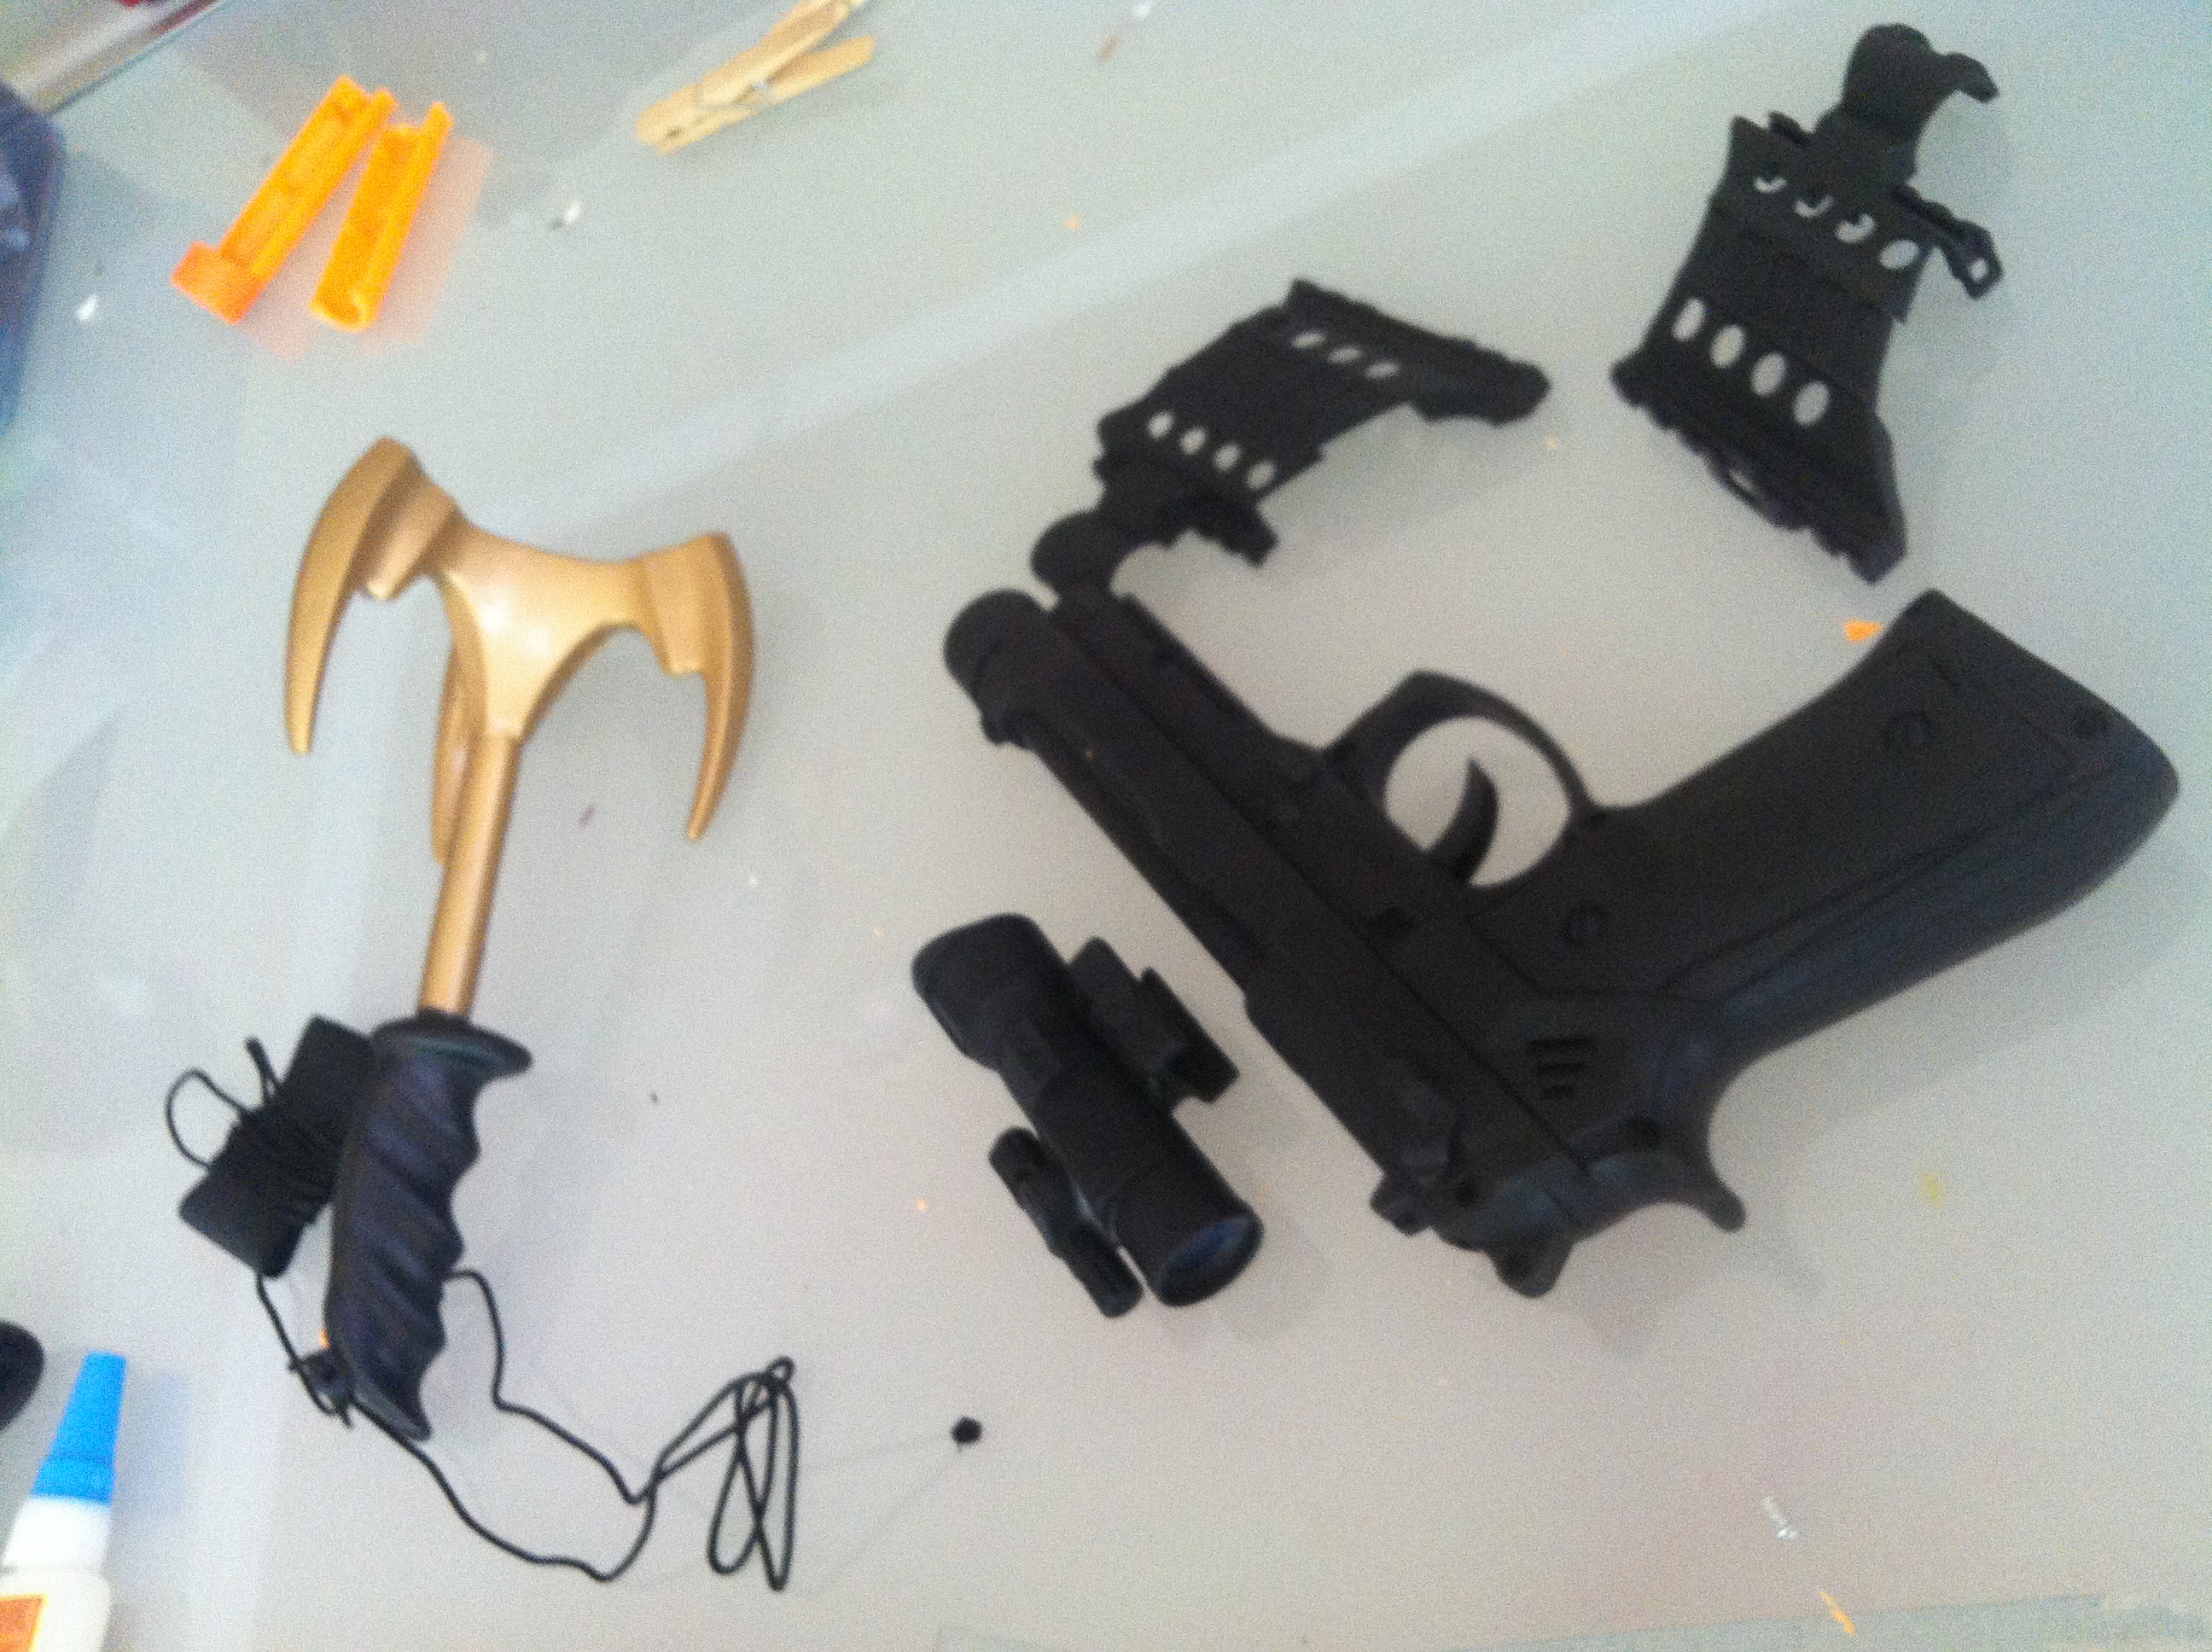
My gun ended up looking VERY modern and recognizable with the black primer on it. I was really worried by this point, but kept on going. Notice I painted all the parts just in case I decided to use them later. (The grappling hook is part of Step 5.)
Step Four: Metalize
 You will need an amazing substance called Rub-n-Buff to make the gun look metallic. It comes in small tubes, but don't let that fool you, a little goes a LONG way. It comes in tons of colors, I used the silver shade and the antique gold for my gun. Different metal looks all put together in one weapon really make something look steampunk, so don't hesitate to use two or three different colors on the different parts of your gun.
You are going to use the Rub-n-Buff to highlight the metal areas of your gun by hand. This of it more as a polish than a paint. Put a small dot of it on a smooth cloth, then carefully start applying it to your weapon. I HIGHLY suggest you practice on something else first to get a feel for it. Remember how you slowly added more and more primer paint to your gun in step three? Start with a tiny bit and then add more. I left a lot of black showing in the crevices of my gun to make it look grimy and old. As you "buff" your weapon, think about what parts of the gun's surface would get touched or rubbed against things the most. Those areas should be the brightest and the crevices should stay darker.
Let the Rub-n-Buff dry for a few hours. It is wax-based and rubs off on everything while wet, so be careful!
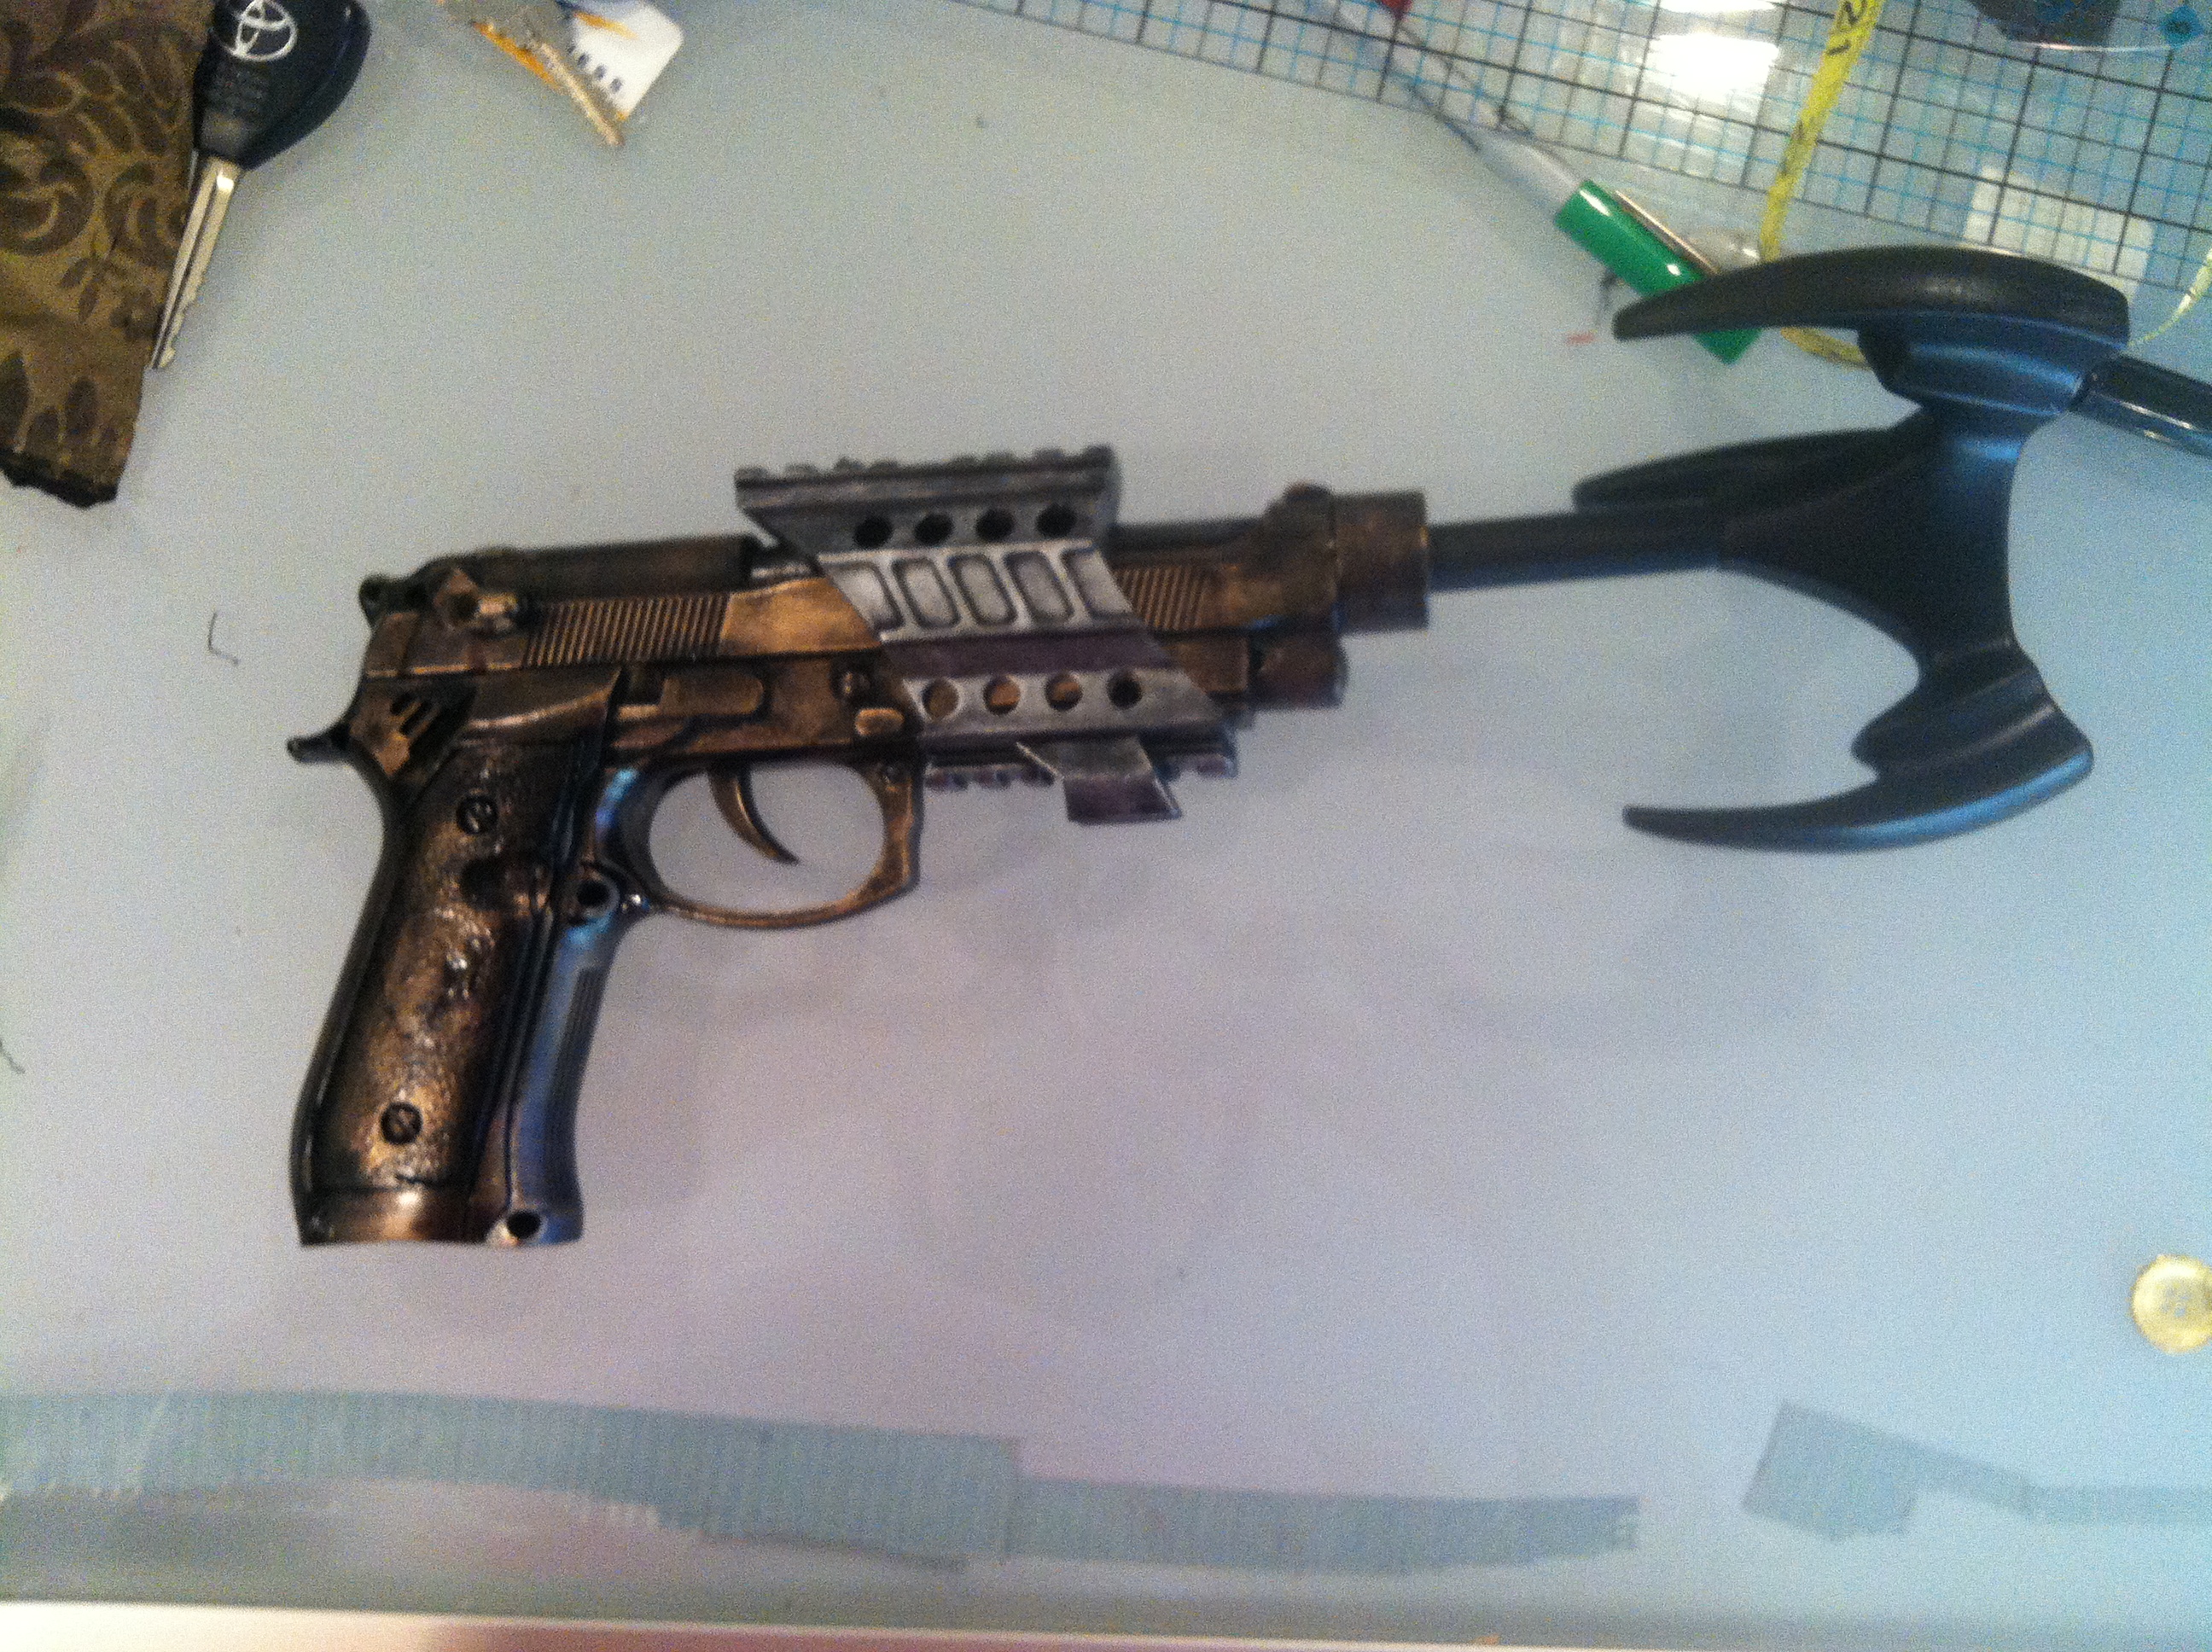
Step Five: Customize
This is where you get to let your creativity run wild! My steampunk weapon is a grapple gun, so I will tell you what I did to stylize my weapon in that manner, but don't limit yourself! Do a Google image search and get inspired.
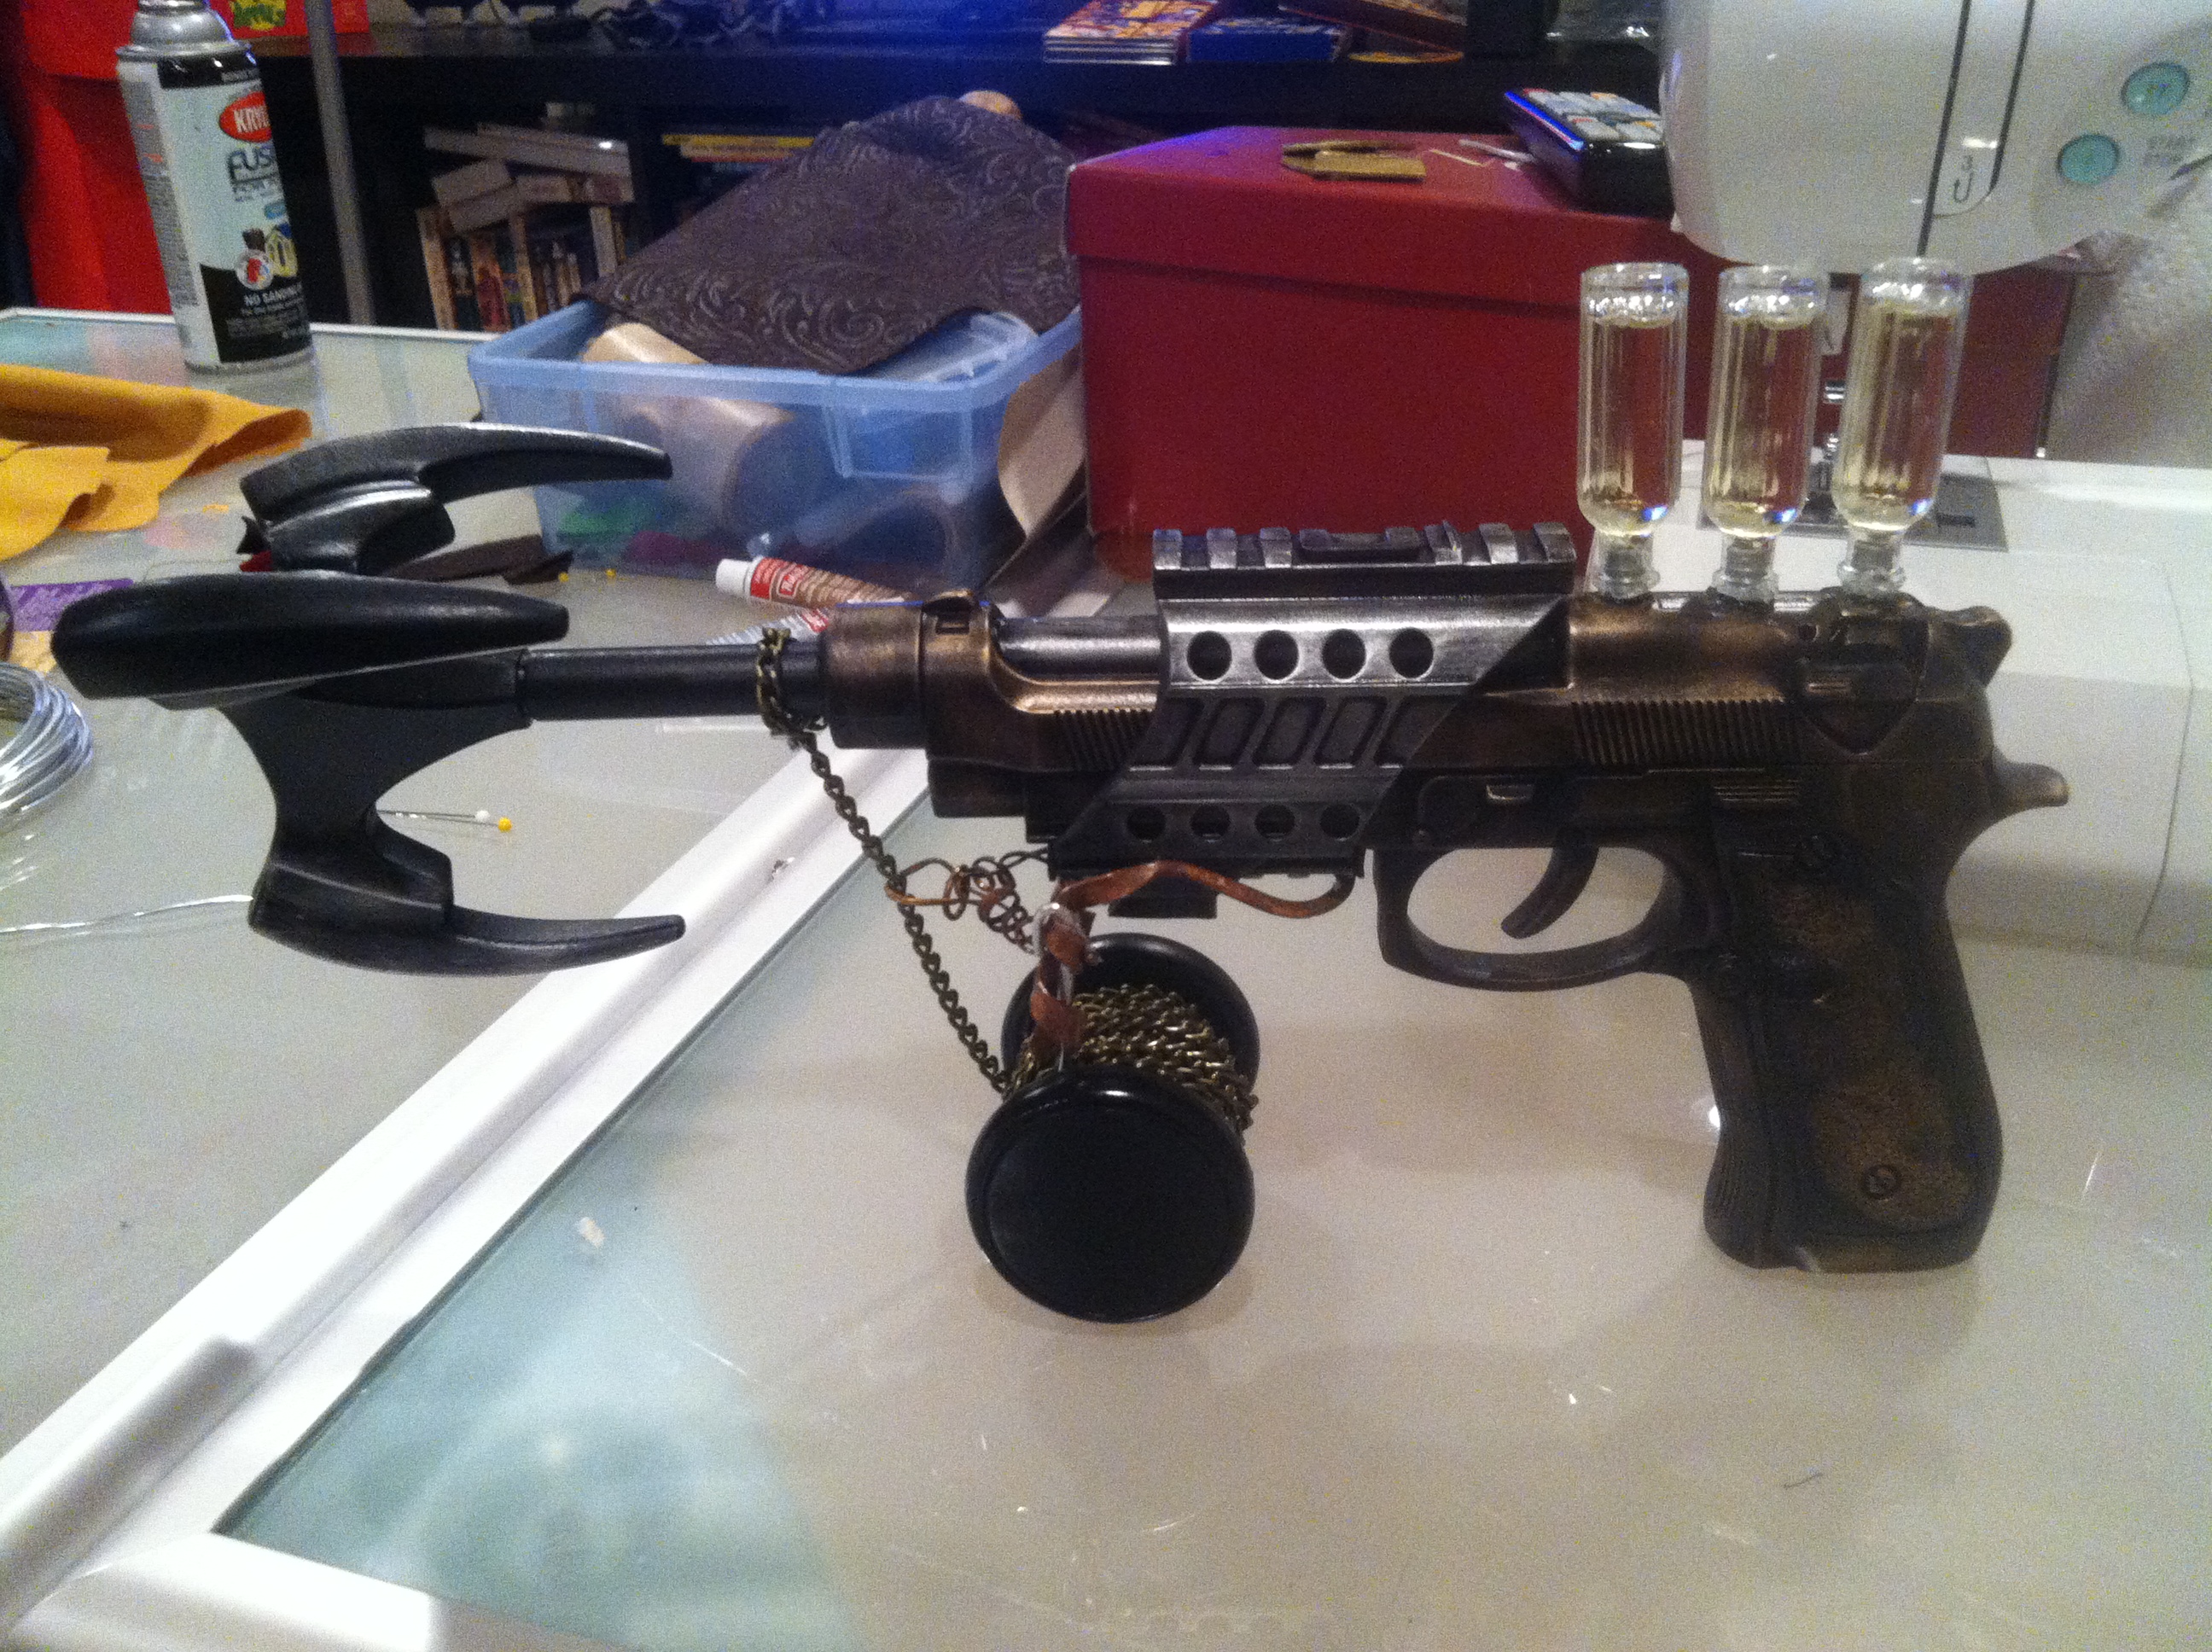 I bought a toy Batman grappling hook to go with my gun. I painted it black, using the same method described above, and then used a slight brush of Rub-n-Buff to give it a little bit of a metallic reflection. I cut off the handle of the grappling hook and glued it into the barrel of my gun. I lucked out and it fit perfectly. I attached very thin black chain (I think it was supposed to be used in jewelry making) to a Yo-Yo and wrapped it around until it looked like a convincing spool for a grapple gun. And finally I used thick copper wire to make a rigging to attach the yo-yo to the bottom of the gun.
I wanted my gun to have cool chemical chambers on it, so I started testing the cleaning liquids around my house in small bottles I bought at Micheal's. I ended up settling with Murphy's Oil (the kind you use to clean wood) because of its cool amber color and thick consistency. I filled three little perfume bottles with it, drilled three appropriately-sized holes in the top of my gun, and glued them into place. I was careful to glue them in such a way as to permanently seal the bottles as well. Sadly, there was a mishap in my workshop and one of the bottles ended up breaking. I still haven't found a matching bottle to replace it, so my grapple gun only has two canisters of super sticking liquid/super propellent on it.
Seriously, have fun with this last step. Wander around your local craft store or browse the internet and you will find some amazing things to work with! Lights, gears, piping, wood detailing, chemical chambers, moving parts, sound effects, and many other amazing things are possible, but you have to be brave enough to experiment a little.

Do-It-Yourself: Steampunk Bustle Skirt
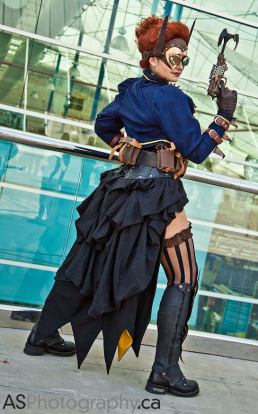
 The bustle skirt was my favorite part of my Steampunk Batgirl costume. I wanted to create an item that was a steampunk staple, but still hint at the traditional cape that Batgirl is famous for wearing. The skirt is a simple six-panel skirt that is just missing the front three panels. Don't know what that means? That's ok, keep reading and I will do my best to explain. (I simplified some steps in this process, but it will end up looking just like my skirt.)
Waistband
The first thing you need to figure out is the length of your waistband. Measure your TRUE waist, which should be the narrowest part of your torso, a little above your belly button. If you are going to wear the skirt under a corset subtract one inch from that measurement, otherwise add one inch to the measurement.
Example: Waist measurement: 28 inches
Under Corset: 27 inches
Not under corset: 29 inches
 This will end up being the length of your waistband, including seam allowances. The under corset length is smaller to accommodate the smaller waist size and avoid uncomfortable bunching under the corset. Measure and cut a rectangular strip if your fabric, using your adjusted waist measurement as the length and a width of 4 inches.
Take your waistband strip and iron some interfacing on the underside of it. You don't need heavy duty interfacing, just some regular weight stuff to give the waistband some structural strength. MAKE SURE THAT YOU BUY IRON-ON INTERFACING. It will make your life a LOT easier, so ask the store personnel if you are unsure. It's really easy to buy the wrong stuff, and we all hate the walk of shame back through the fabric store that you left 20 minutes ago.
 Before you start sewing, you will want to iron creases into your waistband because it will make things much faster. Fold it over length-wise and iron it until it holds the crease down the center, then fold half inch folds along each edge of the waistband and iron until they hold creases as well. These mark your seam allowances and the creases will make the sewing easier.
 Fold the waistband lengthwise, with the interfacing on the outside. This should be folded opposite of the ironed seam that you ironed earlier. You will then sew the ends closed on the half inch creases that you ironed earlier, but make sure that the lengthwise half inch seams are sewn in the folded position.
Now you are done prepping your waistband! You will turn it right-side out later, but for now we will move on to the panels!
Panels
 I traced my panels from a floor-length skirt onto large pieces of butcher paper (ok, so they were old DnD maps, sue me). Those panels are about 13 inches wide across the top, 34 inches wide across the bottom, and 42 inches long, but I added about 5 more inches on both sides and an extra foot to the length of my panel outline. The fuller you want your bustle, the more fabric you need to add to each panel. I used three enlarged panels to create my steampunk skirt. Remember, always trace an cut patterns length-wise according to the weave of the fabric, just like the picture to the right.
PLEASE NOTE: Only add extra inches of fabric to the panels that you are going to use for the bustle. You won't want to add as much/any extra fabric to the panel pattern for the front of the skirt or you will trip all over it.
 Then sew the panels together by matching the edges and stitching them together to form a circle or semi-circle, like the picture to the left. My skirt only used three panels since it only went half way around my body. Full skirts will usually use five or more panels. Make sure your seams are all facing the same direction on your skirt as you sew. After you sew your panels together, you will want to finish your edges on the underside of the skirt and hem the outer edges. This video shows you ways to do that.
Put it all Together
Now you will pin the panels to the waistband before you sew them. You will choose one of the lengthwise half-inch seam allowances and pin the panels to, and start by pinning the front edges of the skirt to the appropriate place on the waistband. For my skirt, I wanted the skirt to open right in front of my hip bones so that my bloomers and garters would show. The easiest way to do this is to safety pin the waistband on yourself, then pin the front edges of the skirt to where you want them on the waistband.

 Once the front pins are in place, you will need to make pleats to gather the rest of the skirt fabric to the waistband. You will basically fold the fabric over itself, then pin it into place. This it the most tedious part of making the skirt, but remember that the pleats do not have to be perfect.
Once you are done pinning the skirt, carefully sew the pleats in place on the side that you pinned. Iron the pleats flat after you sew them, then close the waistband (be careful that the other seam allowance is folded up inside), and then sew it shut across the bottom.
Bustling the Bustle
Now your basic skirt is finished, it's time to add the bustle. The easiest way is to put your skirt on the dress form and start pinning. There isn't really a magic formula, just start pulling spots and pinning them to higher places to give it the tiered appearance. Once you have everything looking good, hand stitch each spot where you pinned. Don't start sewing until your whole bustle is pinned, because you will probably change your mind... a few times.


Bat Wings
 The "bat" part of the skirt was actually designed to be a completely separate piece. It was made just like a cape, and is hand stitched into the waistband so that it can be detached and reattached very easily. I did that to give the skirt more versatility as a costume piece. I can now wear it with my
 steampunk batgirl, or remove it to be just steampunk!
I measured and drew the desired shape on butcher paper (another old DnD map) and traced one on the black and one on the yellow fabrics. I then carefully cut them out and pinned them together, starting with the point of each bat wing shape to be sure they lined up correctly. I then stitched them together and turned it inside out to hide the edges, just like a simple cape design. Originally, I had planned to add interfacing to give the wings some stiffness and shape, but I really liked how the material flowed without it. Then I simply closed up the top of the "wings" and hand stitched it into the waistband of the skirt, underneath the already finished bustle.


Have questions? Need clarification? Post a reply or email me at Kimi@goldenlasso.net
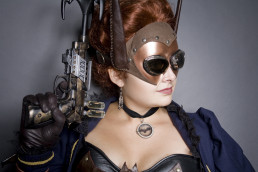
Steampunk Batgirl Mask
I am creating an unnamed (*cough*) steampunk superhero costume for San Diego Comic-Con. I have never attempted a steampunk outfit before, so I knew there would be a bit of a learning curve. The mask was going to be the most difficult piece of the outfit for me, and a make-it or break-it piece for the cosplay, so I started off my project with that piece. It was a major lesson in patience for me. While not all of my costumes go perfectly, this is the first time that something has gotten ruined and I had to restart from scratch.
Plan A:
 My plan was very simple, I would create the mask out of InstaMorph, then paint and cover parts of it with leather. Easy right? Nope.
The formation of the mask went well enough. InstaMorph is my go-to substance when I have to create something from scratch. It's very easy to work with, but also very strong. Fiberglass will be a big step up, but for now, this works very well. The only drawback is the low melting point, which is around 150 degrees. Do not make something out of this material and then leave it in the car.
Anyway, the formation went very well and I was thrilled with the initial fit and look of the mask. It had amazing potential, but the edges were a little uneven. I sanded these down to get a flatter edge since I eventually wanted it to resemble metal. It sanded easily, but ended up getting a fuzzy texture on the areas I sanded it. Here is the turning point. What I should have done was boil the plastic one more time to smooth this out. Opps. Instead I thought the paint would cover the fuzz and it would end up with a rough metal look. This didn't happen. My mask ended up looking almost furry, and since it had already been painted, I couldn't go back an reform the Instamorph into another shape. Bye bye Plan A!
Plan B:
I was not going to spend hours forming a mask from scratch again, especially because I now doubted that I could get the finished texture that I wanted, so Plan B started with a trip to Michael's. I found surprisingly sturdy white all-face masks for around $5. They were plastic, but had texture and thickness enough to be the base for my alterations. I brought one home and started creating my masterpiece. Plan A was a black mask with leather accents, but my plan changed a lot after the initial failure.
 The shape was actually very easy to get. I simply drew the shape I wanted on the back (just in case the pencil would leave marks), and then cut it with strong scissors. I then rubbed it down with mineral spirits to remove any excess oils or anti-mold coating on the plastic, and sprayed a few base coats of black Krylon Fusion spray paint. I always use the Fusion as a base coat on plastics because it (supposedly) bonds with plastics. It seems to work pretty well for all my projects so far. I used black because it gives a great base to metallic paints, and it looks better than white if the metallic chips for some reason. I used Krylon Copper Metallic spray paint after letting the black dry for a few days. (I've been testing a lot of metal-imitating spray paints and will be doing a blog post to compare them in the future!)
I wanted the mask to look like molded metal, so it was a VERY slow process. To get it smooth you have to do lots of thin layers, but not too thin or you never get rid of the texture. If you spray too thickly, you will start getting drips. PRO TIP: Let each layer dry COMPLETELY before you add on the next one.
Once again, I was too enthusiastic and handled the mask after only a few hours of drying. There are now a few TINY marks on it, but nobody can see them unless they are less than a foot away. Please, don't make my mistake! Let your creation dry for a few days before you move on to  adding rivets, leather, goggles etc. I knew better, but just got too excited!
Next I measured and cut the leather. I glued the edges under so that it would appear smooth and then glued the leather to the mask. After that I used a leather punch to make holes through the leather and mask. The rivets are purely decoration, and were glued in place through those holes. Actually setting the rivets with a hammer (like I did on my Sif costume) would have damaged the mask.
Finally, I added the ears and strap. I cut the ears from Plan A's mask and wrapped them in leather, gluing them in place and using a whip stitch to close the edge. This also added a cool steampunk look to them. I sewed and glued them and the strap in place. All of the leather and straps were taken from a $4 purse that I bought at the thrift store. The last thing I did to the mask was glue on the goggles, which were purchased on Amazon for $7 and dismantled so I could attach them correctly.
 (The ears will lay flat against my head when I wear it.)
Overall, I am much happier with the final outcome than I was with my original design. I think this looks much more "steampunk" and will actually be more comfortable to wear, mostly because of its lighter weight.
Stay tuned for more updates on this very educational cosplay experience!