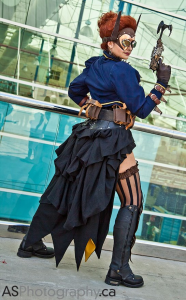
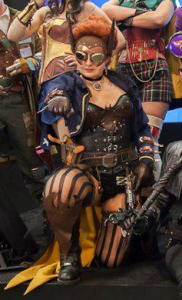
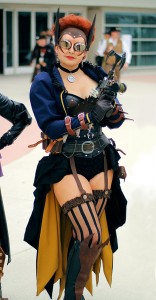
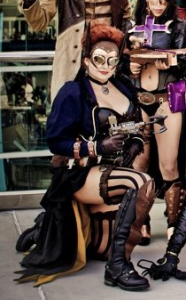
 The bustle skirt was my favorite part of my Steampunk Batgirl costume. I wanted to create an item that was a steampunk staple, but still hint at the traditional cape that Batgirl is famous for wearing. The skirt is a simple six-panel skirt that is just missing the front three panels. Don’t know what that means? That’s ok, keep reading and I will do my best to explain. (I simplified some steps in this process, but it will end up looking just like my skirt.)
Waistband
The first thing you need to figure out is the length of your waistband. Measure your TRUE waist, which should be the narrowest part of your torso, a little above your belly button. If you are going to wear the skirt under a corset subtract one inch from that measurement, otherwise add one inch to the measurement.
Example: Waist measurement: 28 inches
Under Corset: 27 inches
Not under corset: 29 inches
 This will end up being the length of your waistband, including seam allowances. The under corset length is smaller to accommodate the smaller waist size and avoid uncomfortable bunching under the corset. Measure and cut a rectangular strip if your fabric, using your adjusted waist measurement as the length and a width of 4 inches.
Take your waistband strip and iron some interfacing on the underside of it. You don’t need heavy duty interfacing, just some regular weight stuff to give the waistband some structural strength. MAKE SURE THAT YOU BUY IRON-ON INTERFACING. It will make your life a LOT easier, so ask the store personnel if you are unsure. It’s really easy to buy the wrong stuff, and we all hate the walk of shame back through the fabric store that you left 20 minutes ago.
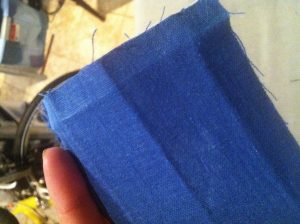 Before you start sewing, you will want to iron creases into your waistband because it will make things much faster. Fold it over length-wise and iron it until it holds the crease down the center, then fold half inch folds along each edge of the waistband and iron until they hold creases as well. These mark your seam allowances and the creases will make the sewing easier.
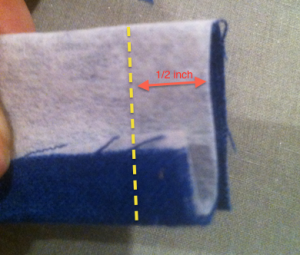 Fold the waistband lengthwise, with the interfacing on the outside. This should be folded opposite of the ironed seam that you ironed earlier. You will then sew the ends closed on the half inch creases that you ironed earlier, but make sure that the lengthwise half inch seams are sewn in the folded position.
Now you are done prepping your waistband! You will turn it right-side out later, but for now we will move on to the panels!
Panels
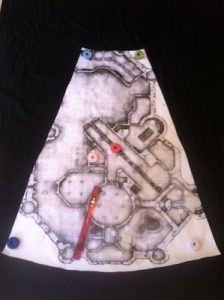 I traced my panels from a floor-length skirt onto large pieces of butcher paper (ok, so they were old DnD maps, sue me). Those panels are about 13 inches wide across the top, 34 inches wide across the bottom, and 42 inches long, but I added about 5 more inches on both sides and an extra foot to the length of my panel outline. The fuller you want your bustle, the more fabric you need to add to each panel. I used three enlarged panels to create my steampunk skirt. Remember, always trace an cut patterns length-wise according to the weave of the fabric, just like the picture to the right.
PLEASE NOTE: Only add extra inches of fabric to the panels that you are going to use for the bustle. You won’t want to add as much/any extra fabric to the panel pattern for the front of the skirt or you will trip all over it.
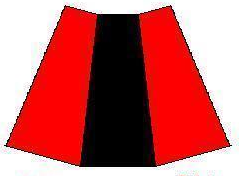 Then sew the panels together by matching the edges and stitching them together to form a circle or semi-circle, like the picture to the left. My skirt only used three panels since it only went half way around my body. Full skirts will usually use five or more panels. Make sure your seams are all facing the same direction on your skirt as you sew. After you sew your panels together, you will want to finish your edges on the underside of the skirt and hem the outer edges. This video shows you ways to do that.
Put it all Together
Now you will pin the panels to the waistband before you sew them. You will choose one of the lengthwise half-inch seam allowances and pin the panels to, and start by pinning the front edges of the skirt to the appropriate place on the waistband. For my skirt, I wanted the skirt to open right in front of my hip bones so that my bloomers and garters would show. The easiest way to do this is to safety pin the waistband on yourself, then pin the front edges of the skirt to where you want them on the waistband.
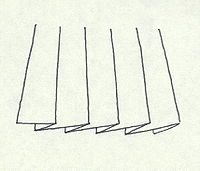
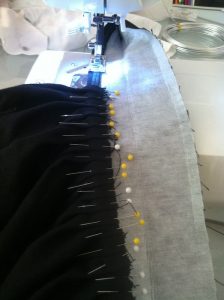 Once the front pins are in place, you will need to make pleats to gather the rest of the skirt fabric to the waistband. You will basically fold the fabric over itself, then pin it into place. This it the most tedious part of making the skirt, but remember that the pleats do not have to be perfect.
Once you are done pinning the skirt, carefully sew the pleats in place on the side that you pinned. Iron the pleats flat after you sew them, then close the waistband (be careful that the other seam allowance is folded up inside), and then sew it shut across the bottom.
Bustling the Bustle
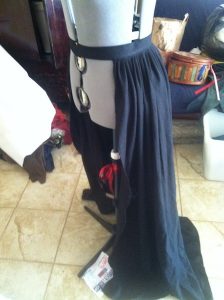
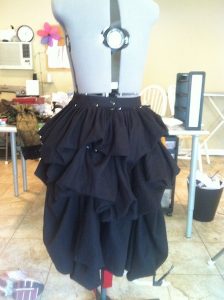
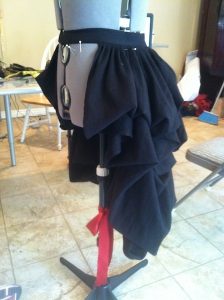
Now your basic skirt is finished, it’s time to add the bustle. The easiest way is to put your skirt on the dress form and start pinning. There isn’t really a magic formula, just start pulling spots and pinning them to higher places to give it the tiered appearance. Once you have everything looking good, hand stitch each spot where you pinned. Don’t start sewing until your whole bustle is pinned, because you will probably change your mind… a few times.
Bat Wings
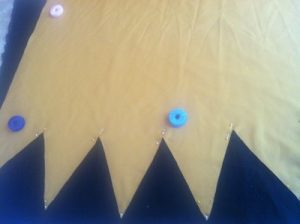 The “bat” part of the skirt was actually designed to be a completely separate piece. It was made just like a cape, and is hand stitched into the waistband so that it can be detached and reattached very easily. I did that to give the skirt more versatility as a costume piece. I can now wear it with my
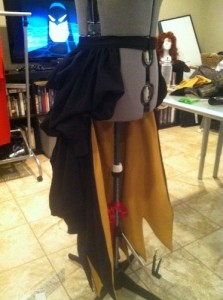 steampunk batgirl, or remove it to be just steampunk!
I measured and drew the desired shape on butcher paper (another old DnD map) and traced one on the black and one on the yellow fabrics. I then carefully cut them out and pinned them together, starting with the point of each bat wing shape to be sure they lined up correctly. I then stitched them together and turned it inside out to hide the edges, just like a simple cape design. Originally, I had planned to add interfacing to give the wings some stiffness and shape, but I really liked how the material flowed without it. Then I simply closed up the top of the “wings” and hand stitched it into the waistband of the skirt, underneath the already finished bustle.
Have questions? Need clarification? Post a reply or email me at Kimi@goldenlasso.net
76 Comments
Comments are closed.
So helpful thank you so much!
[…] bustle tutorial from http://www.goldenlasso.n… Please follow our boards! […]
[…] to the pattern. But, after the disaster of the original skirt, I decided not to use it. Thanks to Golden Lasso and The Brain Squirrel Monologues, I figured out how to make a bustle that would attach to a belt. […]
Great article, I think I am going to use this for my Queen of hearts skirt. Thank you
This tutorial is super awesome! But I was wondering, if I wanted to make a bustle skirt that was like yours but had shorter panels in the front for a hi-low look, how would I go about doing that?
It is all in how you drape it. I only took my skirt part of the way around because that’s the look I wanted. You could either make a skirt that had the length you wanted and then make the bustle attachment separately (easiest) or you could make it one skirt by calculating the different lengths that each part would need to be to get the desired lengths. It can be done, but I’d suggest working off a pattern if you are newer to sewing!
Best tutorial I’ve seen! Thank you!!
I think the only thing I’m confused about is what are you pinning/sewing the skirt ruffles/floofs to?
Hi Anita! I am pinning the fabric to itself, usually attaching a little pinch of fabric a little higher on the same piece so it gives a draped look. Think of it like when you pull up a long skirt to go up some stairs or something. Hope that helps!
Hi! I’ve been looking for a semi-simple overskirt tutorial for a while for a black bird costume. I was just wondering… About how much fabric did you use on this? It’s okay if you don’t remember, I know this was posted a while ago.
Hi!
I *think* I used about 5 yards, but it’s not an exact science. More panels will mean it’s more full and you will have to work harder to tack it all up and fewer panels will make it smaller but faster to finish. 🙂
[…] Do-It-Yourself: Steampunk Bustle … – The bustle skirt was my favorite part of my Steampunk Batgirl costume. I wanted to create an item that was a steampunk staple, but still hint at the … […]
How many metres of fabric does this need? >/////<
That is amazing!! I never thought of turning Batgirl Steampunk! I have been looking for a simple, easy to understand bustle tutorial for a long time! I have a question for you, what kind of fabric did you use for the bustle? Thanks!
I LOVE YOUR OUTFIT! I WISH I KNEW HOW TO SEW!
[…] Do-it-yourself: steampunk bustle skirt | the golden lasso […]
[…] Do-it-yourself: steampunk bustle skirt | the golden lasso […]
[…] Do-it-yourself: steampunk bustle skirt | the golden lasso […]
Hi! I stumbled across your awesome tutorial. I’m a complete sewing newbie, so I have a few questions. I know the tutorial is older so, if you don’t remember that’s okay! I can wing it haha.
What general measurements do you use when doing seam allowances?
Do the four inches for the waistband include seam allowances?
What width is the iron-on interfacing?
Thank you for your time 🙂
1. I don’t remember for this exact project. I usually use 1/4 inch seam allowance, but when I was first learning to sew I used 1/2 because I felt better about it. It’s one of those!
2. I believe this included seam allowances. It wouldn’t really make a difference though, so if you’d like thicker waistbands you can add seam allowance to that.
3. The iron-on facing is exactly the same size as the waistband that you cut. In fact, I usually cut the waistband and then iron it to the interfacing, then just trim around it!
I hope that helps! Thanks for visiting my blog! 🙂
Thank you so much!! I really appreciate it. It does help 🙂
I’m gonna subscribe because your cosplays are amazing!
Im a sewing noob so this looks like it will be very helpful. I’m attempting to victorian steampunkify Mad Moxxi from Borderlands and I’m trying to make sure I have a balance of steampunk and the iconic pieces that make Moxxi, Moxxi. This stuff is not easy and your batgirl came out awesome!
I hope I can do half as well with Moxxi
[…] Do-it-yourself: steampunk bustle skirt – the golden lasso […]
This will probably sound silly, but what would you recommend doing to a closure? A zipper or a button? My hip to waist ratio is too drastic to be able to just pull it on like a normal skirt, and I dont like the idea of an elastic waistband.
Hi Rii! I use hooks and eyes to close them. A button would be much better than a zipper for this. 🙂
i was curious if you could give us a run down of the bat wing part? is it in panels like the bustles or were you able to cut that out of one piece? could give us a general measurement to work with?
i’ll be using this for lace victorian burlesque skirt and was going to do the “cape” part in a lined lace with a more rounded elegant bottom but was curious what you’re measurement and cutting was like on that part?
I love this tutorial, will definitely be using it for my steampunk cosplay. 🙂 But what would I do if I wanted the skirt to be in the front too? And what type of fabric did you use?
Just wanted to say I appreciate your site. The instructions for the bustle skirt are very articulate–a lot of times I have to read instructions 2 or 3 times because it is difficult to communicate (with yours I didn’t have to). I am hoping to achieve a Victorian Jane costume (Tarzan and Jane)–more of a ‘been in the jungle a few months’, so her traditional dress is getting torn, etc., complete with waist-corset and bell-sleeve sheer blouse; so thanks so much!
Love your costumes 🙂
[…] http://www.goldenlasso.net/batgirl-bustle-skirt/ […]
Amazing tutorial! I can’t wait to make this for my Halloween costume this year.
Out of curiosity how did you fasten the waistband?
Hi! I used hooks and eyes. You can use velcro or snaps or anything else though since it doesn’t really show.
I loved this tutorial! I’m trying to find a bustle skirt for my Harley Quinn outfit and for my friends poison ivy outfit. Couple questions: First what are you wearing under that skirt that looks like a swimsuit bottom?
Second, so if I were to make a skirt that goes all the way around, just make it really short in front and long at back?
Third, when you say “There isn’t really a magic formula, just start pulling spots and pinning them to higher places to give it the tiered appearance”, do you mean just grab a spot and pull directly up and pin? Will the hand stiches hold all by themselves? how will the stiches be covered?
I’m sorry, This is the first time I have done anything like this.
1) Those are ruffled bloomers, you can buy them online or at a lingerie store. Depending on how you want to look, you can get shorter ones or more period long ones.
2) Yep. Just make sure the front panels are the length that you want them to be.
3) Yes, just pinch in one spot and lift it directly up. Pin each one until you like how the whole skirt looks. The hand stitching will hold if you do it well. I do mine in X shapes. I usually just sew through the under layer and the back of the fold you pinch up. Then it won’t show on the front. Does that make sense?
Hey so first off I love this and I’m planing on useing for a steampunk cosplay at anime expo so I was wondering do I have to sew the yellow part on there or can I just leave it as is because well I like it as is. Thanks!!
[…] ordered the below under-bust tan corset to use from eBay as well. I am going to use this Steampunk bussel tutorial for creating my dark green Bustle to sit on top of the petticoat. As I have so many costumes under […]
I was just curious, what type of fabric did you use? I know I used linen fabrics for my corset but I fear they won’t turn out for this model of skirt.
I used a black linen because it is so easy to drape. Most fabrics will work well as long as they aren’t overly stiff. Your stuff should work perfectly!
I love this tutorial! Thanks so much for posting it. It’s giving me a great aid in making my Steampunk Harley Quinn costume 😀 And btw, OMG! Loving the Batgirl costume so stinking much 😀
Nys
Love this skirt! I’m trying to make a bustle skirt for a steampunk Poison Ivy cosplay. I want it to look like this except have a front that is shorter. I have a secondary tutorial that I want to half imitate for the front. The only problem is I don’t have a sewing machine nor do I really know how to use one (I’ve always done all the sewing I need by hand). Any suggestions(other than buying a machine, LOL)?
Umm… not really. I highly suggest learning to sew by machine. You can buy a perfectly serviceable machine for $50, and it is more than worth the time you will save with it. With the help of YouTube, there is nothing you won’t be able to learn to do!
Just wanted to say that I attempted this bustle skirt as my first ever ‘proper’ sewing project and I am thrilled with how it has turned out. Thank you so much for posting this up.
This is a very helpful, informative tutorial. I’ve looked at so many other bustle tutorials over the years, and many of them either leave out important details, or the desired end result isn’t what I had been looking for. Yours is exactly what I’ve been looking for this whole time.
I plan on doing a steampunk Lady Amalthea cosplay sometime next year, and I was looking for ways to modify her actual dress to make it work with my theme. Your tutorial helped me to figure out the logistics perfectly, so I thank you.
Forgot to add – you look insanely cool in your outfit. Top marks =)
This is by far the clearest and simplest tutorial of it’s kind I have found. Have now almost completed my Halloween outfit for steampunkesque Goblin masquerade queen (I wanted to do all my ideas in one) I’m just calling it Goblin Queen for short. Thank you so much!
I have to say thank you for posting this. I made a skirt for my steam punk-ish ring master costume I will wear on Halloween. I will be wearing it this weekend for my birthday part also
Can you explain this further, I am really confused?
Before you start sewing, you will want to iron creases into your waistband because it will make things much faster. Fold it over length-wise and iron it until it holds the crease down the center, then fold half inch folds along each edge of the waistband and iron until they hold creases as well. These mark your seam allowances and the creases will make the sewing easier. Am I sewing the ends closed as in making the waistband into a continuous circle?
Fold the waistband lengthwise, with the interfacing on the outside. This should be folded opposite of the ironed seam that you ironed earlier. You will then sew the ends closed on the half inch creases that you ironed earlier, but make sure that the lengthwise half inch seams are sewn in the folded position.
I am making a dio de los muertos and found your tutorial. AWESOME.One question though how the heck do you close the skirt around you waist? I couldnt’ see that in the tutorial so I added some ribbon tails and tied it on>. Thanks for the awesome play by play I was lost on what to do!
Great question! Sorry I left that out! The waistband goes all the way around even though the bustle is just in the back. It hooks in the front (under my corset) with basic hooks and eyes. They look sort of like these: http://www.bblackandsons.com/images/T132.JPG
Hope that helps! 🙂
Thank you AWESOME again I am used a beautiful rosepink taffeta with gold fleur de lis on it Lookes GREAT. Thank you again for the step by step
Hey, just a quick question: How did you close the waistband around the waist? As in, what fastener did you use? I scanned the instructions a couple of times and saw no mention of it.
Great question! Sorry I left that out! The waistband goes all the way around even though the bustle is just in the back. It hooks in the front (under my corset) with basic hooks and eyes. They look sort of like these: http://www.bblackandsons.com/images/T132.JPG
I don’t know if I missed it, but how many yards of fabric did you use? Like a guess? Im trying to figure out what to get.
I’m so glad you posted this. Its going to help out a ton
Hi there!
I can’t remember… probably around 5 yards of the black and 2-3 yards for the yellow lining? Don’t forget to pre-wash the fabric!
I just wanna say that I searched through about a million bustle skirt tutorials, and not one of them was half as well thought out as this one, nor did it accurately explain everything nearly as well as this one did! So thank you so much, you’ve made making my next cosplay a million times easier!!! <3 <3 <3
Hi!!
So im a complete noob at sewing, like i know nothing and i was wondering if you might be able to make this into a video tutorial….I must have read through the intructions here 10 times and im still struggling lol. I understand a good deal but i am for sure a visual learner :).
Just wondering
Bless. This. Post.
I never thought I’d find a bustle tutorial that was so to the point and easy to understand! I’m currently working on a steampunk Harley Quinn cosplay. This has been a godsend! Thank you! <3
Thanks! I’m happy that my tutorials can help people! I’d love to see pics when you have finished your project!
[…] Steampunk bussel tutorial Spats http://theindigophial.blogspot.com/2009/02/spats-tutorial.html […]
You may have just saved me from the wrath of my little sister. I make her Halloween/Renaissance costumes and she has decreed that her next will be a steampunk stilt-walker. This involves a bustle. Your tutorial is the best one I have found by a long shot. I just have one question: where you pleat the skirt before attaching, would a running stitch and gathers work as well? Or is the pleating necessary for something?
I look forward to hearing back from you!
Hi Anny!
Yep, a stitch with gathers should work just fine. I just like the more finished look of the pleating. It’s a control freak thing. 🙂
Hope your project goes well and I’d love to see the finished pictures!
I didn’t know I’d come across such wonderful porn when I was googling how to attatch a half-skirt to a corset. 🙂 This is great. I’m so sending this to my best friend.
This is a great set of instructions! I will be using it to make an addidtion to a dress I will be wearing to a steampunk banquet. I do have a question though; how much fabric did you get to start with? Thanks and hopefully mine will turn out as well as yours!
Hi Becca! Thanks for visiting Golden Lasso!
To be honest, I’m not completely sure how much I used. Some of it I already had, but I think I bought 5-6 yards of the black? I always over buy! Dealing with extra is always easier than coming up short! Hope that helps!
[…] and so will be adding a bustled back overskirt… because I can. I’m planning to use this tutorial for the most part. Without the bat […]
This is awesome! I’ve been trying to figure out a bottom for my steampunk Batgirl outfit and I haven’t found anything I’m in love with until I found this. What kind of fabric did you use?
Hey Melanie! Thanks for checking out my site. I’d love to see pics of your steampunk Batgirl when it’s finished.
I used a black linen and a yellow polyblend that had a similar weight to the linen (couldn’t find a linen in the right yellow color). Linen hangs beautifully, flows nicely, is easy to work with, and pretty easy to find. It also isn’t fancy looking, and I wanted my Batgirl to look based on a more middle class Victorian look.
I’ll be posting my grapple gun tutorial soon! Stay tuned! 🙂
Kimi, my friend is trying to put a ruffle on the bottom of her gown for a cosplay – if I send you an email, do you think you might have any tips or tutorials for her?
Thanks for posting this, it’s a big help for the costume I’m making 🙂 My aunt actually gave me your website – Jenn Heaton? Anyway, thank again for having this up!
You are very welcome! Thanks for stopping by my site. It’s nice to know that these articles help people with their costuming projects. Jen is a great friend of mind and I’m happy that she’s helping spread the word about my blog! 🙂 Good luck with your project! I’d love to see pics when you’re done.
I’ll be sure to email them to you; I’m just now starting to make my own costume designs and I’ve got a ton of them. I’m actually using this for my Halloween costume (it’s rather last minute compared to my usual Halloweens but I am making it myself for the first time as well) and I’m sure the tutorial will be very useful in my future cosplay endeavors too 🙂
how much material do you need?
I bought 6 yards of fabric, and if I remember correctly, I used almost all of it.
Well done!
Looks great Kimi!
Did you line the whole skirt, or just the center back panel?
Hi Claire! Thanks for posting! I only lined the bat section with the yellow. Since the rest won’t be seen (and since it’s black anyway) I didn’t line the rest of it. 🙂