
Do-it-Yourself: Metal Armor & Accessories
My first YouTube cosplay tutorial is up! I often am asked about my metal Wonder Woman armor, so I decide it would be a great topic! Check out the video to see how I make metal armor and accessories without power tools and on a small budget!
This tutorial does have some sharp edges! Please use the proper safety gear. Crafters under the age of 18 should only attempt this tutorial with parental permission and supervision.
Materials:
Craft Foam
Scissors/Exacto Knife
Pencil & Sharpie
Aluminum Kick Plate
Aviation Snips (min.18-gage)
Block Sanders
Hammer & Nail
Dremel (optional)
If making Wonder Woman tiara you will also need:
Metal Star
Stain Glass Window Paint
6 inches of 1/4 inch elastic
Adhesive Putty or Double Sided Foam Adhesive Strip
TO ADD THE ETCHED LINES INTO THE METAL USE THIS TUTORIAL: https://www.youtube.com/watch?v=XOQM9kBG2JA
Post any questions in the comments or reach out on social networks! Thank You for Watching! Subscribe if you want more Golden Lasso Girl videos!
Watch More GoldenLassoGirl Videos: http://tinyurl.com/glgvideos
Subscribe to GoldenLassoGirl: http://tinyurl.com/glgsubscribe
Twitter: https://twitter.com/goldenlassogirl
Instagram: https://instagram.com/goldenlassogirl
Facebook: http://fb.me/goldenlassocosplay
Do-it-Yourself: New52 Wonder Woman Corset
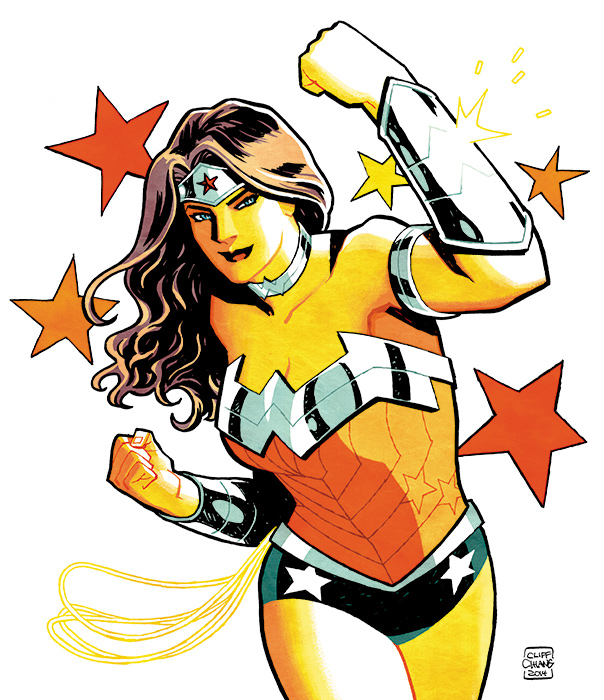 Wonder Woman's corset in the New52 is stunning. The complex chevron pattern combined with stars is intricate and eye-catching. As difficult as it is to draw, it's even more difficult to sew. Chevrons are quite a challenge and are also very time consuming.
Now there are two ways to make this corset, the easier way (still not super easy) and the hard way. The easy way would be to buy/make a corset, then make the straight lined chevrons out of a stretch fabric to cover that corset. I was hesitant to use this method because it can result in the chevrons looking warped as the fabric stretches to match the curves of the body, and because I wanted my corset to look like it was made out of leather.
Thus, the hard way.
Please Note: This is a difficult project that requires pretty advanced sewing skills. You will need to be familiar with making corsets and have a corset pattern that works for you as a base for this tutorial. You will also need a walking foot for your sewing machine if you are using leather.
Step 1: Use your corset pattern to make a mock-up. Make sure you use the same type of fabric that you will eventually use for the base of your final corset, I recommend something heavy like duck cloth.
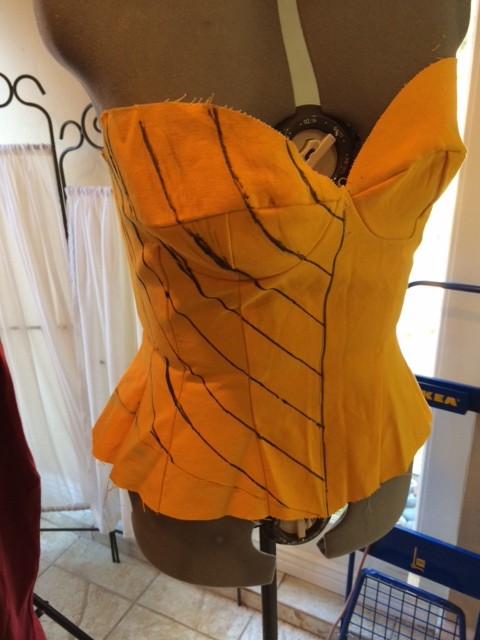
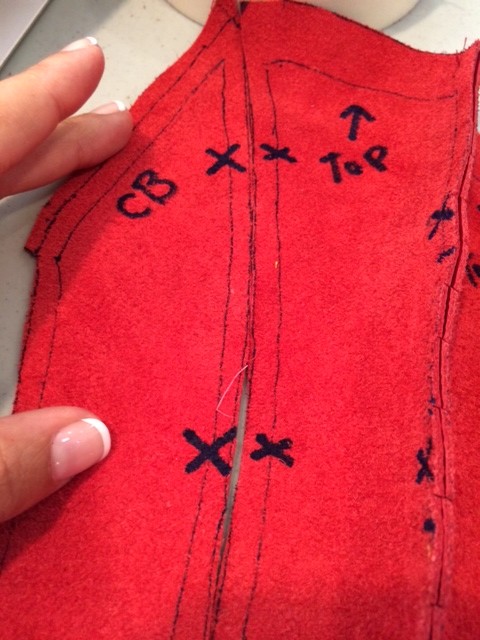
Step 2: Put this mock-up on a dress form, a volunteer, or yourself if you have a friend to help. Then draw chevrons on half of the mock-up. Measure equidistant meeting points on the center front of the corset as a base, then draw out from there. The trick is that these cannot be straight lines drawn with a ruler. You will get a tube shape if you tried to make a corset out of straight lines that would not form to the contours of your body correctly. You have to draw chevrons that form to the body's curves and appear to make straight chevrons. YOU WILL GET LOTS OF FREAKY SHAPED STRIPS. THAT IS OK!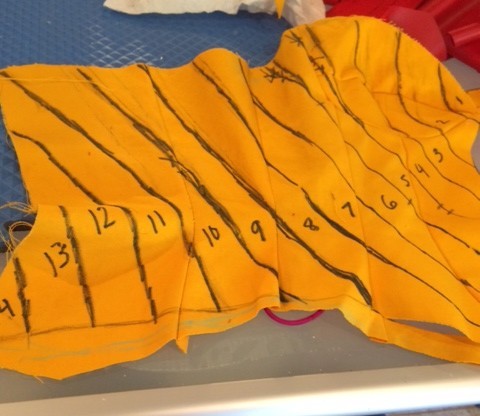
Step 3: Mark the lines on your mock-up with notches and numbers so you can keep track of which order the pieces go in, and where they meet. Cut the mock-up along the lines you drew to create the pattern for your final corset cover. DON'T FREAK OUT AT THE STRANGE SHAPES YOU GET!
 Step 5: Trace your pattern pieces onto your final fabric and add a 1/2 inch seam allowance around each piece. Make sure you have two complete sides for your corset and the pieces for each side should be a reflection of each other. Make sure you copy over the notches and identifying marks onto the BACK side of these pieces. I used leather but other pleathers will work as well. Stretch fabrics will not work and will warp the final product, try the previous method listed above if you want to use a stretch fabric.
 Step 6: Carefully, starting from the top center piece, sew one side of the corset together. Make sure to line up the notches, they are your guide! Now sew the refection side of it together. You should now have two complete halves of a corset cover that are reflections of one another.
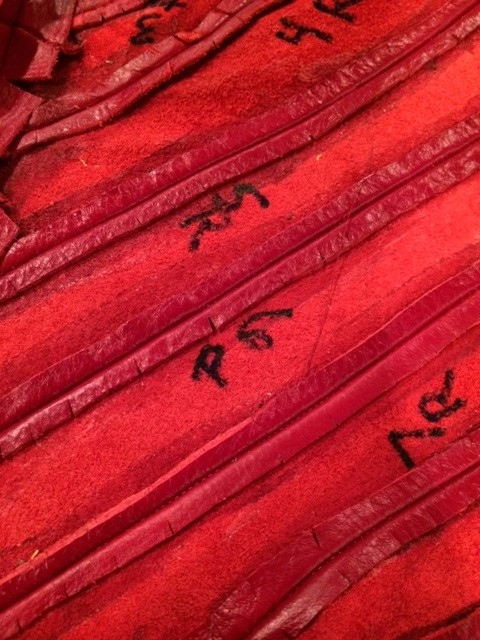
Step 7: Using rubber cement, glue all of your seam allowances flat against the back of your corset cover. Make them all as flat as possible. Flat seam allowances will make your life easier later and make your final product look better! Make sure the glue is dry before moving on to step #8.
 Step 8: Now it's time to make the chevrons happen! Meeting the right sides of the corset center fronts (those are two edges) use pins or tape if you are using a leather-like material to insure that the seams of your chevrons meet up. You might have to do a little manipulating and stretching to make the pieces line up perfectly in the front, but this is a VERY important step. You don't want your chevrons to not line up. Sew them together on the wrong side down what now is the center front of your corset cover.
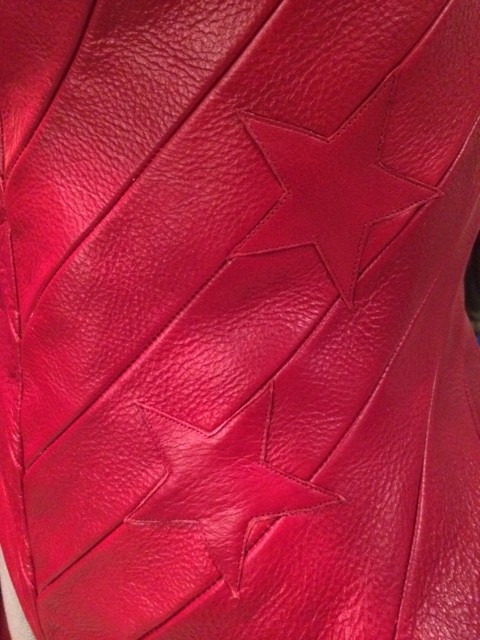 Step 9: The hardest part of your project is over!! Congrats!! Now cut out the stars from the same material as your chevrons, making sure they have the correct proportions to your chevrons. Put a small amount of rubber cement on the back of each star and place it where you'd like it on the corset. The glue will help hold the star in place while you top-stitch it down.
Step 10: Using your corset pattern, make the base corset with metal boning.
Step 11: Again using your dress form, a volunteer, or yourself if you have a friend to help you, put your 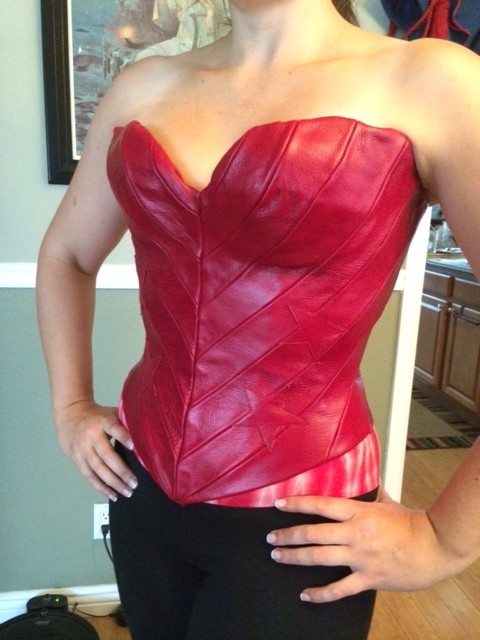 base corset in place. Then, finding the exact center, use bardge cement to glue the center seam of your chevroned corset cover to your base corset. This will keep the center front from moving around. You can also glue around the cups of the corset and along the sides and center back once the front has dried.
Step 12: Hand stitch the edges of your corset cover down on the inside of your base corset. This takes a while and you will definitely need a thimble if you are using leather. Make sure you stitch down all the edges!
Step 13: Grommet the corset.
CONGRATS!! YOU ARE DONE!! Hopefully you have an amazing piece of cosplay art to enjoy!

WonderCon!
I made it safely back from Scotland! I had an amazing time, saw beautiful places, drank too much, and lost a few pounds (haha... get it... they use the UK pound.... sorry). I have several great posts in the works and am ready to catch up, but first...
 WONDERCON!

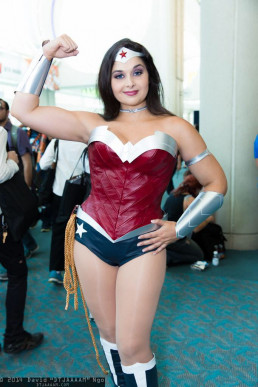
I will be attending Wondercon on Friday only, due to Renaissance Faire obligations. I'll be dressed as Wonder Woman at a convention for the first time since 2011! My armor is all polished and my golden lasso is ready!
For those of you who haven't attended WonderCon, it's a wonderful event and I highly recommend it to old-school convention lovers. It's growing fast, but is usually compared to SDCC before it became the pop-sensation that it is today. It's much smaller than SDCC and that leads to really great interactions between fans, creators, artists, cosplayers, and staff. The parking can still be difficult, but it's do-able and there are probably even hotels still available in the area if you decide you want to head down there this weekend. It's also right down the street from Disneyland, so it's a great weekend destination for the whole family or Disney-lovers. The convention even arranged discounted Disney tickets for convention attendees!
For all my panel-loving friends, I highly suggest attending The Psychology of Star Trek vs. Star Wars, Friday at 1:30pm. Dr. Andrea Letamendi, you may know her as the Huntress from my Steampunk DC group, is an amazing panelist and is sure to make a great case for Star Wars! Brian Ward, the steampunk Green Arrow and copper-working genus, is going to be refereeing... er... moderating the discussion.
I hope to see you there! Follow me @GoldenLassoGirl to find me or to get in touch!
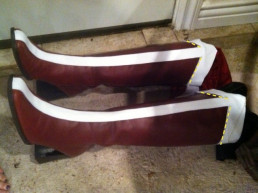
Do-It-Yourself: Wonder Woman Boots
 When I first designed my Wonder Woman cosplay, I wanted to make something that would be a believable real-world interpretation of Diana. That did not include the white and red go-go boots that are part of Wonder Woman's trademark costume, so I chose to go for the more Amazonian look of greek sandals and lace-up steel greaves. Since then, I have wanted the more traditional boots so I can be more easily recognized at cosplay events... because people seem to think I'm a patriotic Xena. Go fig.
There are a lot of affordable Wonder Woman boots for sale, however, my unique costume made things difficult because the shiny, bright red boots available online wouldn't match my muted, matte leather look. This limited me to two options, have them custom made or make them myself. My teacher salary and common sense made me choose the latter.
Step one, find boots. This step was very difficult for me, but I had an incredibly specific set of requirements and I was not willing to compromise... or pay over $50. I did weekly searches of Ebay, Etsy, and my local used clothing stores to find the perfect pair. Ebay eventually resulted in the perfect pair of tall leather burgundy boots in my size, for a price that I was willing to pay. With shipping, they put me back about $30. I had leftover white leather from my Sif cosplay, so it worked out perfectly.
 The next step is to make the pattern. I highly suggest that you get a friend to help you with this because you have to be wearing the boots to get an accurate measurement. I used white interfacing that I cut in strips and taped in place with scotch tape to create my pattern. The interfacing has similar properties to the leather, and was already laying around my workshop. I started with the stripe at the top of the boot, being careful to cut it in a triangle based shape that would peak in the front and then meet behind my calf. I then measured a long strip to run down the front of the boot.
When I got the mock-up fitting exactly right, I carefully pulled these pieces  off the boot (careful to keep them together as one piece) and traced them onto the back of the white leather. I used a pencil to insure that it wouldn't show later and CAREFULLY cut them out. Make sure that you cut one for the right and one for the left, they should be mirror images of each other. If you get two identical pieces, you did it wrong. After I cut them out I stitched white thread along the edges of the white to give it texture. It will also make it look like the stripes are sewn on, when they will (mostly) just be glued on.
PRO TIP: Cut slowly and don't use the full length of the scissor blades. This will insure you get smooth lines without those annoying jagged spots.
Once the pieces are cut, you should TAPE the stripes in place on the boot using masking or painters tape. Pins will leave little puncture marks in the leather, so avoid them. You should be wearing the boots for this step because the intended center of the boot and where the center of the boot is on your calf may be two different things. Trust me, I learned that the hard way. Double and triple check that you like the way the boots look and that they match each other. Pay special attention to the high point at the top of the boot and if the front stripe lands in the same place on both boots. Once they match you are ready to start attaching them!
 I wanted to make sure my boots were super strong, so I sewed the top stripe to the top of the boot. (The yellow dotted lines in the picture to the left show exactly where I did the sewing.) You can usually use a normal sewing machine for this unless the boots aren't made of dress leather. Once this part is sewn together you should stuff your boots (with newspaper, extra cloth, etc) until they hold their shape themselves. You will then use Barge cement to glue down the stripe in the front and to finish attaching the stripe at the very top of the boot. Follow the application directions on the can to get the best hold. This glue needs 24 hours minimum of undisturbed drying time to get it's full hold, so don't wear the boots for this step.
Wait at least 24 hours before messing with the boots. Seriously. This is the hardest part for me, but learn from my mistakes and don't move the boots around until they have dried for at least 24 hours. Once the boots are completely dry, you should remove the tape and try them on and see if everything turned out the way you wanted! If there are any small spots that aren't glued down around the edges you can add tiny drops of Barge with a toothpick or small paintbrush.
Congratulations! You can now make your own unique pair of custom Wonder Woman boots on a budget!
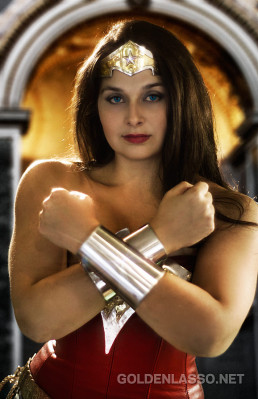
Wonder Woman Armor
The most difficult part of making a good Wonder Woman outfit is the armor. It can make or break the whole outfit. No matter how much time and effort you put into the corset and star-spangled-underwear, if your armor is obviously spray-painted cardboard nobody will be impressed. Being the over-achiever that I am, I wanted my armor to be made of real metal. This would be impossible for most first-time cosplayers, however I have worked at Renaissance Faires in California for over 10 years. I know more than my fair share of blacksmiths, leather workers, and armorers. So I put word out on the dust filled streets of Faire in 2011 that I wanted Wonder Woman armor made...
 These are the people I choose to spend time with...
... and the amazing Jacques Louis David answered my call. Jacques is an artist and should become very, very famous someday. He makes armor at fair, but his most recent passion is for metal sculpture and installation pieces. He also happens to be a comic and Wonder Woman fan. We met a bunch of times to discuss "the plan" and he was kind enough to hold my hand through the whole process. I know a lot more about armor than your normal (late) 20's California girl. I own a collection of swords and used to train horses for a jousting company, but Jacques' knowledge blew my mind and made me consider things I hadn't even realized were possible. Over beers and burgers, we came up with our design. I had bought a belt at a Thrift store, so that was not something we needed to worry about. We figured out that I needed the tiara, eagle chest piece, bracers, and greaves. If you ever want to commission metal work, talk to Jacques.
For my gladiator type Wonder Woman, I chose to replace the boots with greaves which are basically metal shin guards. They would be much more functional than knee-high boots in an actual battle. I could also lace them on and get a similar look to the era where Wonder Woman wore sandals.


50s Wonder Woman and the greaves for my Wonder Woman
I went with the eagle design for the chest piece because it made the most sense for a real warrior to wear an animal symbol. Although I love the W design, it didn't really fit with the image I was going for in this costume. This was easily the hardest piece of the project.
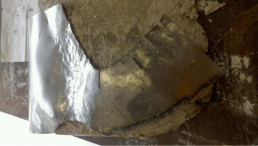
We needed the eagle to be fitted to my...ahem... chest. That meant that Jacques needed something the shape of my chest that was hard enough to bang... I mean hammer against. We made a plaster mold of me wearing a corset (the same corset I patterned the Wonder Woman corset from). Jacques then took this shell and made a body-double of me made out of really hard plaster. That gave him the surface he needed to hammer out an eagle in the shape of my boobs.


Wrapped up in getting plastered...

The eagle (upside down) in process
After forming the steel (which is armor grade), brass was added to give a hint of the traditional Wonder Woman costume. The same was added to the grieves and the tiara. The only pieces that are only polished steel are the bracers, which are such thick steel the could probably really deflect bullets. I added laces on those to continue with the theme.
 The power of the DC Universe - SDCC 2011
I am incredibly happy with how everything turned out. The metal pieces look amazing and really wow the crowed when I wear them. I really hope that SOMEONE in a film studio sees this someday and realizes that if a middle school teacher can do this in her spare time, they can do an even better job for a feature film.
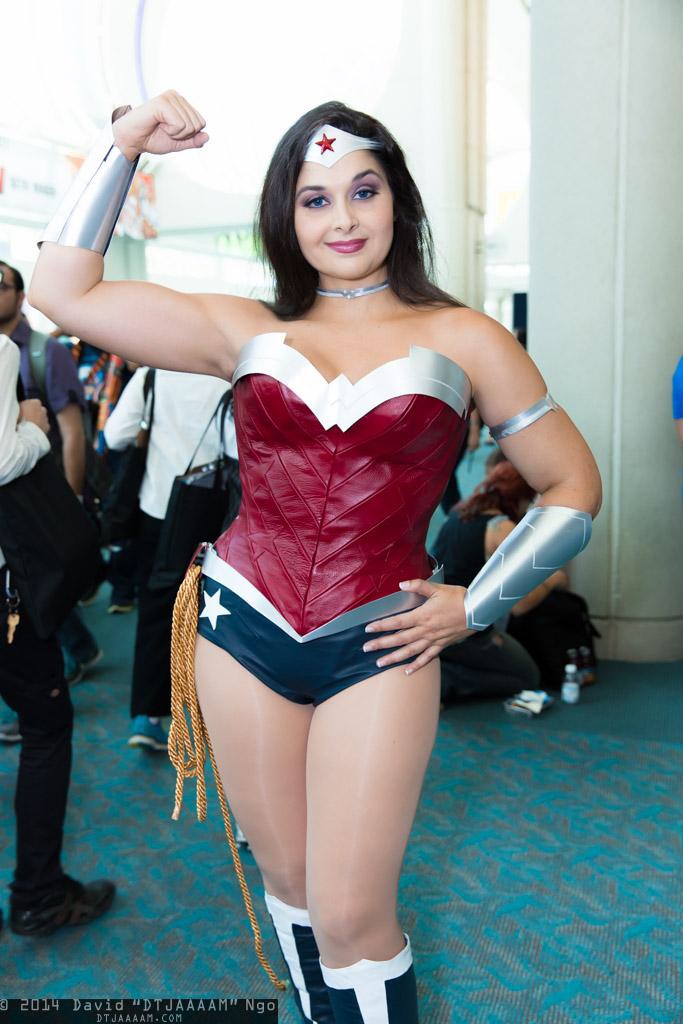
Bringing an Amazon to Life
When I put my mind to something, very little can stop me. Common sense and logic were completely forgotten with this intense labor of love. I spent way too much money, way too much time, called in a lot of favors, and had a few near-breakdowns, all in the name of bringing an Amazon to life.
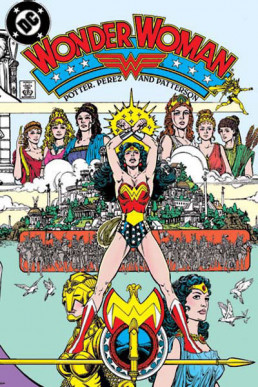
For months I studied Wonder Woman cosplay pictures online. Many of them were very, very good. However, I noticed that most were based on the 4-color comic book idea of Diana. While I love that image, I wanted to bring a Christopher Nolan-style Wonder Woman to life. I wanted a REAL amazon, with REAL armor. This would be outside the realm of most first-time cosplayers, but (lucky for me) I'm a nerd. After working at Renaissance Faires for over a decade (fuck, has it really been that long???) I've made some really talented friends.
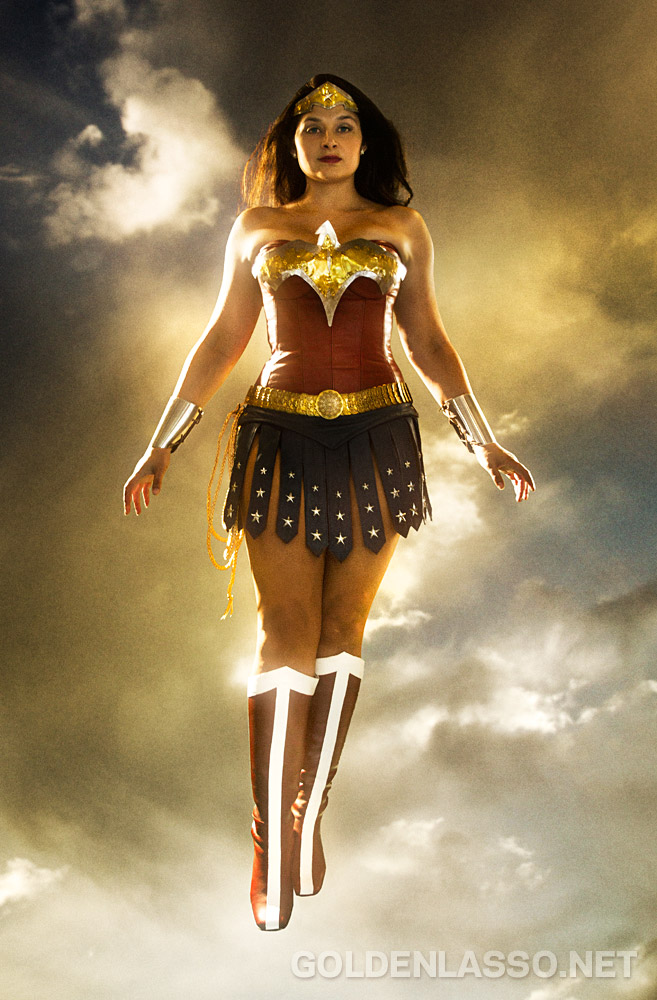
The first thing I needed was a concept. I've always thought that the bathing suit look was fine in the comics, but I can't really picture anyone wearing it to fight crime in the real world. I have always liked the skirt option for Wonder Woman, and there are many renditions of her in Gladiator-style Roman skirts. Since these actually functioned as clothing for real warriors in centuries past, that's the option I went with. To do it right, I'd need real dyed leather and real molded steel. This was going to become a much larger project than I had ever planned for...
... but damn am I proud of the results...

Debuted at Comic-Con San Diego 2011
I will be posting specific breakdowns of the creation of the armor and sewing the leather pieces another night.

Why did I start Cosplaying?
It all started with a TV show... a really, REALLY BAD TV show.
As you have probably noticed by now, I am a big Wonder Woman fan. So when I heard that David E. Kelley was bringing her to the small screen in 2011, I was both excited and doubtful. How on earth were they going to pull off Diana with a small budget? I actually got my hopes up when they announced that Adrianne Palicki would be Diana. The woman is 5'11"! Maybe they were going to make a true Amazon Princess after all..
Then they released this image and I died a little inside.

This... shiny latex abomination killed all my hopes for the show. How could any self-respecting costume designer let this be photographed? Did they just grab whatever they could from a Halloween store and say "Fuck it"? Ms. Palicki is a beautiful woman, but she looks like a cheap hooker here. I hope that someone was fired for the horrible production quality of this photograph.
I eventually got a copy of the Wonder Woman pilot and OH MY GOD IS IT BAD. It is seriously the worst writing I have ever seen on any show, and I used to watch Xena and Hercules! Unfortunately, the costume (with a few changes) actually was one of the better parts of the show... THAT'S HOW BAD IT WAS! In the aftermath of the pilot never being picked up (because it was an abomination) many people on the interwebz were using it as proof that a Wonder Woman movie could never be made. They cited the impossible-to-please fans and the logistics of making the costume realistic as evidence of it's impossibility.
I wanted to prove them wrong. I wanted to make a Wonder Woman costume that made sense for a Greek Amazon and was made out of practical materials (ie. leather and steel) so it was more than just a bathing suit. And thus, I was born into the world of cosplay.