Do-it-Yourself: The Perfect Cutting Table
The perfect cutting table is a dream for many crafters and DIYers, but sadly, professional cutting tables are expensive! However, you can adapt your existing tables to be the next best thing by adding a top to them for only about $50! These table tops are made of material that pins can be put directly into to hold your fabric and crafting materials securely in place.
Step 1: Measure your table space!
My tables were 4ft x 8ft. Pushed together they were almost exactly 8ft x 8ft.
Step 2: Visit your local home improvement store!
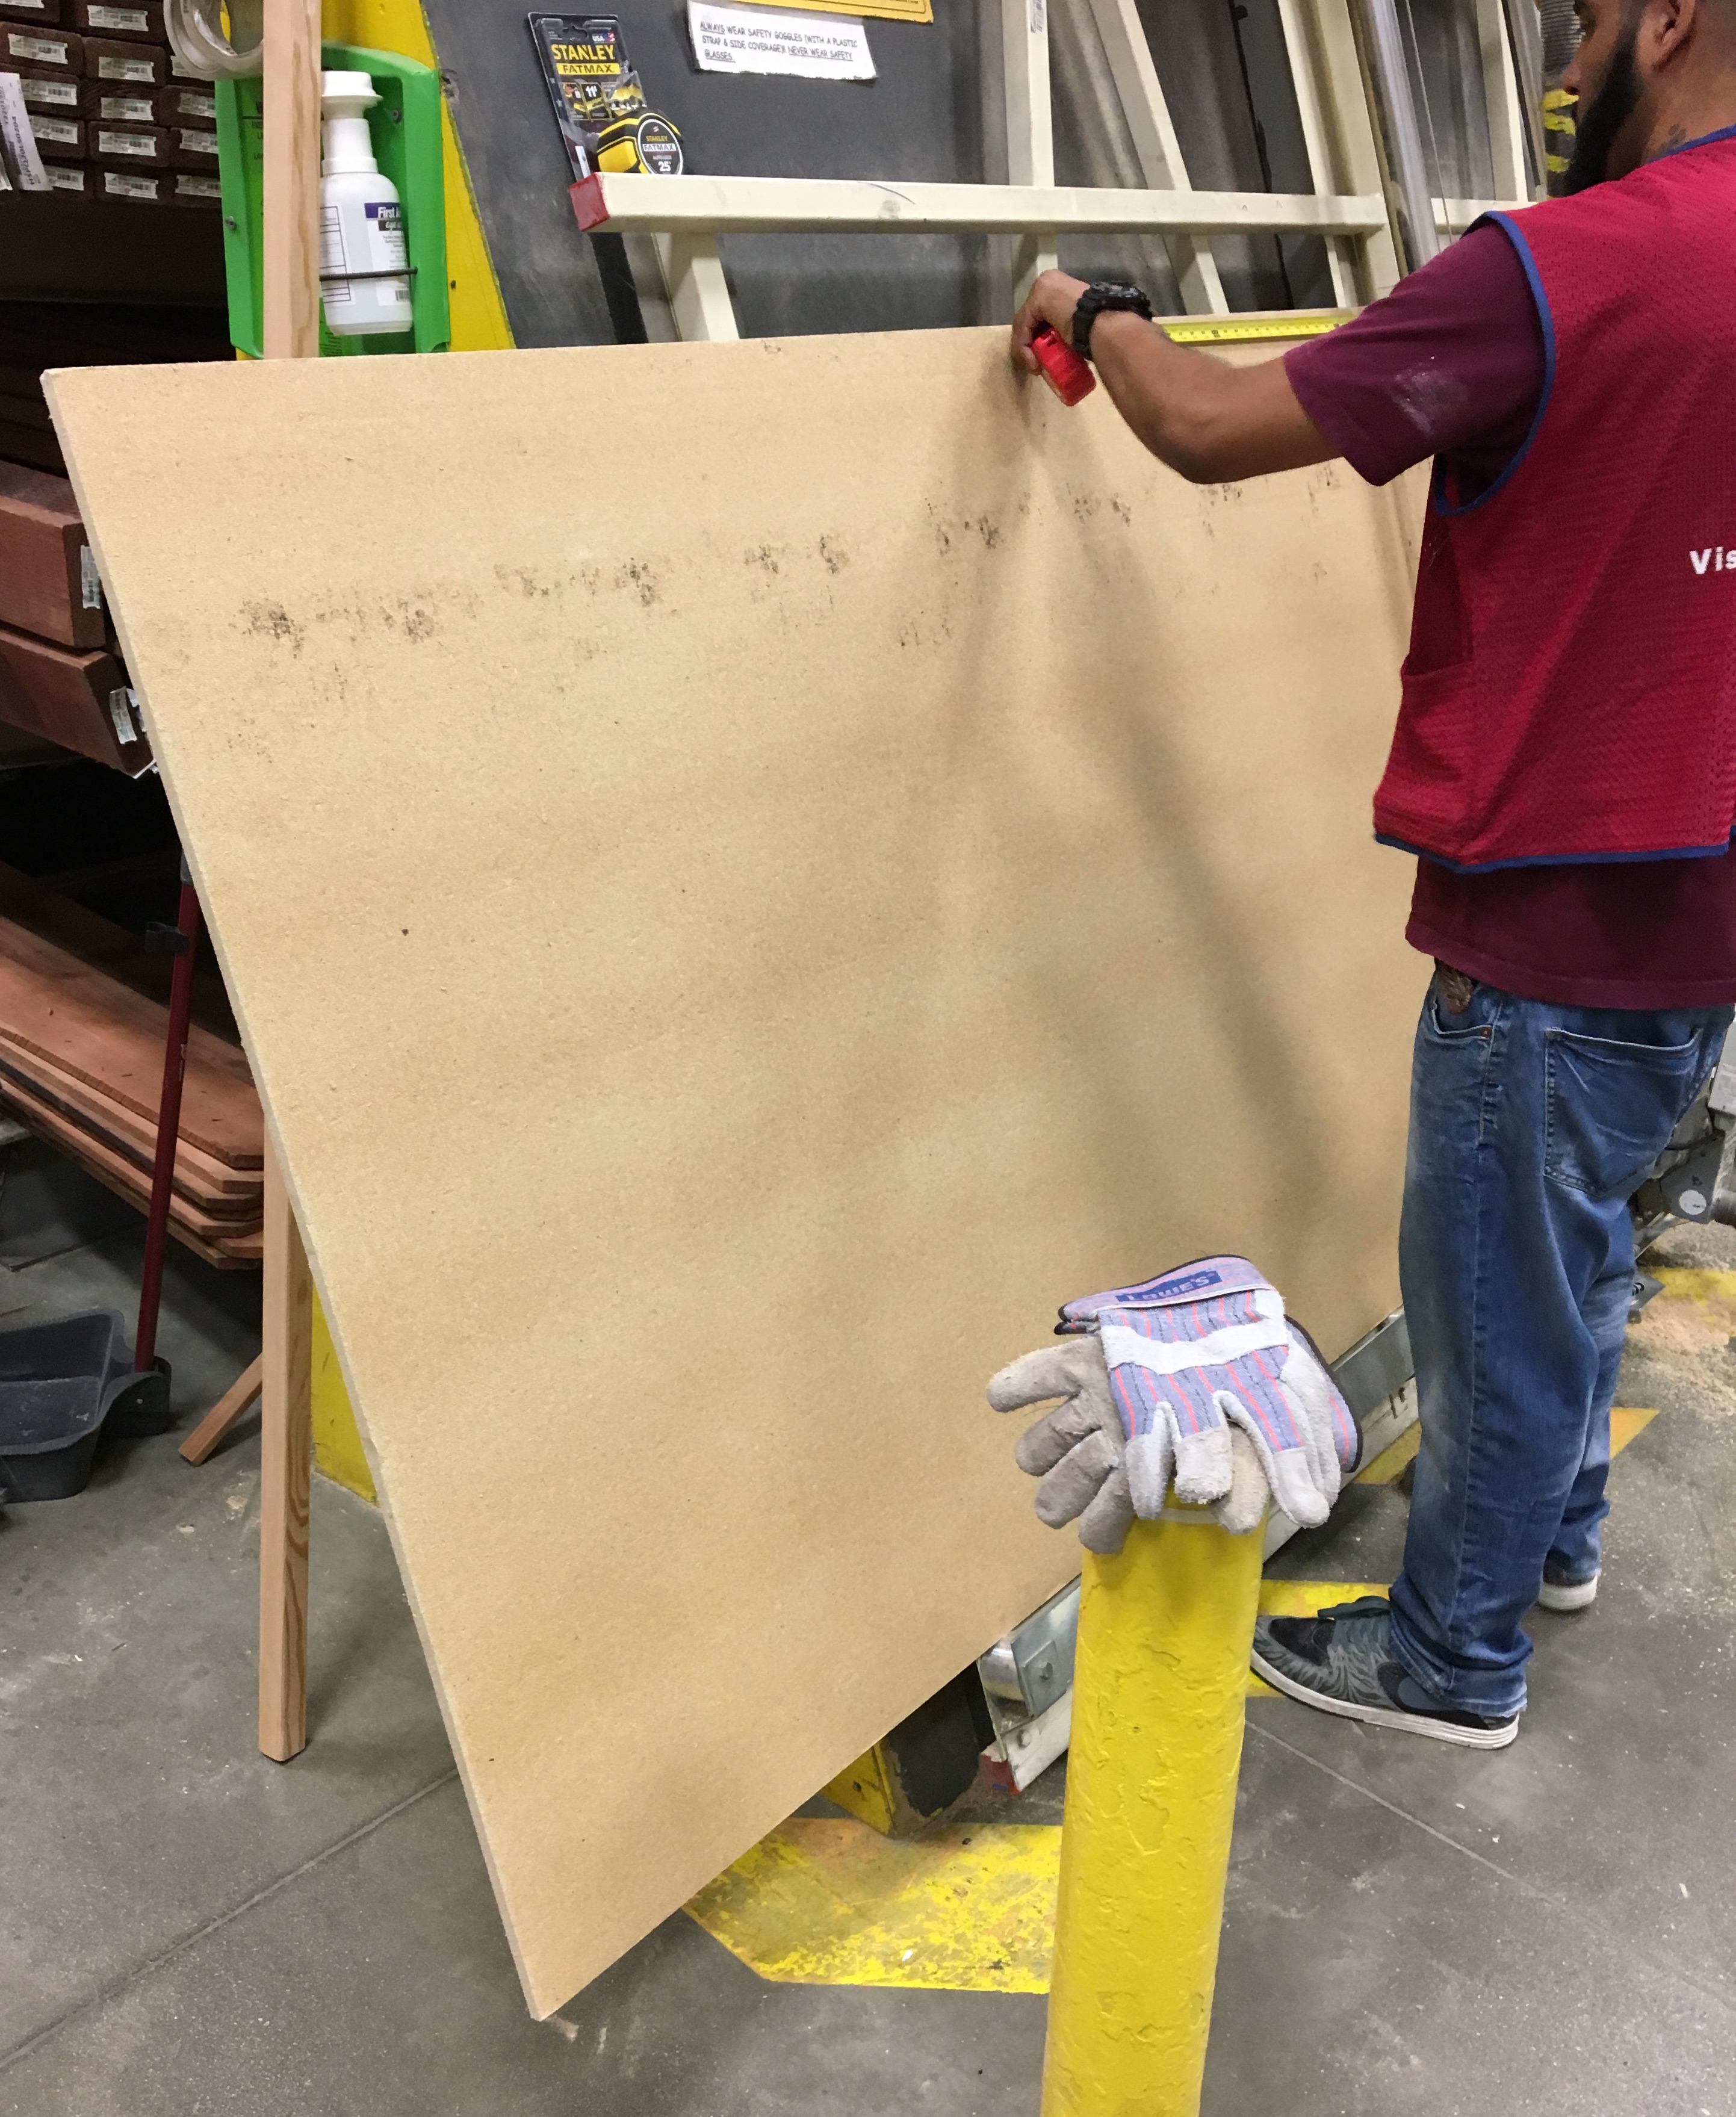
You are looking for large boards of insulation called homasote. (That is the brand name and the store employees should be able to direct you to the same material under a generic name. Think Kleenex vs. facial tissue.) This material is a fiber composite, and has a consistency and weight similar to cork board, but more heavy duty. It's generally tan in color but one side might be painted.
It costs around $20 for a 4x8 piece. Make sure you buy enough to cover your desired space, and have the store cut it into the right shapes to fit on your table AND fit in your car. (Trust me on that last part... doh!)
Step 3: Get the board in place!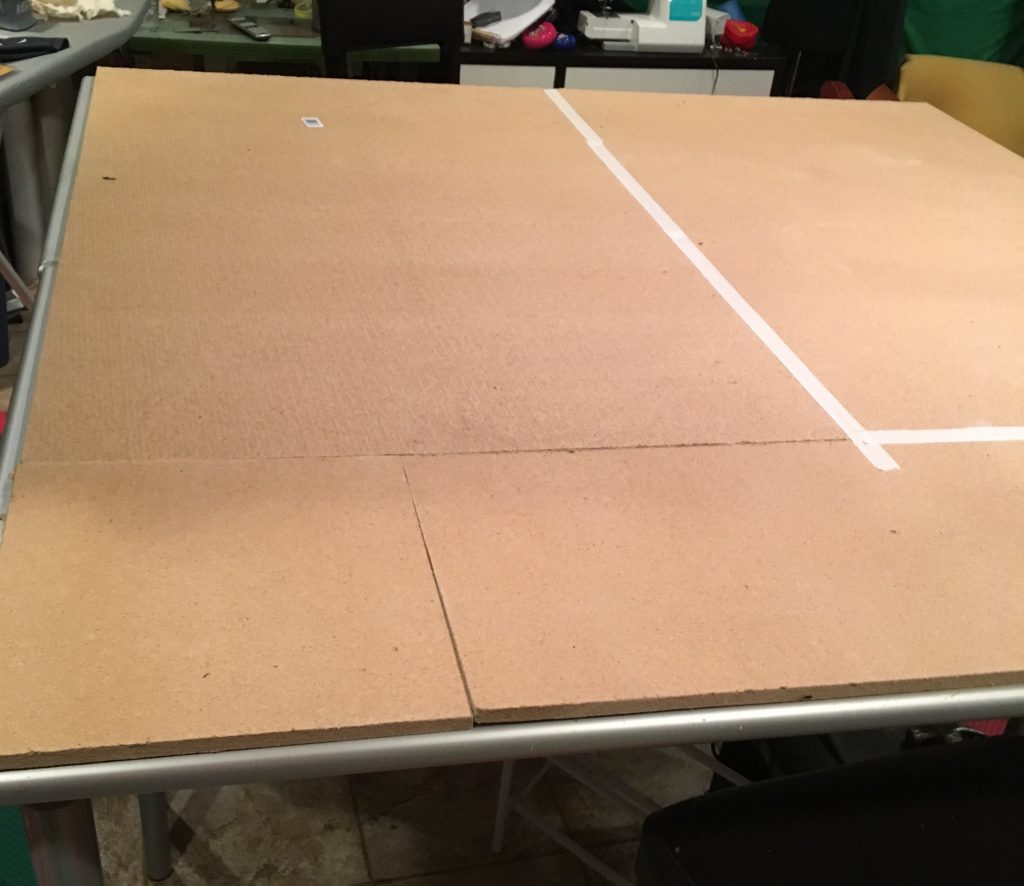

Lay the pieces out to cover the table, then use heavy duty masking tape to cover the seams and keep the boards together. Use the tape to seal the edges of the board to the edges of the table to keep it from slipping around. (DON'T GLUE IT DOWN! You want to be able to easily replace it if something happens!)
 Step 4: Cover it!
The best material to use is tag paper. It's easy to get and cheap to replace if you want a clean work surface. Butcher paper can work as well but won't hold up as well. Use the masking tape along the seams of the paper to finish off the table and give yourself a smooth work surface.
YOU'RE DONE! :)
Have fun with your awesome new cutting table!
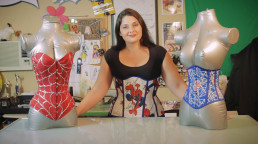
Corsets 101: Picking Your Corset
Don't waste your money on a bad corset! Learn how to tell if a corset is high quality so that it fits you right and will last for years! There are lots of tricks and tips that will help you get the corset that is right for you!
Post any questions in the comments or reach out on social networks! Thank You for Watching! Subscribe if you want more Golden Lasso Girl videos!
Watch More GoldenLassoGirl Videos: http://tinyurl.com/glgvideos
Subscribe to GoldenLassoGirl: http://tinyurl.com/glgsubscribe
Twitter: https://twitter.com/goldenlassogirl
Instagram: https://instagram.com/goldenlassogirl
Facebook: http://fb.me/goldenlassocosplay
Do-it-Yourself: Easy Metal Etching
A simple, safe way to etch designs into metal costume and cosplay pieces. This will also work for metal knives and tools!
Materials:
1 9 volt battery
2 low voltage wires
4 alligator clips
1 cup salt water
Many Q-tips
Electrical tape/nail polish/vinyl sticker
Metal object
Post any questions in the comments below or reach out on social networks! Thank You for Watching! Subscribe if you want more Golden Lasso Girl videos!
Watch More GoldenLassoGirl Videos: http://tinyurl.com/glgvideos
Subscribe to GoldenLassoGirl: http://tinyurl.com/glgsubscribe
Twitter: https://twitter.com/goldenlassogirl
Instagram: https://instagram.com/goldenlassogirl
Facebook: http://fb.me/goldenlassocosplay
Do-it-Yourself: Crafting Safety
Safety is something that many of us slack on when we are crafting! Check out this short video to learn the 5 things you should have to keep yourself safe while creating your cosplay or other craft project.
Post any questions in the comments or reach out on social networks! Thank You for Watching! Subscribe if you want more Golden Lasso Girl videos!
Watch More GoldenLassoGirl Videos: http://tinyurl.com/glgvideos
Subscribe to GoldenLassoGirl: http://tinyurl.com/glgsubscribe
Twitter: https://twitter.com/goldenlassogirl
Instagram: https://instagram.com/goldenlassogirl
Facebook: http://fb.me/goldenlassocosplay

Do-it-Yourself: Metal Armor & Accessories
My first YouTube cosplay tutorial is up! I often am asked about my metal Wonder Woman armor, so I decide it would be a great topic! Check out the video to see how I make metal armor and accessories without power tools and on a small budget!
This tutorial does have some sharp edges! Please use the proper safety gear. Crafters under the age of 18 should only attempt this tutorial with parental permission and supervision.
Materials:
Craft Foam
Scissors/Exacto Knife
Pencil & Sharpie
Aluminum Kick Plate
Aviation Snips (min.18-gage)
Block Sanders
Hammer & Nail
Dremel (optional)
If making Wonder Woman tiara you will also need:
Metal Star
Stain Glass Window Paint
6 inches of 1/4 inch elastic
Adhesive Putty or Double Sided Foam Adhesive Strip
TO ADD THE ETCHED LINES INTO THE METAL USE THIS TUTORIAL: https://www.youtube.com/watch?v=XOQM9kBG2JA
Post any questions in the comments or reach out on social networks! Thank You for Watching! Subscribe if you want more Golden Lasso Girl videos!
Watch More GoldenLassoGirl Videos: http://tinyurl.com/glgvideos
Subscribe to GoldenLassoGirl: http://tinyurl.com/glgsubscribe
Twitter: https://twitter.com/goldenlassogirl
Instagram: https://instagram.com/goldenlassogirl
Facebook: http://fb.me/goldenlassocosplay
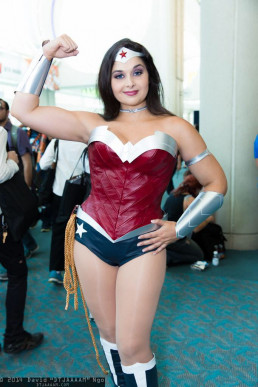
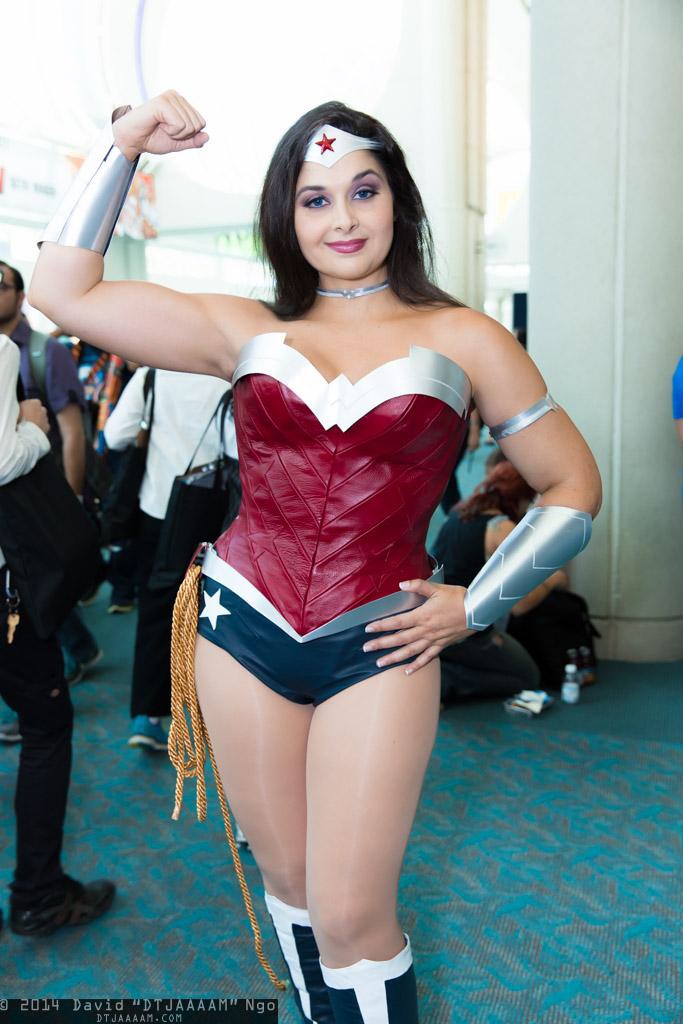
Do-it-Yourself: New52 Wonder Woman Corset
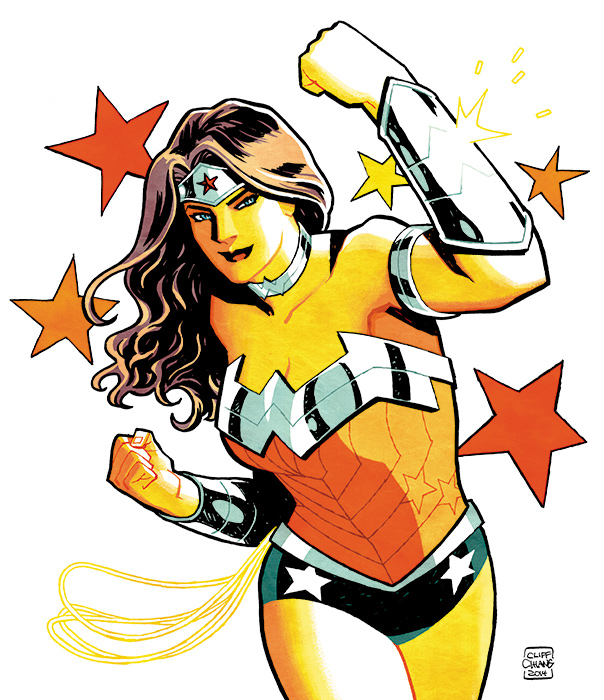 Wonder Woman's corset in the New52 is stunning. The complex chevron pattern combined with stars is intricate and eye-catching. As difficult as it is to draw, it's even more difficult to sew. Chevrons are quite a challenge and are also very time consuming.
Now there are two ways to make this corset, the easier way (still not super easy) and the hard way. The easy way would be to buy/make a corset, then make the straight lined chevrons out of a stretch fabric to cover that corset. I was hesitant to use this method because it can result in the chevrons looking warped as the fabric stretches to match the curves of the body, and because I wanted my corset to look like it was made out of leather.
Thus, the hard way.
Please Note: This is a difficult project that requires pretty advanced sewing skills. You will need to be familiar with making corsets and have a corset pattern that works for you as a base for this tutorial. You will also need a walking foot for your sewing machine if you are using leather.
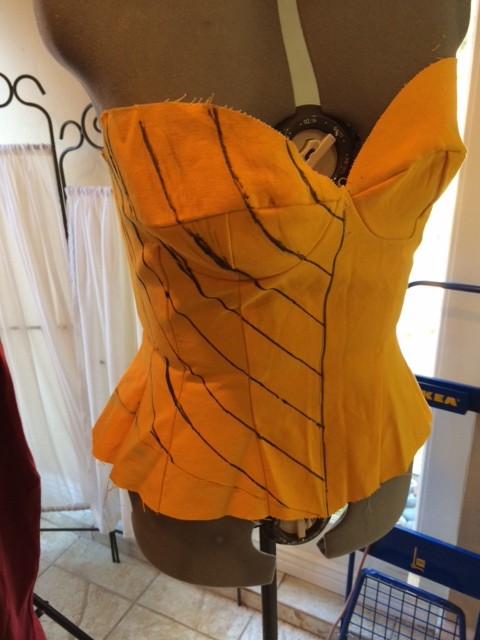
Step 1: Use your corset pattern to make a mock-up. Make sure you use the same type of fabric that you will eventually use for the base of your final corset, I recommend something heavy like duck cloth.
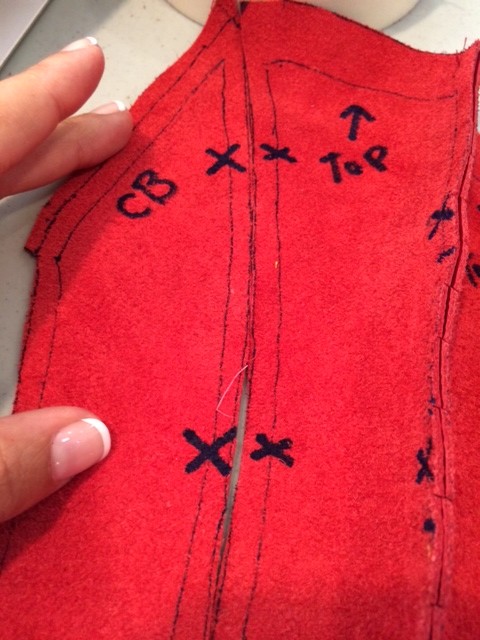
Step 2: Put this mock-up on a dress form, a volunteer, or yourself if you have a friend to help. Then draw chevrons on half of the mock-up. Measure equidistant meeting points on the center front of the corset as a base, then draw out from there. The trick is that these cannot be straight lines drawn with a ruler. You will get a tube shape if you tried to make a corset out of straight lines that would not form to the contours of your body correctly. You have to draw chevrons that form to the body's curves and appear to make straight chevrons. YOU WILL GET LOTS OF FREAKY SHAPED STRIPS. THAT IS OK!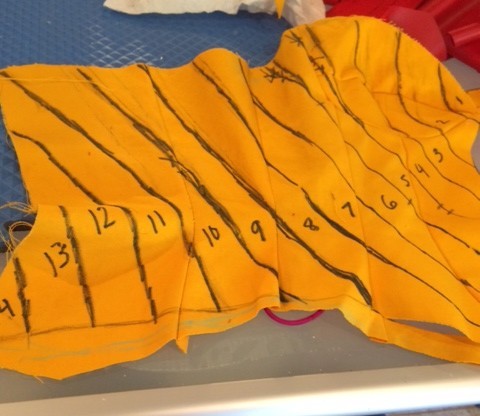
Step 3: Mark the lines on your mock-up with notches and numbers so you can keep track of which order the pieces go in, and where they meet. Cut the mock-up along the lines you drew to create the pattern for your final corset cover. DON'T FREAK OUT AT THE STRANGE SHAPES YOU GET!
 Step 5: Trace your pattern pieces onto your final fabric and add a 1/2 inch seam allowance around each piece. Make sure you have two complete sides for your corset and the pieces for each side should be a reflection of each other. Make sure you copy over the notches and identifying marks onto the BACK side of these pieces. I used leather but other pleathers will work as well. Stretch fabrics will not work and will warp the final product, try the previous method listed above if you want to use a stretch fabric.
 Step 6: Carefully, starting from the top center piece, sew one side of the corset together. Make sure to line up the notches, they are your guide! Now sew the refection side of it together. You should now have two complete halves of a corset cover that are reflections of one another.
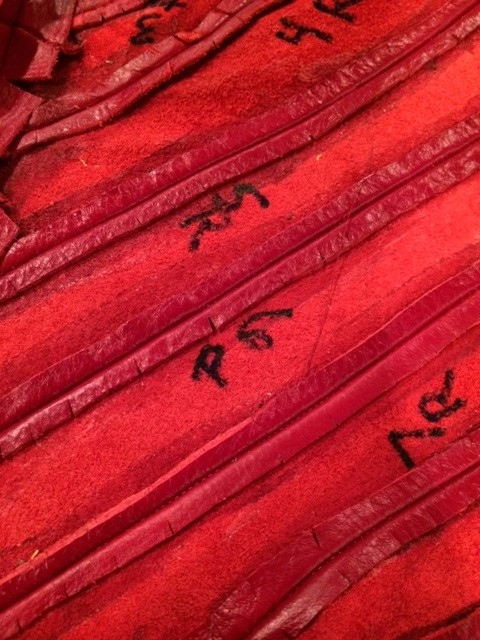
Step 7: Using rubber cement, glue all of your seam allowances flat against the back of your corset cover. Make them all as flat as possible. Flat seam allowances will make your life easier later and make your final product look better! Make sure the glue is dry before moving on to step #8.
 Step 8: Now it's time to make the chevrons happen! Meeting the right sides of the corset center fronts (those are two edges) use pins or tape if you are using a leather-like material to insure that the seams of your chevrons meet up. You might have to do a little manipulating and stretching to make the pieces line up perfectly in the front, but this is a VERY important step. You don't want your chevrons to not line up. Sew them together on the wrong side down what now is the center front of your corset cover.
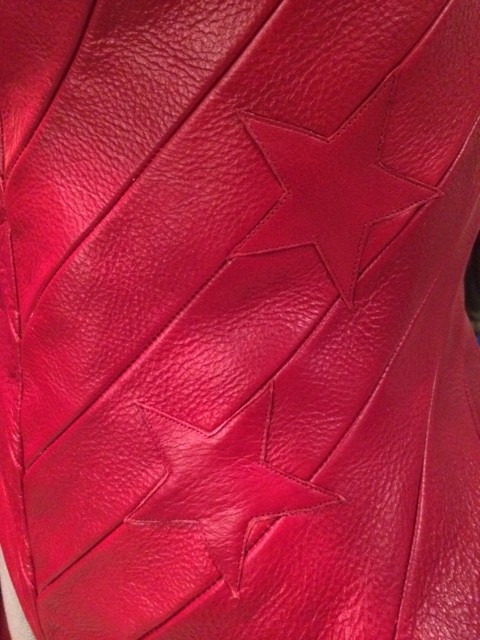 Step 9: The hardest part of your project is over!! Congrats!! Now cut out the stars from the same material as your chevrons, making sure they have the correct proportions to your chevrons. Put a small amount of rubber cement on the back of each star and place it where you'd like it on the corset. The glue will help hold the star in place while you top-stitch it down.
Step 10: Using your corset pattern, make the base corset with metal boning.
Step 11: Again using your dress form, a volunteer, or yourself if you have a friend to help you, put your 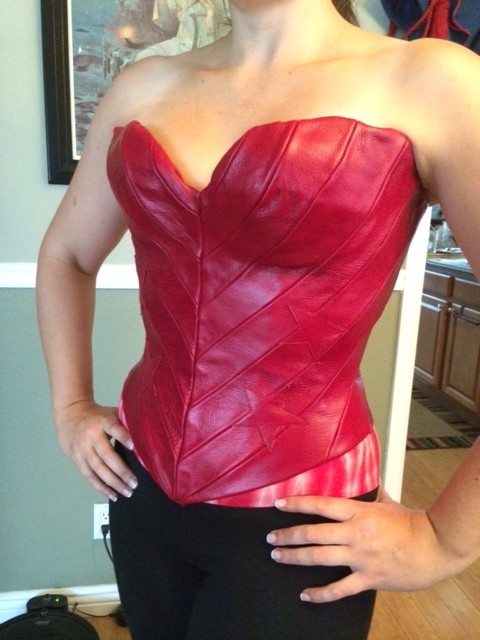 base corset in place. Then, finding the exact center, use bardge cement to glue the center seam of your chevroned corset cover to your base corset. This will keep the center front from moving around. You can also glue around the cups of the corset and along the sides and center back once the front has dried.
Step 12: Hand stitch the edges of your corset cover down on the inside of your base corset. This takes a while and you will definitely need a thimble if you are using leather. Make sure you stitch down all the edges!
Step 13: Grommet the corset.
CONGRATS!! YOU ARE DONE!! Hopefully you have an amazing piece of cosplay art to enjoy!


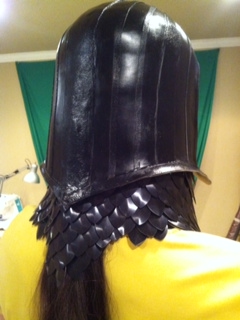
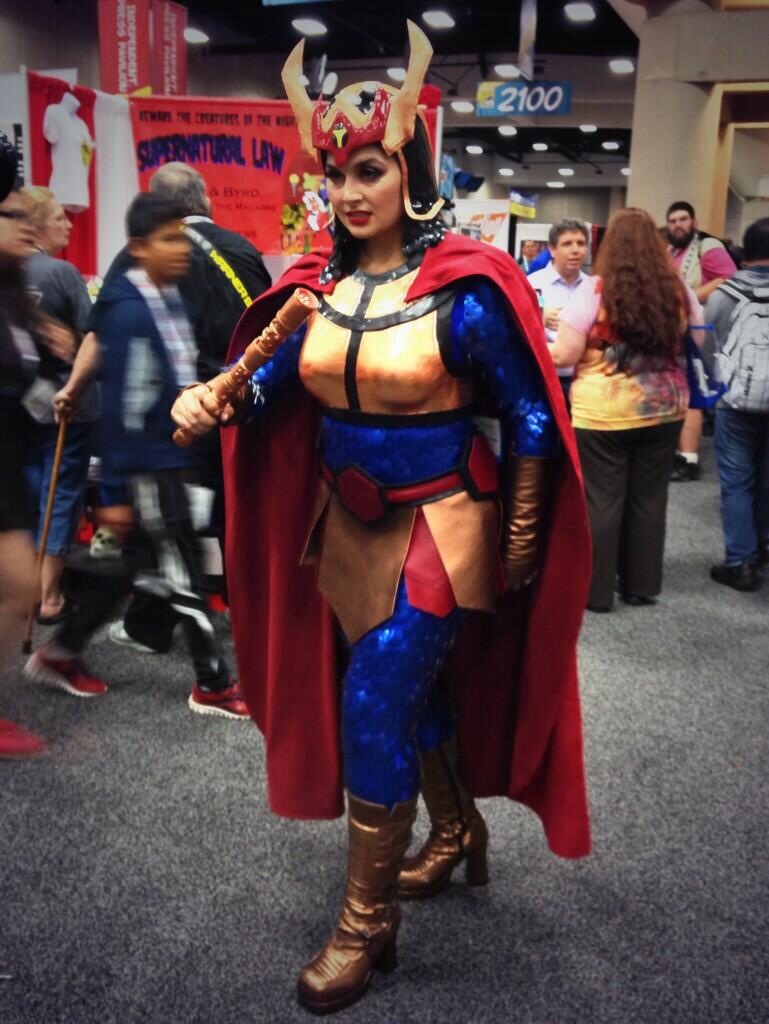
Do-it-Yourself: Costume Helmet (Big Barda)
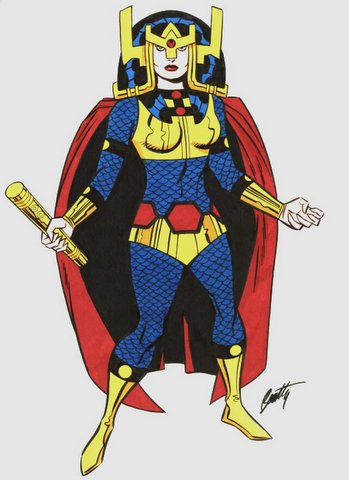 I have always loved Big Barda's design. Over the years it has changed significantly, but her samurai-inspired helmet has remained a trademark of her look. I decided early on that I wanted to go with a more real-world design for the helmet, but make sure that it was still clearly recognizable. Who am I to improve on Jack Kirby's work? Despite the sleek design of the helmet, this was easily one of the most complicated cosplay projects that I have tackled.
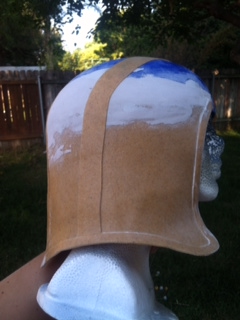
I started with a practical base, which came in the form of a child's toy Dodger helmet that I picked up at the thrift store for $2.50. I cut the bill off of it and used it for the foundation of Barda's Helmet. I then used craft foam to measure, design, and test the a few different designs for the back of the helmet that comes down around the neck. I had to be careful that I could still turn my head without trouble, but still have it come down as far as possible.
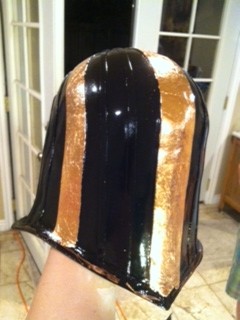
 Once I finalized the pattern for the back of the helmet with the cheap craft foam, I traced it onto Worbla and made the final version. I used industrial glue to cement the new Worbla piece to the Dodger helmet.After the glue dried, I used my heat gun to bend the Worbla into exactly the shape I wanted. This included adding a slight curl to the bottom of the helmet, and making sure it was symmetrical. Finally, I used Bondo to smooth the seam and make the Worbla and Dodger helmet look like one item. My little detail sander is a godsend for working with Bondo on small or detailed items like this. GET ONE!
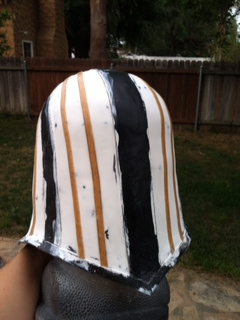
 Adding more details with Worbla was the next step. Barda has very distinctive patterning on her helmet, and this is where Worbla really shines. It's so easy to cut a small strip and then bend it to fit along the edge of almost any shape. It attaches to itself when heated, but I also used glue since I'm not sure if it would have securely attached itself to the Dodger helmet and Bondo.
Then I used Gesso to make it completely smooth, by adding a thin layer then sanding, then adding another layer and sanding. Barda's helmet needs to look completely smooth and very futuristic. The Gesso and sanding made the parts of the helmet completely level and smooth, and also insured a uniform texture for the primer paint to attach.
 After what felt like endless hours of sanding, I added the smaller details to the helmet with Worbla. In the picture to the left, I painted the details from the previous step black so you could see the difference. The Worbla attached to the Gesso, and is always incredibly easy to use on details like this. I used Gesso where the strips of Worbla met to make the details seamless and to avoid the gaps that can sometimes show on the final process.
Now it's time to paint the helmet. Big Barda's helmet is a shiny smooth black, so this took a while. The technique is to lay a thin coat of spray paint over the whole helmet, wait for it to dry COMPLETELY, then use extremely fine sandpaper lightly on any areas that aren't perfectly smooth. After that's done, you do it again. A lot. Eventually, you will get a nice smooth finish that doesn't look like spray paint.
Barda's helmet goes all the way down to her shoulders, and like many comic book outfits that defy logic, she can still turn her head. Physics doesn't work like that for me and so I had to come up with an alternative. I used black scale maille around the neck to extend the look down to give the illusion of the helmet reaching my shoulders. It ended up matching perfectly, and is one of my favorite details on this cosplay. I created the scale maille piece and attached it with Velcro to the inside of the helmet. The fact that it was removable made painting and finishing the helmet easier.
 Clear coating can be one of the most stressful parts of a project. I wanted maximum shine on my helmet, so I used a high gloss clear coat. I highly recommend that you use the same brand of paint throughout a project (if possible), and ALWAYS test different paints together on scraps before using them on your work in progress. Nothing is more heartbreaking than having something almost finished and then watching the paint bubble or flake because of a chemical reaction. I carefully added multiple clear coats, leaving many hours between each coat to insure that it was completely dry when the next was added. THIS IS REALLY IMPORTANT!
I used copper leaf to add the metallic shine. As always, practice leafing on scraps before working on your final piece, and take your time. Fine paintbrushes are very helpful for leafing corners and edges. It can be really tricky to get it looking right. After I finished leafing the main helmet, I added more layers clear coat. This i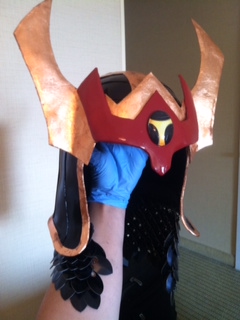 s a vital step after leafing and prevents the metal from tarnishing or peeling off.
Now the majority of the helmet was done, and I could create the decorative front. I wanted it to have some weight and depth to it, so I used Kamui Cosplay's tutorial and sandwiched a layer of craft foam between two layers of Wonderflex. The Wonderflex should be larger than the craft foam so that you can heat seal it around the edges. I molded these pieces with heat to perfectly fit to each other, and to the finished section of the helmet. After these pieces cooled, I painted them or copper leafed them just like I did the other parts of the helmet. To finish it off, I used industrial glue to attach these pieces to the rest of the helmet.
Do-It-Yourself: Steampunk Weapon
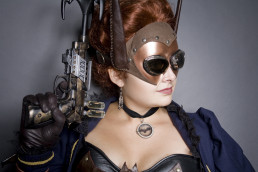
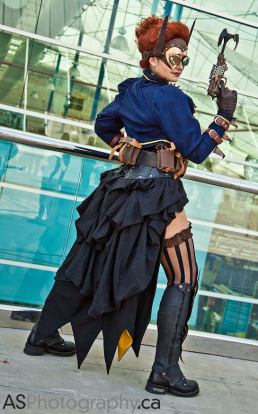
Prop making is one of the most challenging aspects of cosplay and costume making. For this tutorial, I will be showing you how to modify a plastic toy gun into a Steampunk grapple gun. I wanted to do something very specific for my Steampunk Batgirl costume, but you can use many of these techniques to modify other plastic weapons. It also happens to be my favorite part of any costume, and something that I don't get to do nearly enough. The details of a prop can really push a costume to the next level, especially when it comes to Steampunk!
Step one: Choose your Weapon
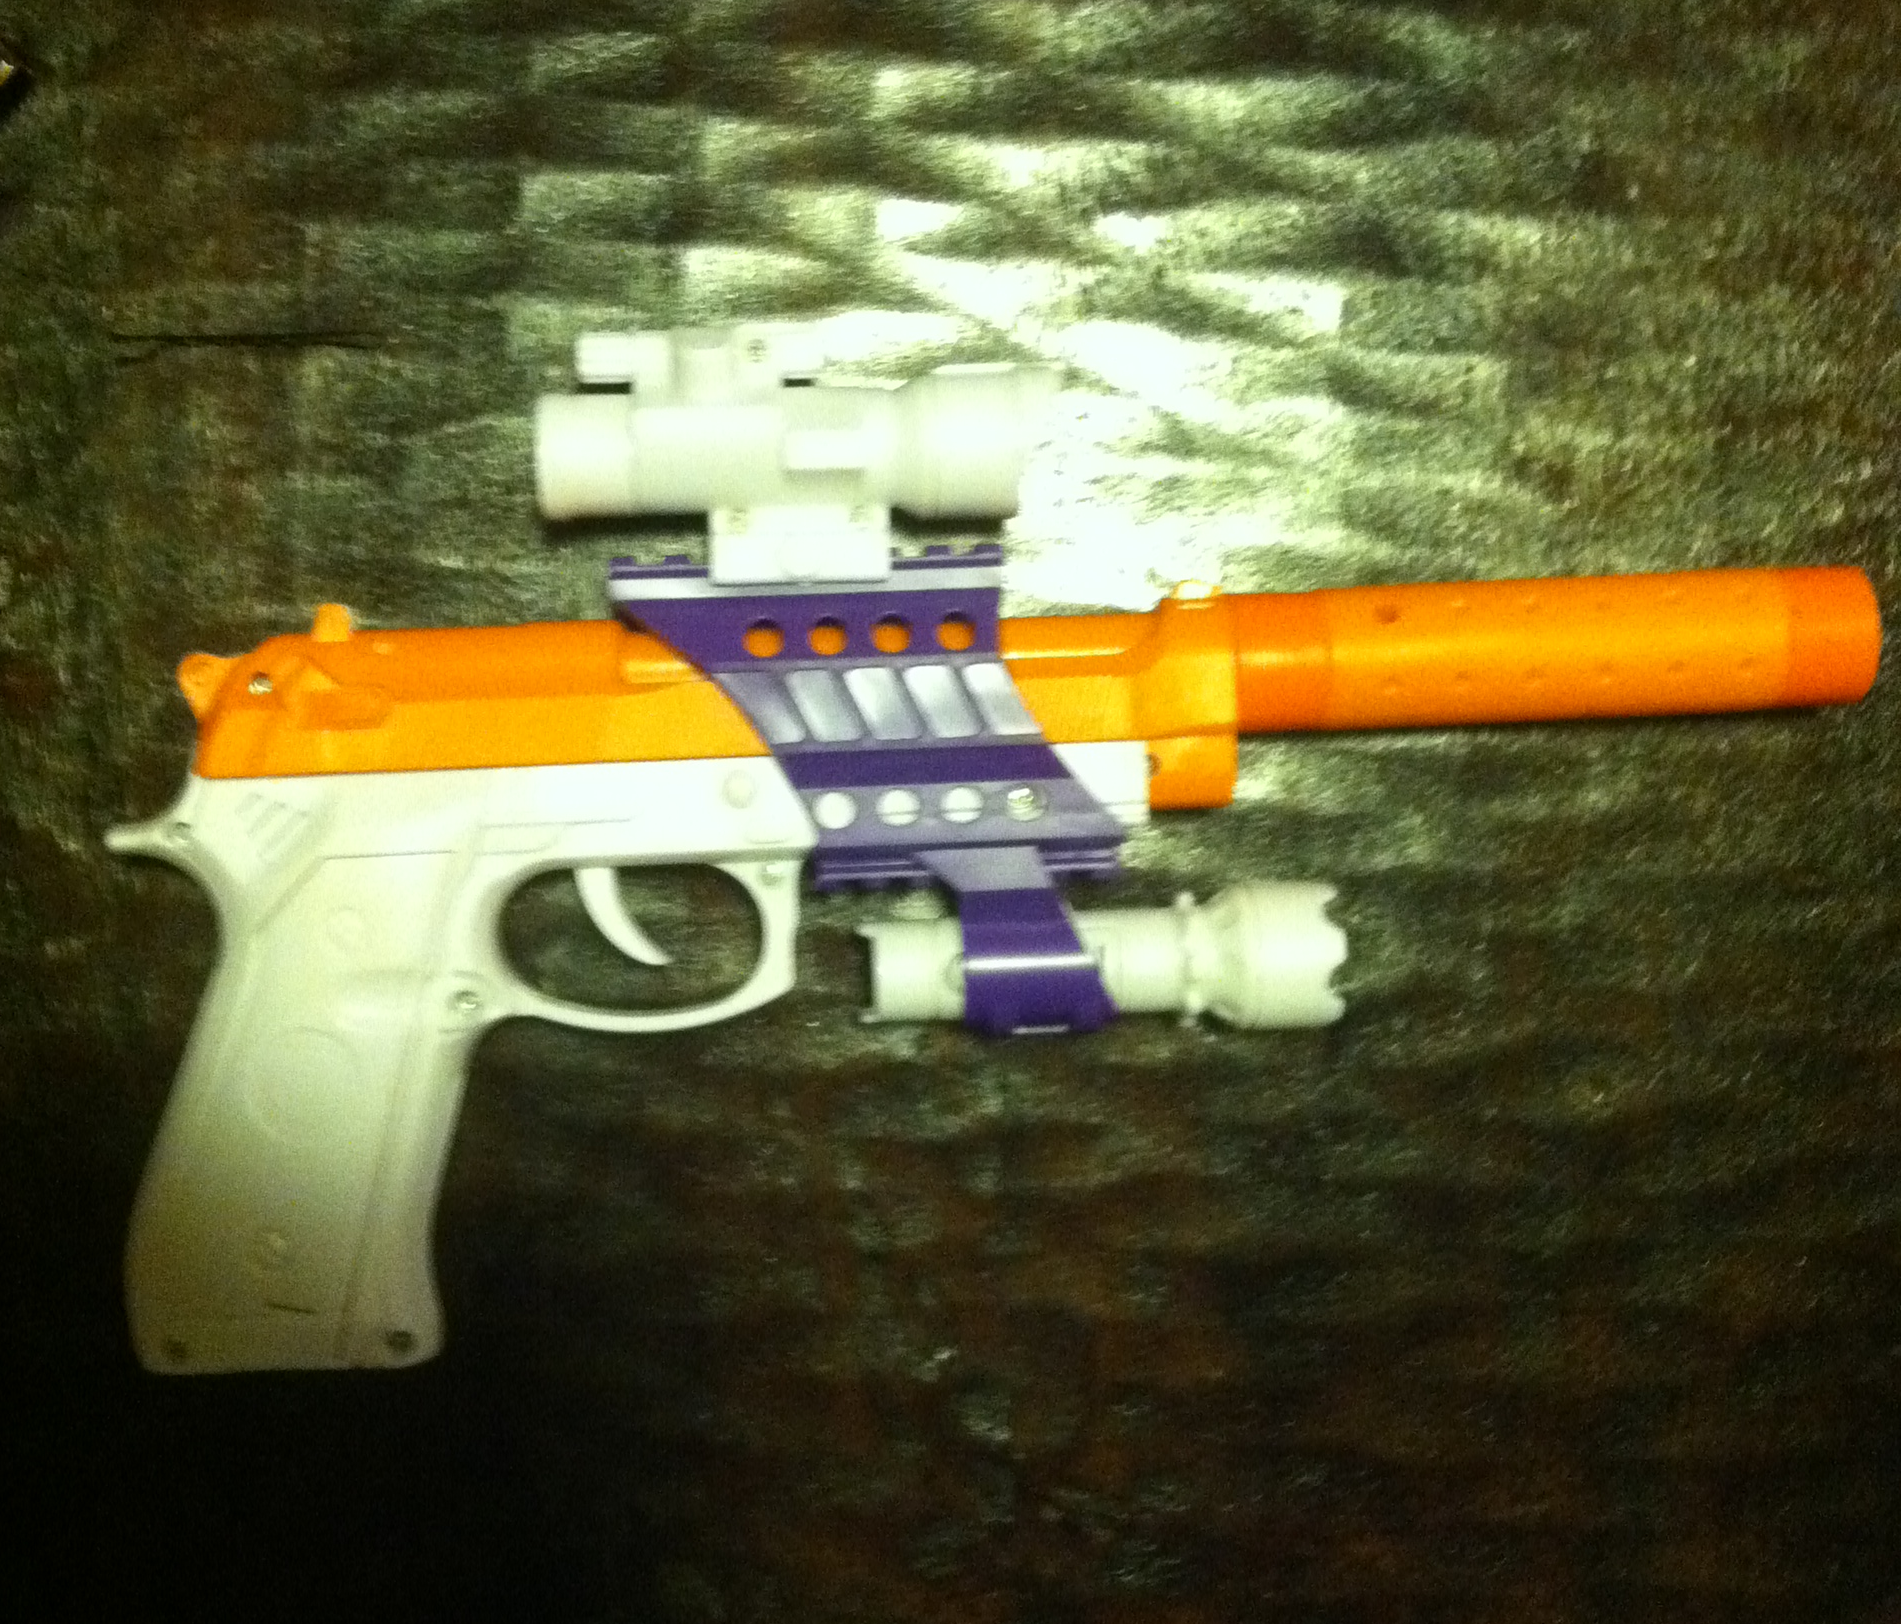 The first, and most important step of making a steampunk weapon is choosing the toy weapon you are going to modify. Take your time. Plan out exactly what you want and don't give up until you find it! Walk around the toy isles, shop online, and check out local Goodwill stores until you find the perfect toy. Don't worry about the color, focus on the shape and how it's built. Avoid guns that are easily recognizable as a specific model, unless that's the look you want (Oops). Make sure the toy is sturdy, that it's made of all plastic (rubber and metal will change how you have to modify it), and if it will be easy to disassemble or mask with tape for the painting process.
The gun pictured is the one I chose. I ended up not using the sights or the silencer that came with it, but the purple details ended up looking pretty cool by the end. Again, color doesn't matter at all.
Step Two: Prep for Paint
This is the most boring step, but it's vital if you want a good looking product by the end of this process. You will need fine grain sandpaper and dish soap. Carefully sand away any imperfections on the gun, without taking away too much or leaving scratches in the plastic. The goal is to make the gun as smooth and realistic as possible. Again, don't worry about the color of the gun, just focus on the texture of its surface.
When you have finished sanding the gun, wash it in normal water and dish washing liquid. You will have to wash your gun with damp rags if it has electronic parts and can't get totally wet. Be sure to rinse the gun thoroughly so soap residue doesn't mess up your painting later. Dry it with a rag and wait a few hours to insure it's completely dry before moving on to Step Three.
Step Three: Primer
 Be careful not to handle the gun too much before you paint it. Oils from your hands can impact the paint. I always use Krylon Fusion spray paint for plastics. For this project, I used black paint with a satin finish.
Take care to keep the spray can at least a foot from the gun and spray a thin layer of the paint, don't worry if you still see the original color through this first layer. Let the layer dry completely, and then add another. Keep adding thin layers until the gun is completely covered. MAKE SURE that each layer dries completely before adding the next, and that the layers stay thin, or you will get drips that ruin the look of your gun.
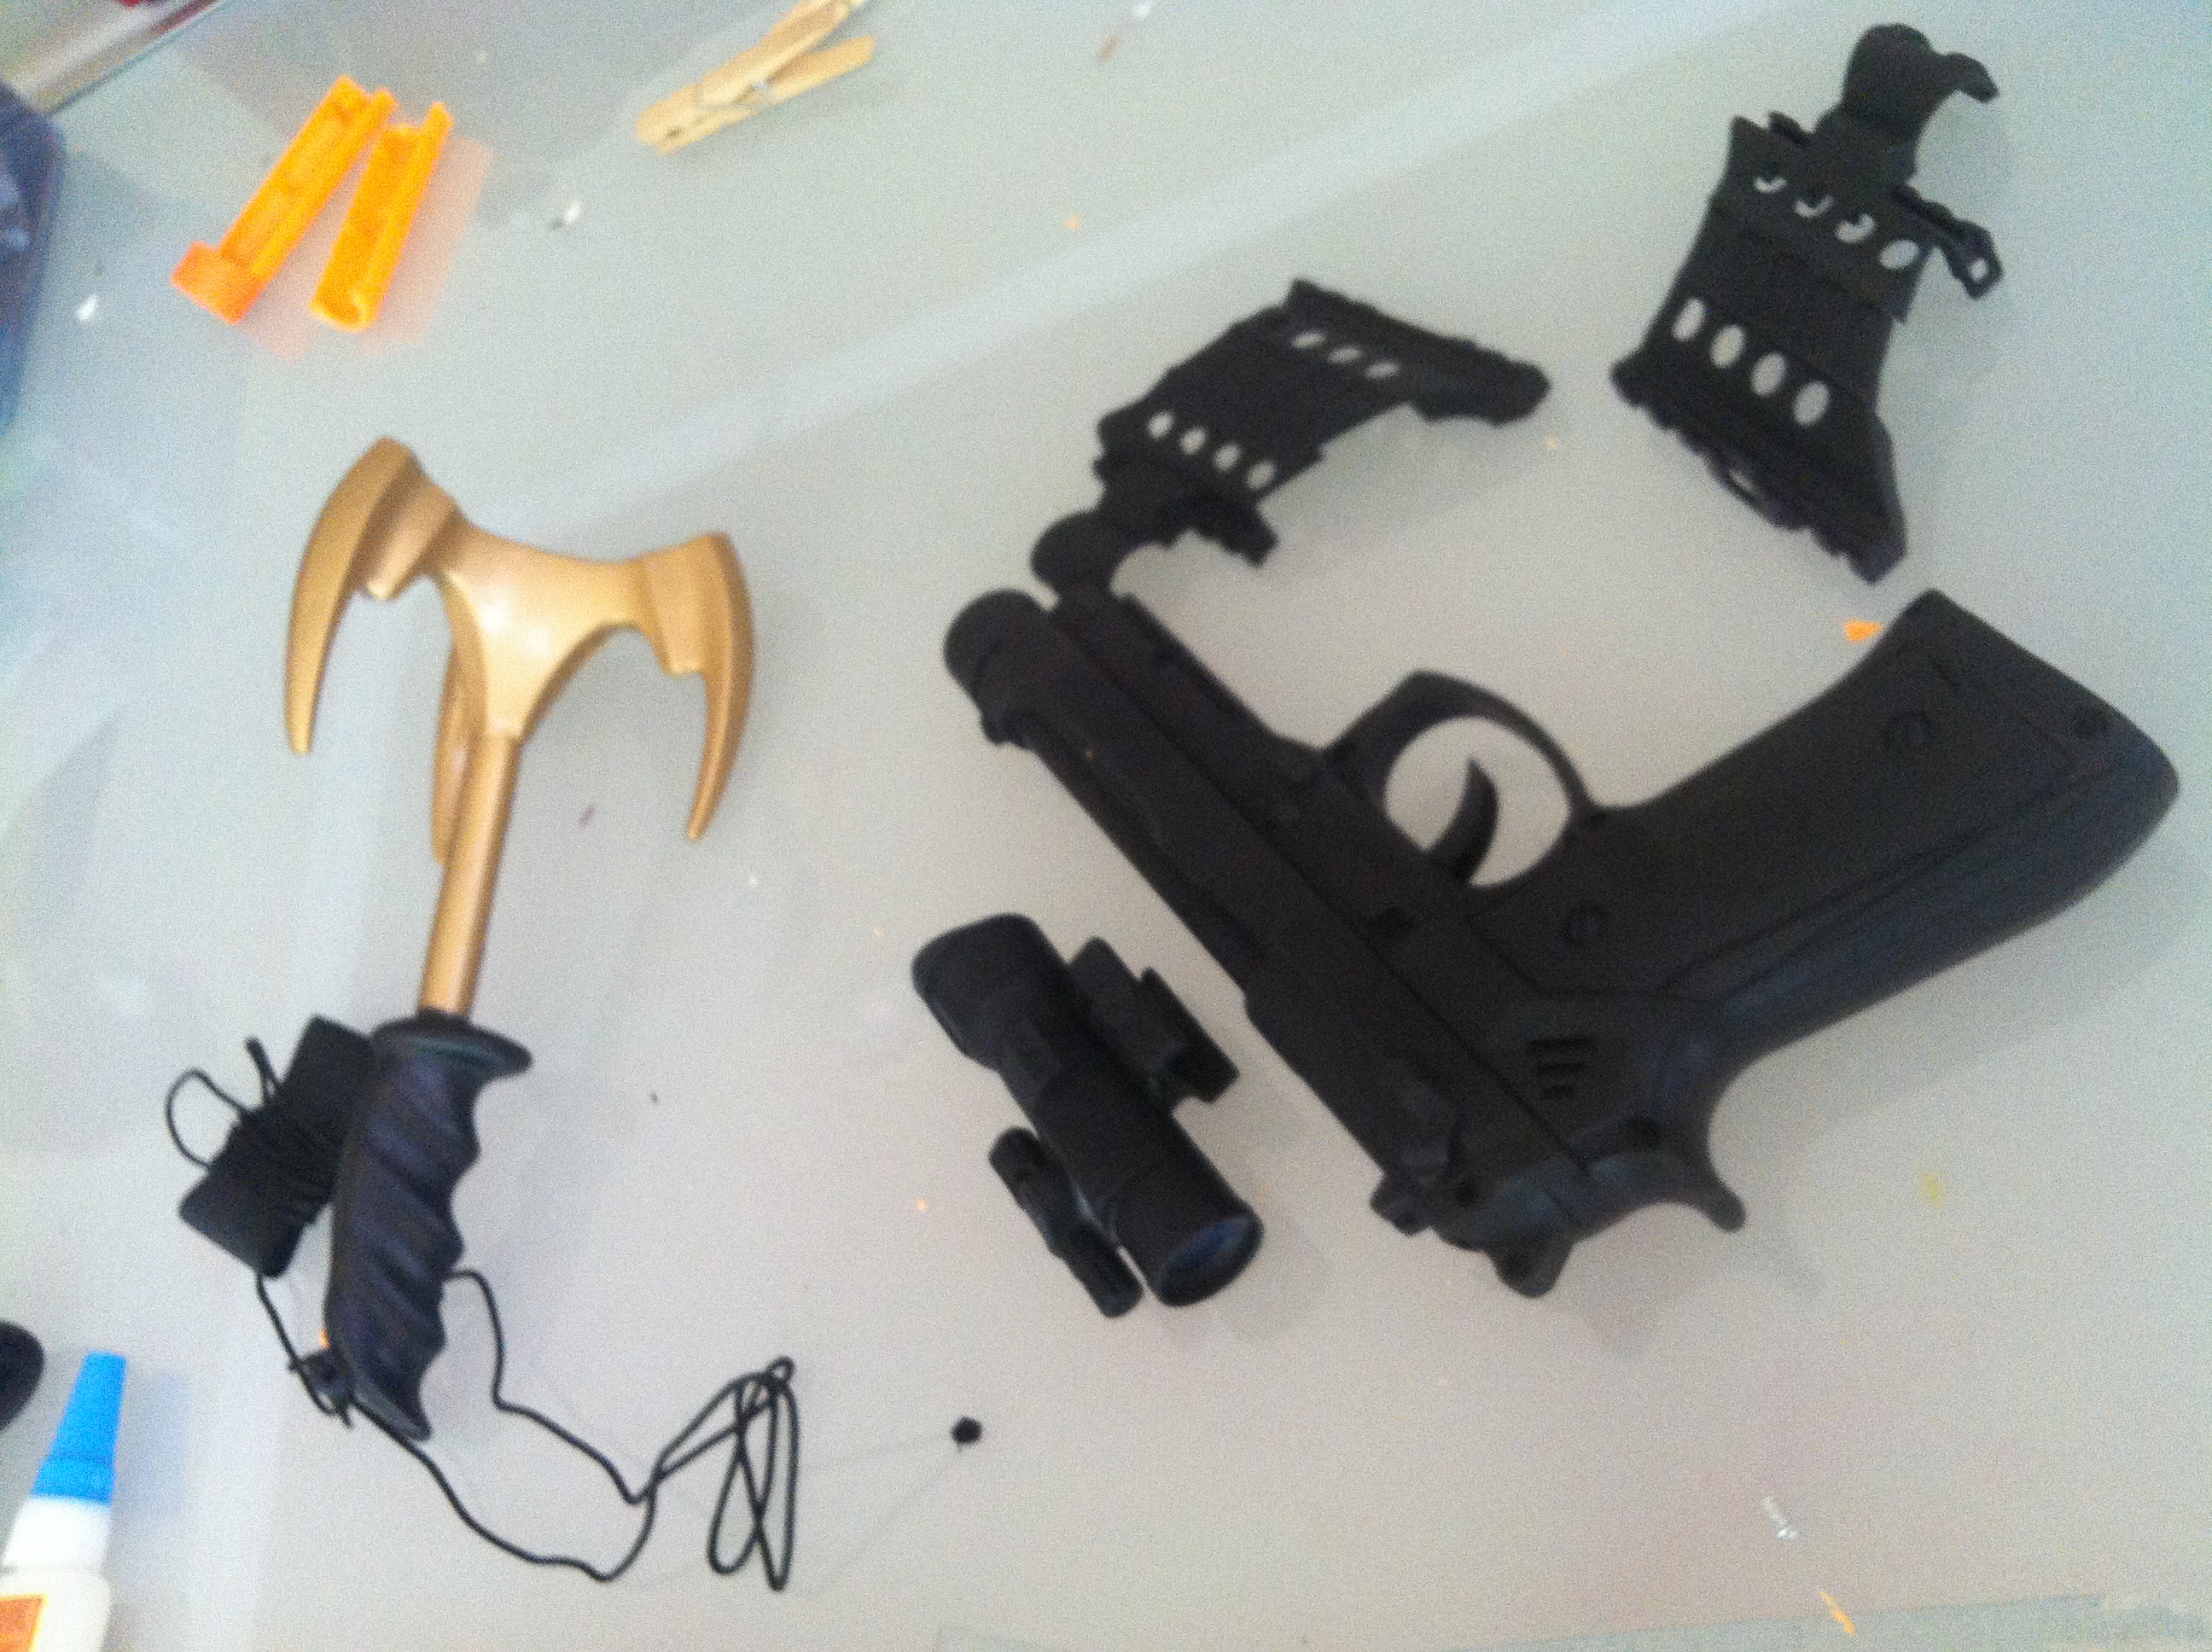
My gun ended up looking VERY modern and recognizable with the black primer on it. I was really worried by this point, but kept on going. Notice I painted all the parts just in case I decided to use them later. (The grappling hook is part of Step 5.)
Step Four: Metalize
 You will need an amazing substance called Rub-n-Buff to make the gun look metallic. It comes in small tubes, but don't let that fool you, a little goes a LONG way. It comes in tons of colors, I used the silver shade and the antique gold for my gun. Different metal looks all put together in one weapon really make something look steampunk, so don't hesitate to use two or three different colors on the different parts of your gun.
You are going to use the Rub-n-Buff to highlight the metal areas of your gun by hand. This of it more as a polish than a paint. Put a small dot of it on a smooth cloth, then carefully start applying it to your weapon. I HIGHLY suggest you practice on something else first to get a feel for it. Remember how you slowly added more and more primer paint to your gun in step three? Start with a tiny bit and then add more. I left a lot of black showing in the crevices of my gun to make it look grimy and old. As you "buff" your weapon, think about what parts of the gun's surface would get touched or rubbed against things the most. Those areas should be the brightest and the crevices should stay darker.
Let the Rub-n-Buff dry for a few hours. It is wax-based and rubs off on everything while wet, so be careful!
Step Five: Customize
This is where you get to let your creativity run wild! My steampunk weapon is a grapple gun, so I will tell you what I did to stylize my weapon in that manner, but don't limit yourself! Do a Google image search and get inspired.
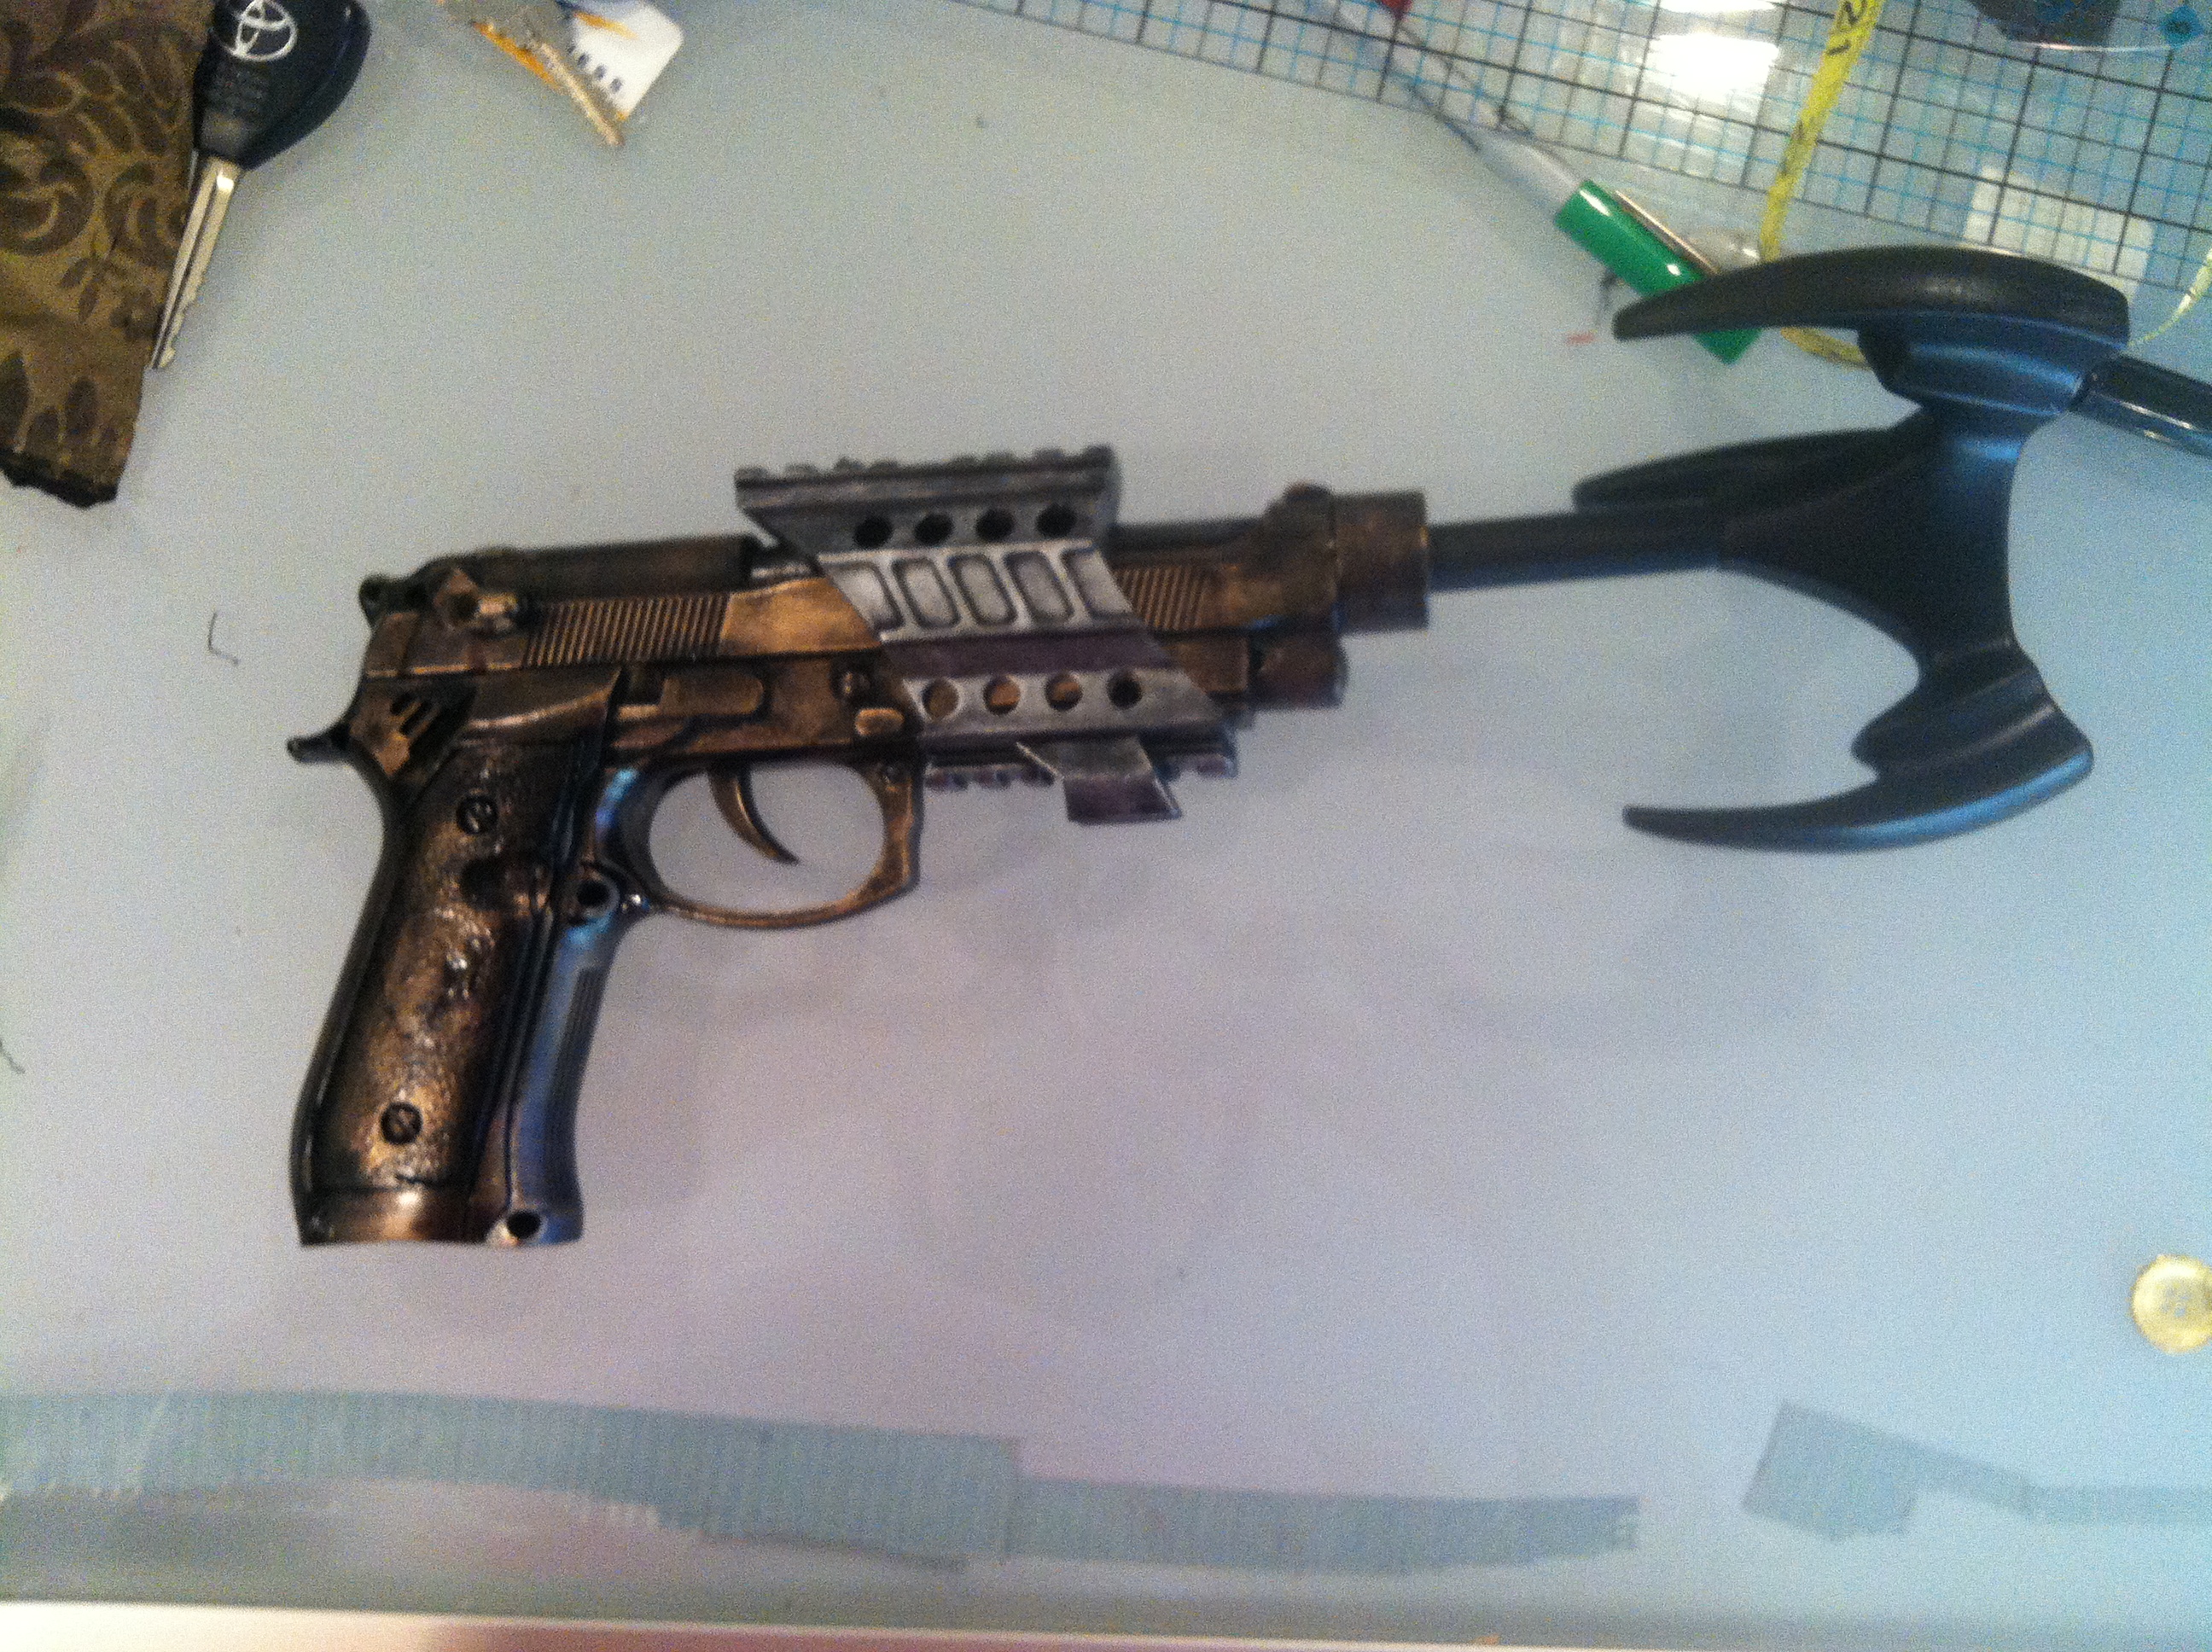
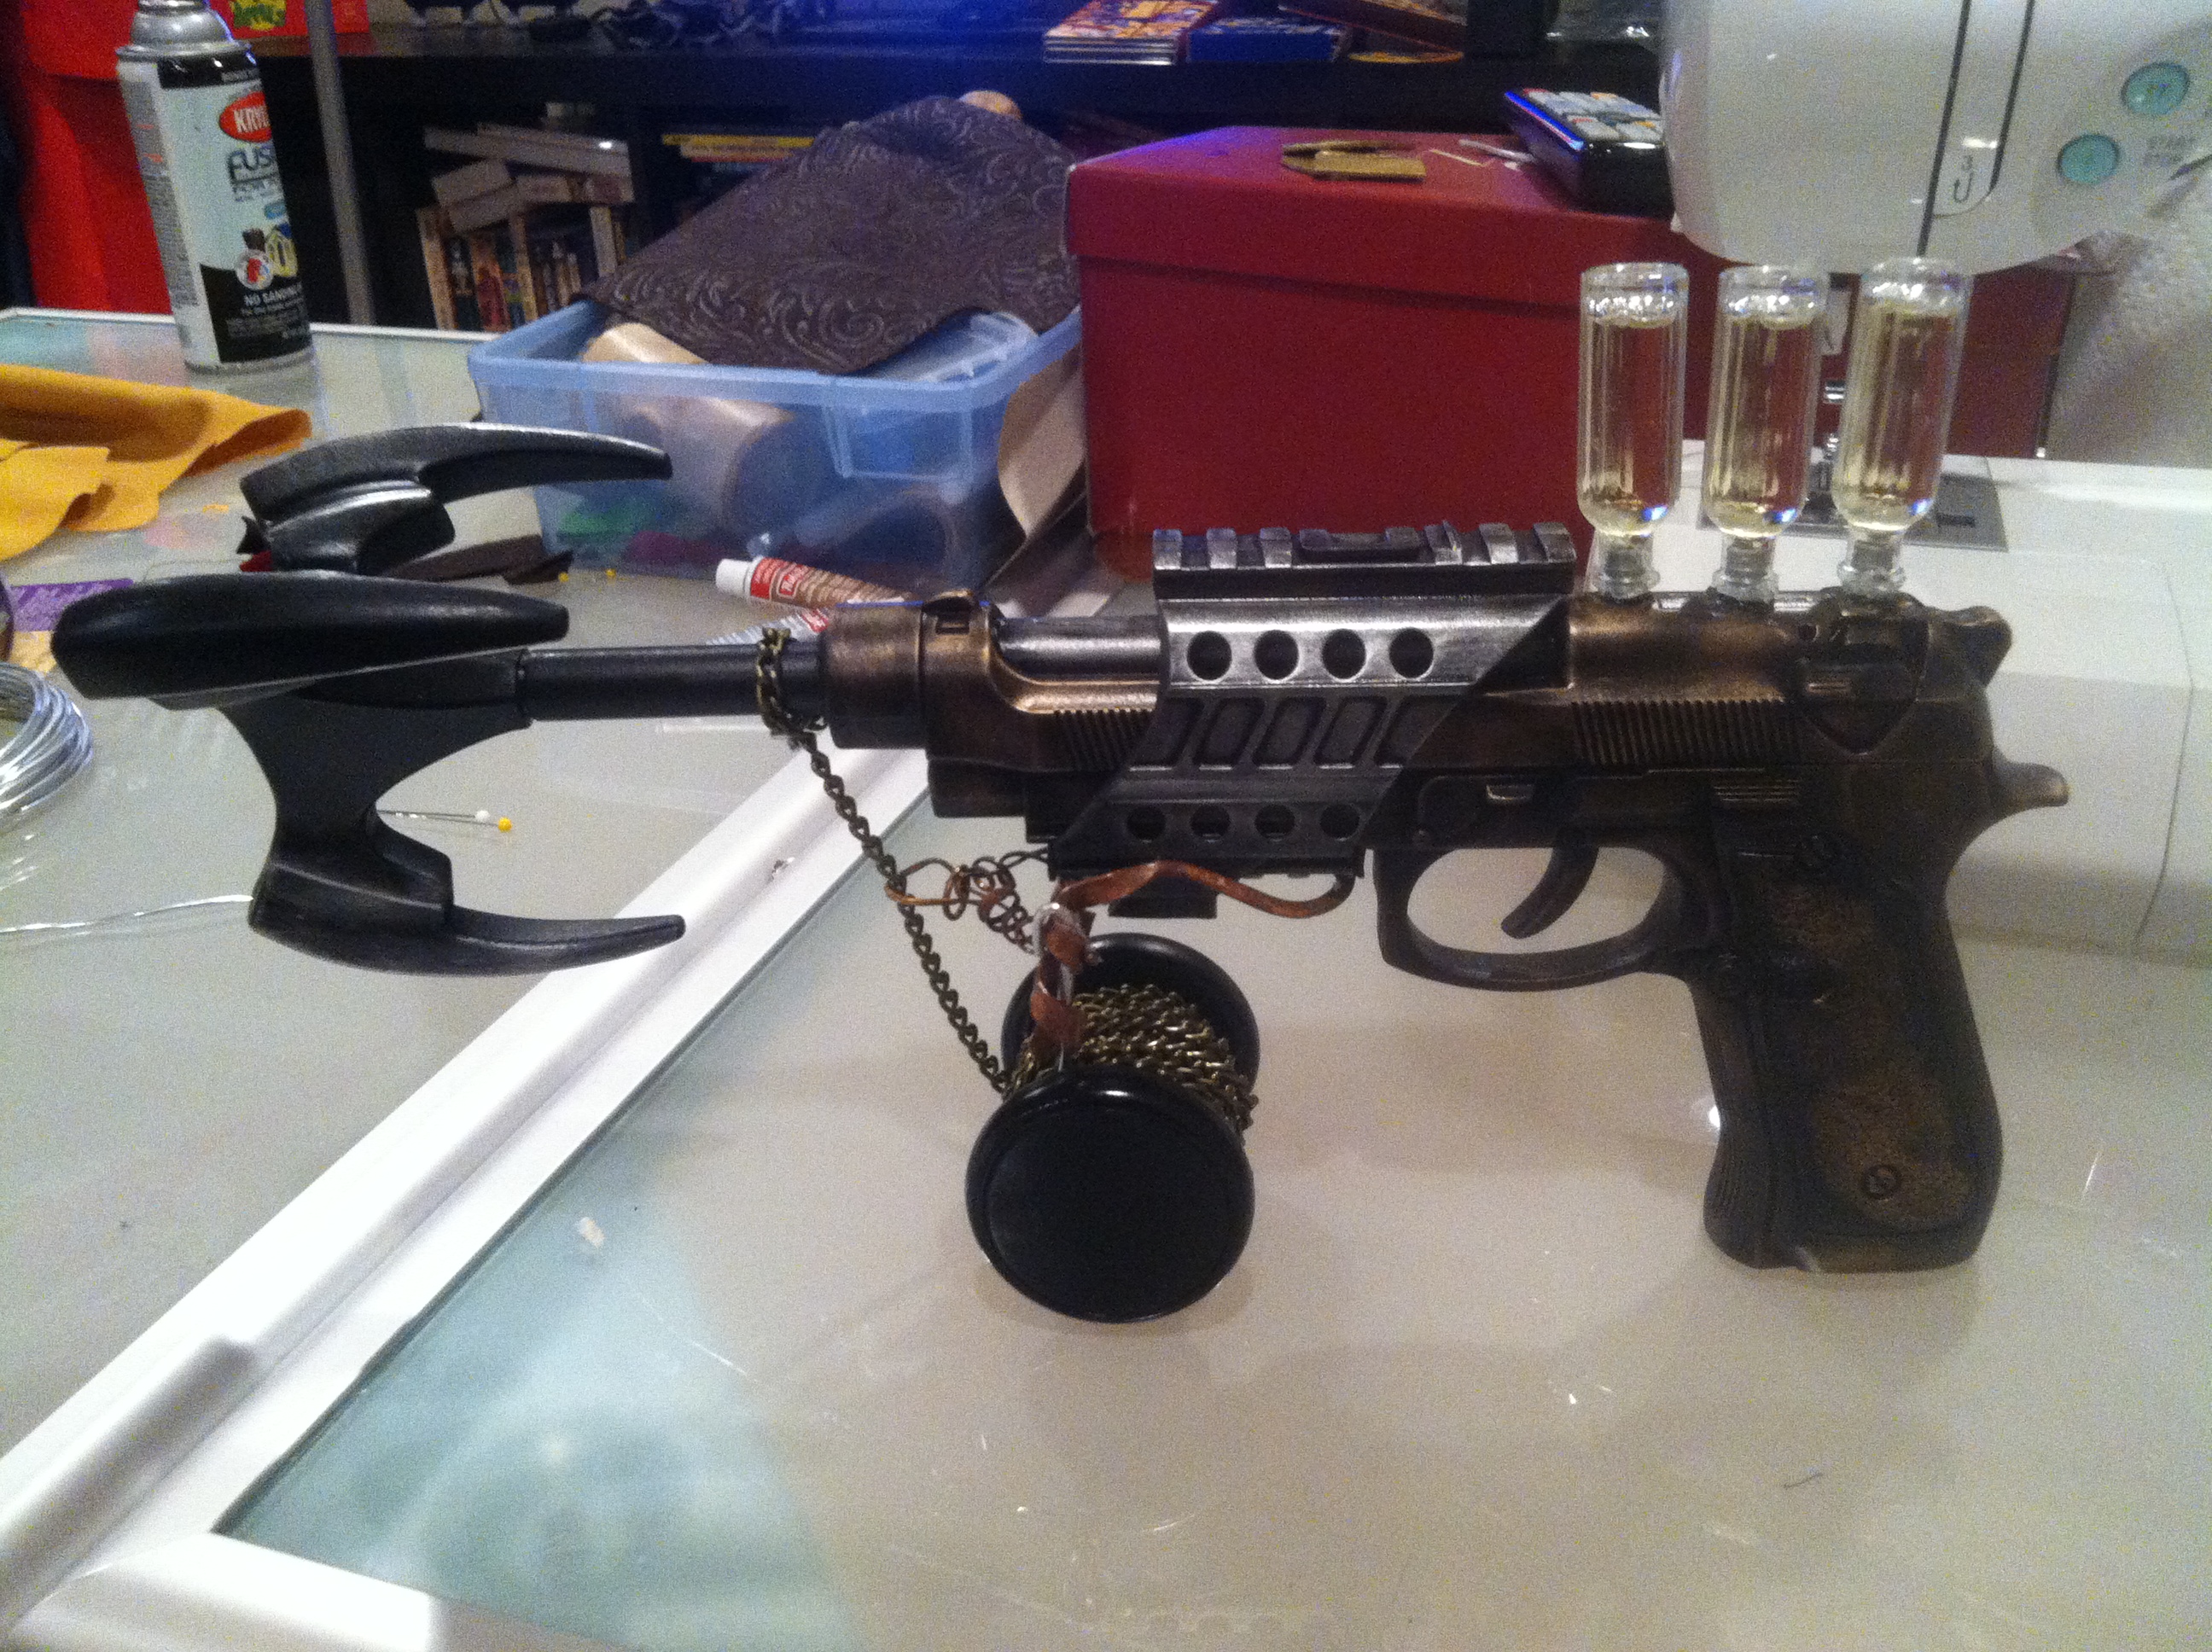 I bought a toy Batman grappling hook to go with my gun. I painted it black, using the same method described above, and then used a slight brush of Rub-n-Buff to give it a little bit of a metallic reflection. I cut off the handle of the grappling hook and glued it into the barrel of my gun. I lucked out and it fit perfectly. I attached very thin black chain (I think it was supposed to be used in jewelry making) to a Yo-Yo and wrapped it around until it looked like a convincing spool for a grapple gun. And finally I used thick copper wire to make a rigging to attach the yo-yo to the bottom of the gun.
I wanted my gun to have cool chemical chambers on it, so I started testing the cleaning liquids around my house in small bottles I bought at Micheal's. I ended up settling with Murphy's Oil (the kind you use to clean wood) because of its cool amber color and thick consistency. I filled three little perfume bottles with it, drilled three appropriately-sized holes in the top of my gun, and glued them into place. I was careful to glue them in such a way as to permanently seal the bottles as well. Sadly, there was a mishap in my workshop and one of the bottles ended up breaking. I still haven't found a matching bottle to replace it, so my grapple gun only has two canisters of super sticking liquid/super propellent on it.
Seriously, have fun with this last step. Wander around your local craft store or browse the internet and you will find some amazing things to work with! Lights, gears, piping, wood detailing, chemical chambers, moving parts, sound effects, and many other amazing things are possible, but you have to be brave enough to experiment a little.

Do-It-Yourself: Superhero Mask
 A good superhero mask can make or break a costume, whether it's for a kid's party, Halloween, or a convention. I use a very simple method to create my superhero masks, and with a few craft supplies and household items, you can create your own mask that will look great and be easy on your wallet!
Materials:
- Craft Foam - Packs run about $7 and individual sheets around $1.
- Styrofoam Wig Head - Found online or at wig shops for about $2 - $4.
- Scissors/ Xacto Knife/ razor blade
- Heat Gun / Hot Hair dryer
- Mod Podge (spray or brush on type)
- Masking Tape
- Spray Paint (optional)
Process:
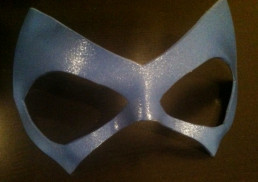
 Step 1: Decide what color and shape of mask you want. Get craft foam of the correct color (or as close as possible) and start sketching your shape lightly in pencil. The side you draw on will eventually become the back side of your mask, so don't worry about erasing mistakes perfectly. I use an Xacto knife or razor blade to cut my masks out because it's easier to get smooth edges on the foam. To insure that my masks are symmetrical, I usually draw one side, cut out almost all of it, then fold it over and trace it to make the other half of the mask.
 Step 2: Molding the foam mask to fit the contours of your face is very easy! Start by taping the mask in place on the foam wig head, making sure that the side with pencil marks becomes the back. Don't use pins because they can leave holes in the foam or will melt it if they heat up during this process. The tape might lose its grip if it gets too hot, but it will keep the mask in place for the beginning of the process.
Using a heat gun or a very hot hair dryer, start heating up the foam mask and gently pressing the mask into place. Be careful not to burn your finger or start melting the foam, especially if you are using a heat gun. If you smell something burning, STOP! I find that it works better to start in the middle of the mask near the nose since that area takes the most shaping, then move to the outer areas of the mask. Once you have the shape you like, let the mask cool completely before moving on to the next step.
 Step 3: If your mask is already the correct color, move on to step four, but if the foam is not the right color now is the time to paint your mask. Leave it on the Styrofoam head, re-taping it so that the tape is on the back of the mask only. Then carefully spray paint or paint the mask by hand. It's important to keep the mask on the head during this phase so that it keeps its new shape. I highly recommend testing your paint on a scrap of foam first because some paints will damage/melt foam. You will notice how messed up my Styrofoam head is in the pictures!
Step 4: After your mask is completely cooled and the paint is TOTALLY dry, you will seal your mask with a clear coat of Mod Podge. I usually use the spray on variety, which is available at craft stores, Wal-Mart and other places, but brushing it on can work as well. MAKE SURE THAT YOUR MASK IS STILL ON THE STYROFOAM HEAD WHEN YOU DO THIS and that the tape is attached to the back side. The Mod Podge will give your foam a shiny look and texture that resembles latex or leather. I recommend multiple coats of Mod Podge to give your mask more strength and to help it keep its shape. Let each coat dry completely before adding the next and leave the mask on the Styrofoam head for at least 24 hours after the last coat.
 Step 5: There are many methods to wear your new mask. You can punch holes on the sides of the mask and tie ribbon or string to it, then tie it behind your head. For the "superhero" look, I usually use spirit gum to attach it directly to my face. Spirit gum is pretty cheap and available at most costume stores. Be sure to buy it in a pack with the spirit gum remover. Trust me on that. I learned the hard way. I also recommend testing it out on a small spot on your before the event, just in case it irritates your skin. You don't want to show up to work on Monday with a raccoon mask rash!
This technique seems simple, but it can create amazing things! With practice, patience, and a little creativity, you will be able to create incredible masks and finish off even the most professional costumes!
Do-It-Yourself: Steampunk Bustle Skirt
 The bustle skirt was my favorite part of my Steampunk Batgirl costume. I wanted to create an item that was a steampunk staple, but still hint at the traditional cape that Batgirl is famous for wearing. The skirt is a simple six-panel skirt that is just missing the front three panels. Don't know what that means? That's ok, keep reading and I will do my best to explain. (I simplified some steps in this process, but it will end up looking just like my skirt.)
Waistband
The first thing you need to figure out is the length of your waistband. Measure your TRUE waist, which should be the narrowest part of your torso, a little above your belly button. If you are going to wear the skirt under a corset subtract one inch from that measurement, otherwise add one inch to the measurement.
Example: Waist measurement: 28 inches
Under Corset: 27 inches
Not under corset: 29 inches
 This will end up being the length of your waistband, including seam allowances. The under corset length is smaller to accommodate the smaller waist size and avoid uncomfortable bunching under the corset. Measure and cut a rectangular strip if your fabric, using your adjusted waist measurement as the length and a width of 4 inches.
Take your waistband strip and iron some interfacing on the underside of it. You don't need heavy duty interfacing, just some regular weight stuff to give the waistband some structural strength. MAKE SURE THAT YOU BUY IRON-ON INTERFACING. It will make your life a LOT easier, so ask the store personnel if you are unsure. It's really easy to buy the wrong stuff, and we all hate the walk of shame back through the fabric store that you left 20 minutes ago.
 Before you start sewing, you will want to iron creases into your waistband because it will make things much faster. Fold it over length-wise and iron it until it holds the crease down the center, then fold half inch folds along each edge of the waistband and iron until they hold creases as well. These mark your seam allowances and the creases will make the sewing easier.
 Fold the waistband lengthwise, with the interfacing on the outside. This should be folded opposite of the ironed seam that you ironed earlier. You will then sew the ends closed on the half inch creases that you ironed earlier, but make sure that the lengthwise half inch seams are sewn in the folded position.
Now you are done prepping your waistband! You will turn it right-side out later, but for now we will move on to the panels!
Panels
 I traced my panels from a floor-length skirt onto large pieces of butcher paper (ok, so they were old DnD maps, sue me). Those panels are about 13 inches wide across the top, 34 inches wide across the bottom, and 42 inches long, but I added about 5 more inches on both sides and an extra foot to the length of my panel outline. The fuller you want your bustle, the more fabric you need to add to each panel. I used three enlarged panels to create my steampunk skirt. Remember, always trace an cut patterns length-wise according to the weave of the fabric, just like the picture to the right.
PLEASE NOTE: Only add extra inches of fabric to the panels that you are going to use for the bustle. You won't want to add as much/any extra fabric to the panel pattern for the front of the skirt or you will trip all over it.
 Then sew the panels together by matching the edges and stitching them together to form a circle or semi-circle, like the picture to the left. My skirt only used three panels since it only went half way around my body. Full skirts will usually use five or more panels. Make sure your seams are all facing the same direction on your skirt as you sew. After you sew your panels together, you will want to finish your edges on the underside of the skirt and hem the outer edges. This video shows you ways to do that.
Put it all Together
Now you will pin the panels to the waistband before you sew them. You will choose one of the lengthwise half-inch seam allowances and pin the panels to, and start by pinning the front edges of the skirt to the appropriate place on the waistband. For my skirt, I wanted the skirt to open right in front of my hip bones so that my bloomers and garters would show. The easiest way to do this is to safety pin the waistband on yourself, then pin the front edges of the skirt to where you want them on the waistband.

 Once the front pins are in place, you will need to make pleats to gather the rest of the skirt fabric to the waistband. You will basically fold the fabric over itself, then pin it into place. This it the most tedious part of making the skirt, but remember that the pleats do not have to be perfect.
Once you are done pinning the skirt, carefully sew the pleats in place on the side that you pinned. Iron the pleats flat after you sew them, then close the waistband (be careful that the other seam allowance is folded up inside), and then sew it shut across the bottom.
Bustling the Bustle
Now your basic skirt is finished, it's time to add the bustle. The easiest way is to put your skirt on the dress form and start pinning. There isn't really a magic formula, just start pulling spots and pinning them to higher places to give it the tiered appearance. Once you have everything looking good, hand stitch each spot where you pinned. Don't start sewing until your whole bustle is pinned, because you will probably change your mind... a few times.


Bat Wings
 The "bat" part of the skirt was actually designed to be a completely separate piece. It was made just like a cape, and is hand stitched into the waistband so that it can be detached and reattached very easily. I did that to give the skirt more versatility as a costume piece. I can now wear it with my
 steampunk batgirl, or remove it to be just steampunk!
I measured and drew the desired shape on butcher paper (another old DnD map) and traced one on the black and one on the yellow fabrics. I then carefully cut them out and pinned them together, starting with the point of each bat wing shape to be sure they lined up correctly. I then stitched them together and turned it inside out to hide the edges, just like a simple cape design. Originally, I had planned to add interfacing to give the wings some stiffness and shape, but I really liked how the material flowed without it. Then I simply closed up the top of the "wings" and hand stitched it into the waistband of the skirt, underneath the already finished bustle.


Have questions? Need clarification? Post a reply or email me at Kimi@goldenlasso.net