Do-It-Yourself: Steampunk Weapon
Prop making is one of the most challenging aspects of cosplay and costume making. For this tutorial, I will be showing you how to modify a plastic toy gun into a Steampunk grapple gun. I wanted to do something very specific for my Steampunk Batgirl costume, but you can use many of these techniques to modify other plastic weapons. It also happens to be my favorite part of any costume, and something that I don't get to do nearly enough. The details of a prop can really push a costume to the next level, especially when it comes to Steampunk!
Step one: Choose your Weapon
 The first, and most important step of making a steampunk weapon is choosing the toy weapon you are going to modify. Take your time. Plan out exactly what you want and don't give up until you find it! Walk around the toy isles, shop online, and check out local Goodwill stores until you find the perfect toy. Don't worry about the color, focus on the shape and how it's built. Avoid guns that are easily recognizable as a specific model, unless that's the look you want (Oops). Make sure the toy is sturdy, that it's made of all plastic (rubber and metal will change how you have to modify it), and if it will be easy to disassemble or mask with tape for the painting process.
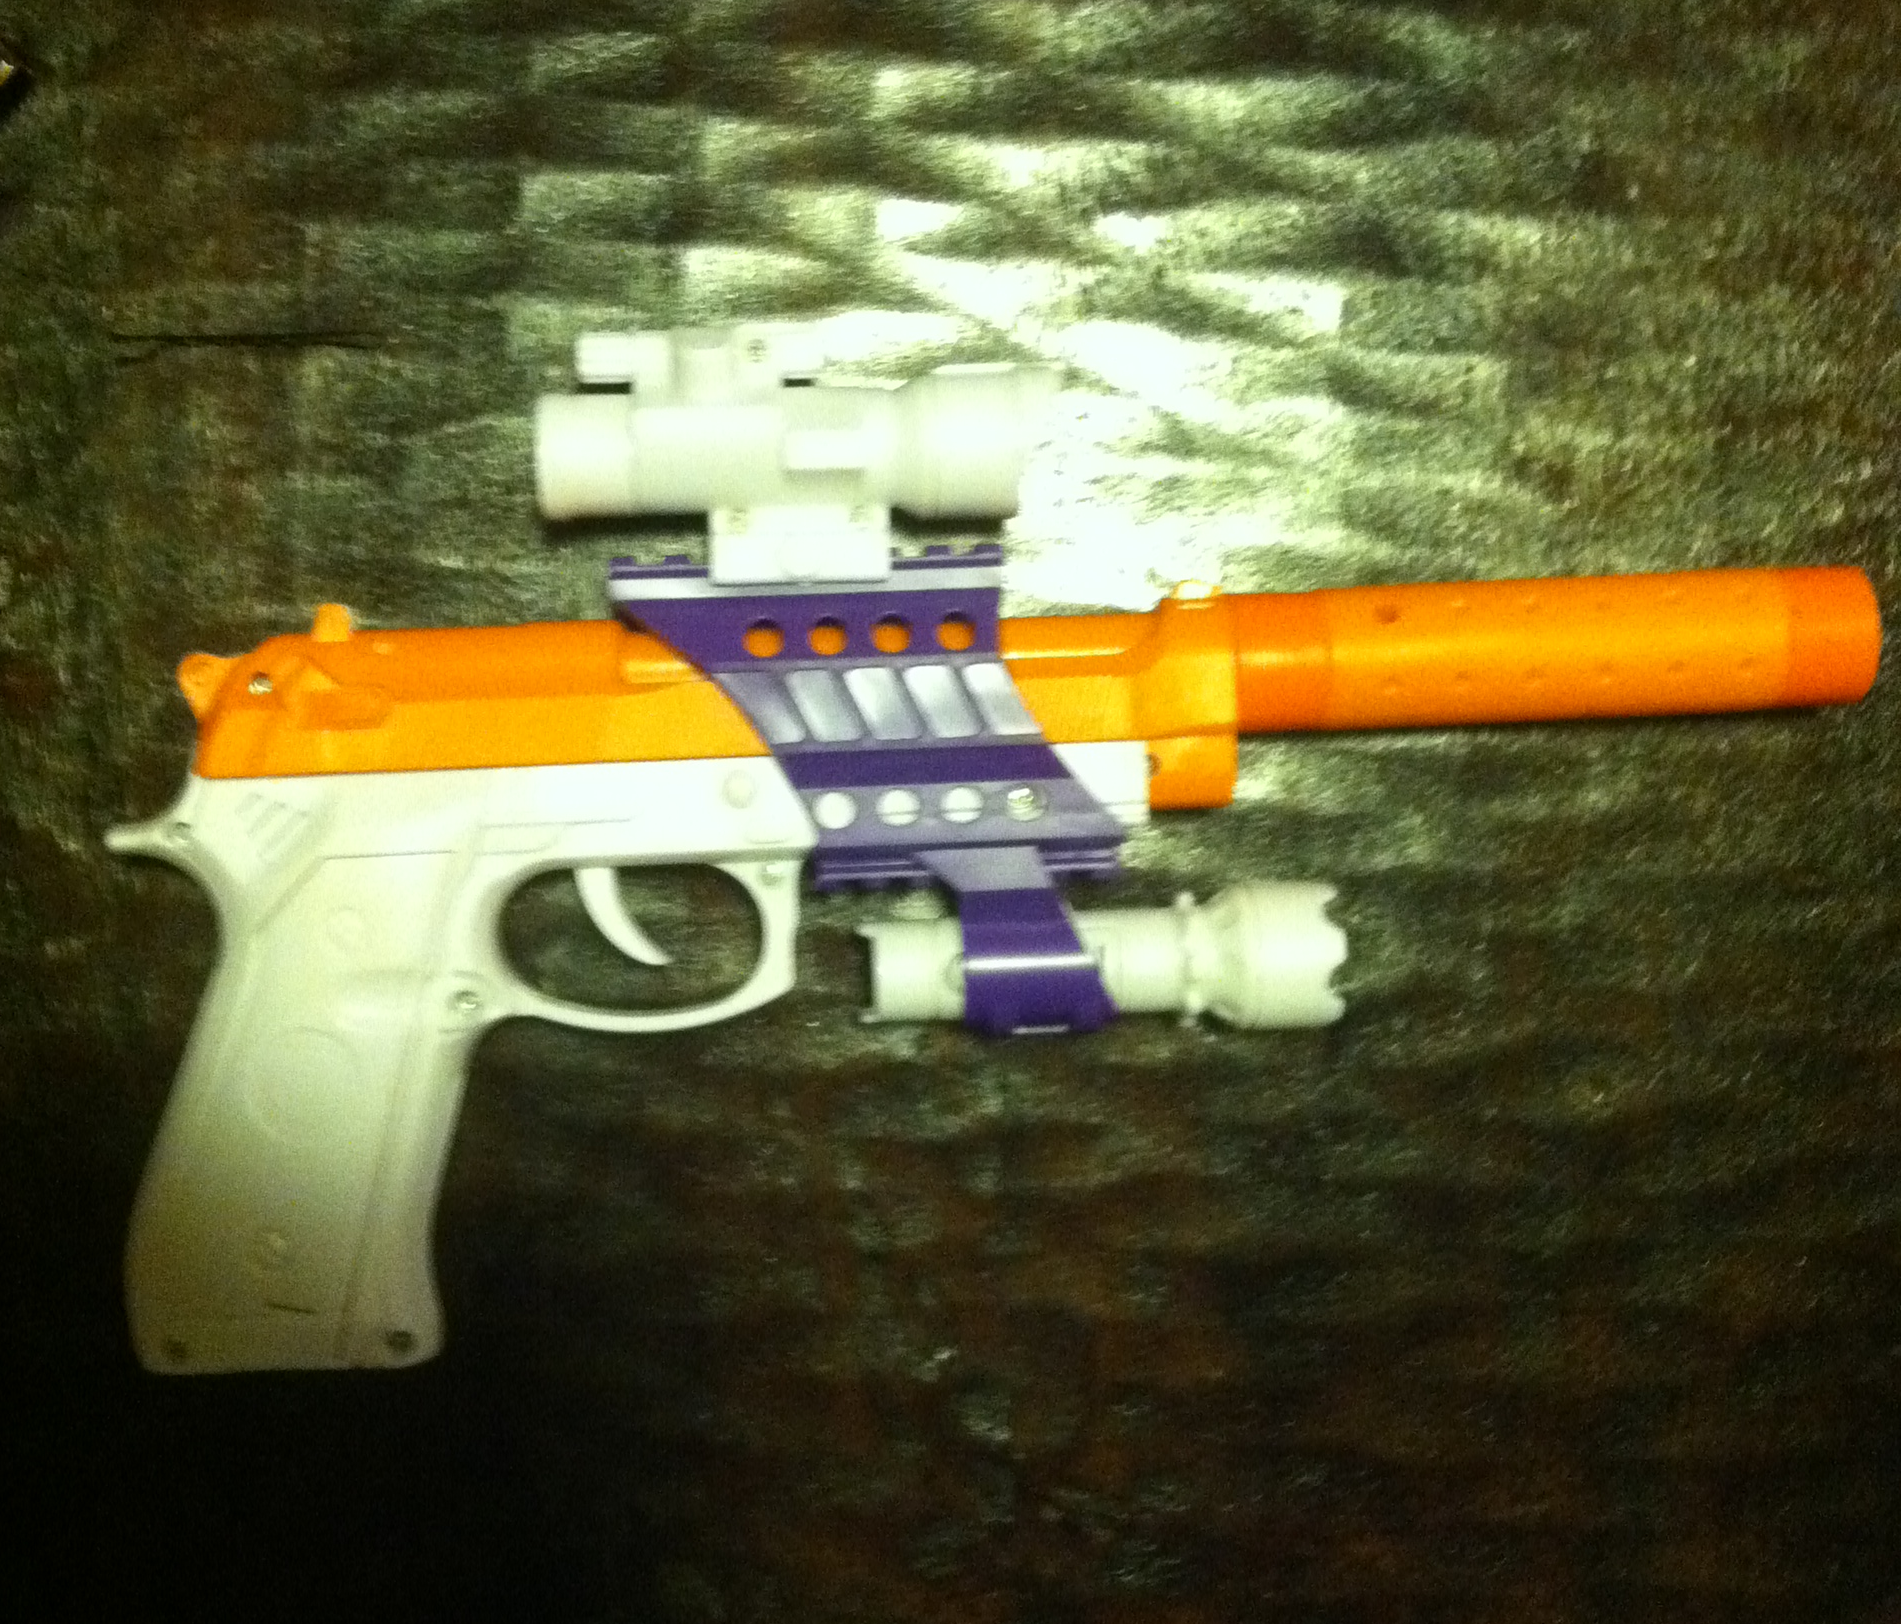
The gun pictured is the one I chose. I ended up not using the sights or the silencer that came with it, but the purple details ended up looking pretty cool by the end. Again, color doesn't matter at all.
Step Two: Prep for Paint
This is the most boring step, but it's vital if you want a good looking product by the end of this process. You will need fine grain sandpaper and dish soap. Carefully sand away any imperfections on the gun, without taking away too much or leaving scratches in the plastic. The goal is to make the gun as smooth and realistic as possible. Again, don't worry about the color of the gun, just focus on the texture of its surface.
When you have finished sanding the gun, wash it in normal water and dish washing liquid. You will have to wash your gun with damp rags if it has electronic parts and can't get totally wet. Be sure to rinse the gun thoroughly so soap residue doesn't mess up your painting later. Dry it with a rag and wait a few hours to insure it's completely dry before moving on to Step Three.
Step Three: Primer
 Be careful not to handle the gun too much before you paint it. Oils from your hands can impact the paint. I always use Krylon Fusion spray paint for plastics. For this project, I used black paint with a satin finish.
Take care to keep the spray can at least a foot from the gun and spray a thin layer of the paint, don't worry if you still see the original color through this first layer. Let the layer dry completely, and then add another. Keep adding thin layers until the gun is completely covered. MAKE SURE that each layer dries completely before adding the next, and that the layers stay thin, or you will get drips that ruin the look of your gun.
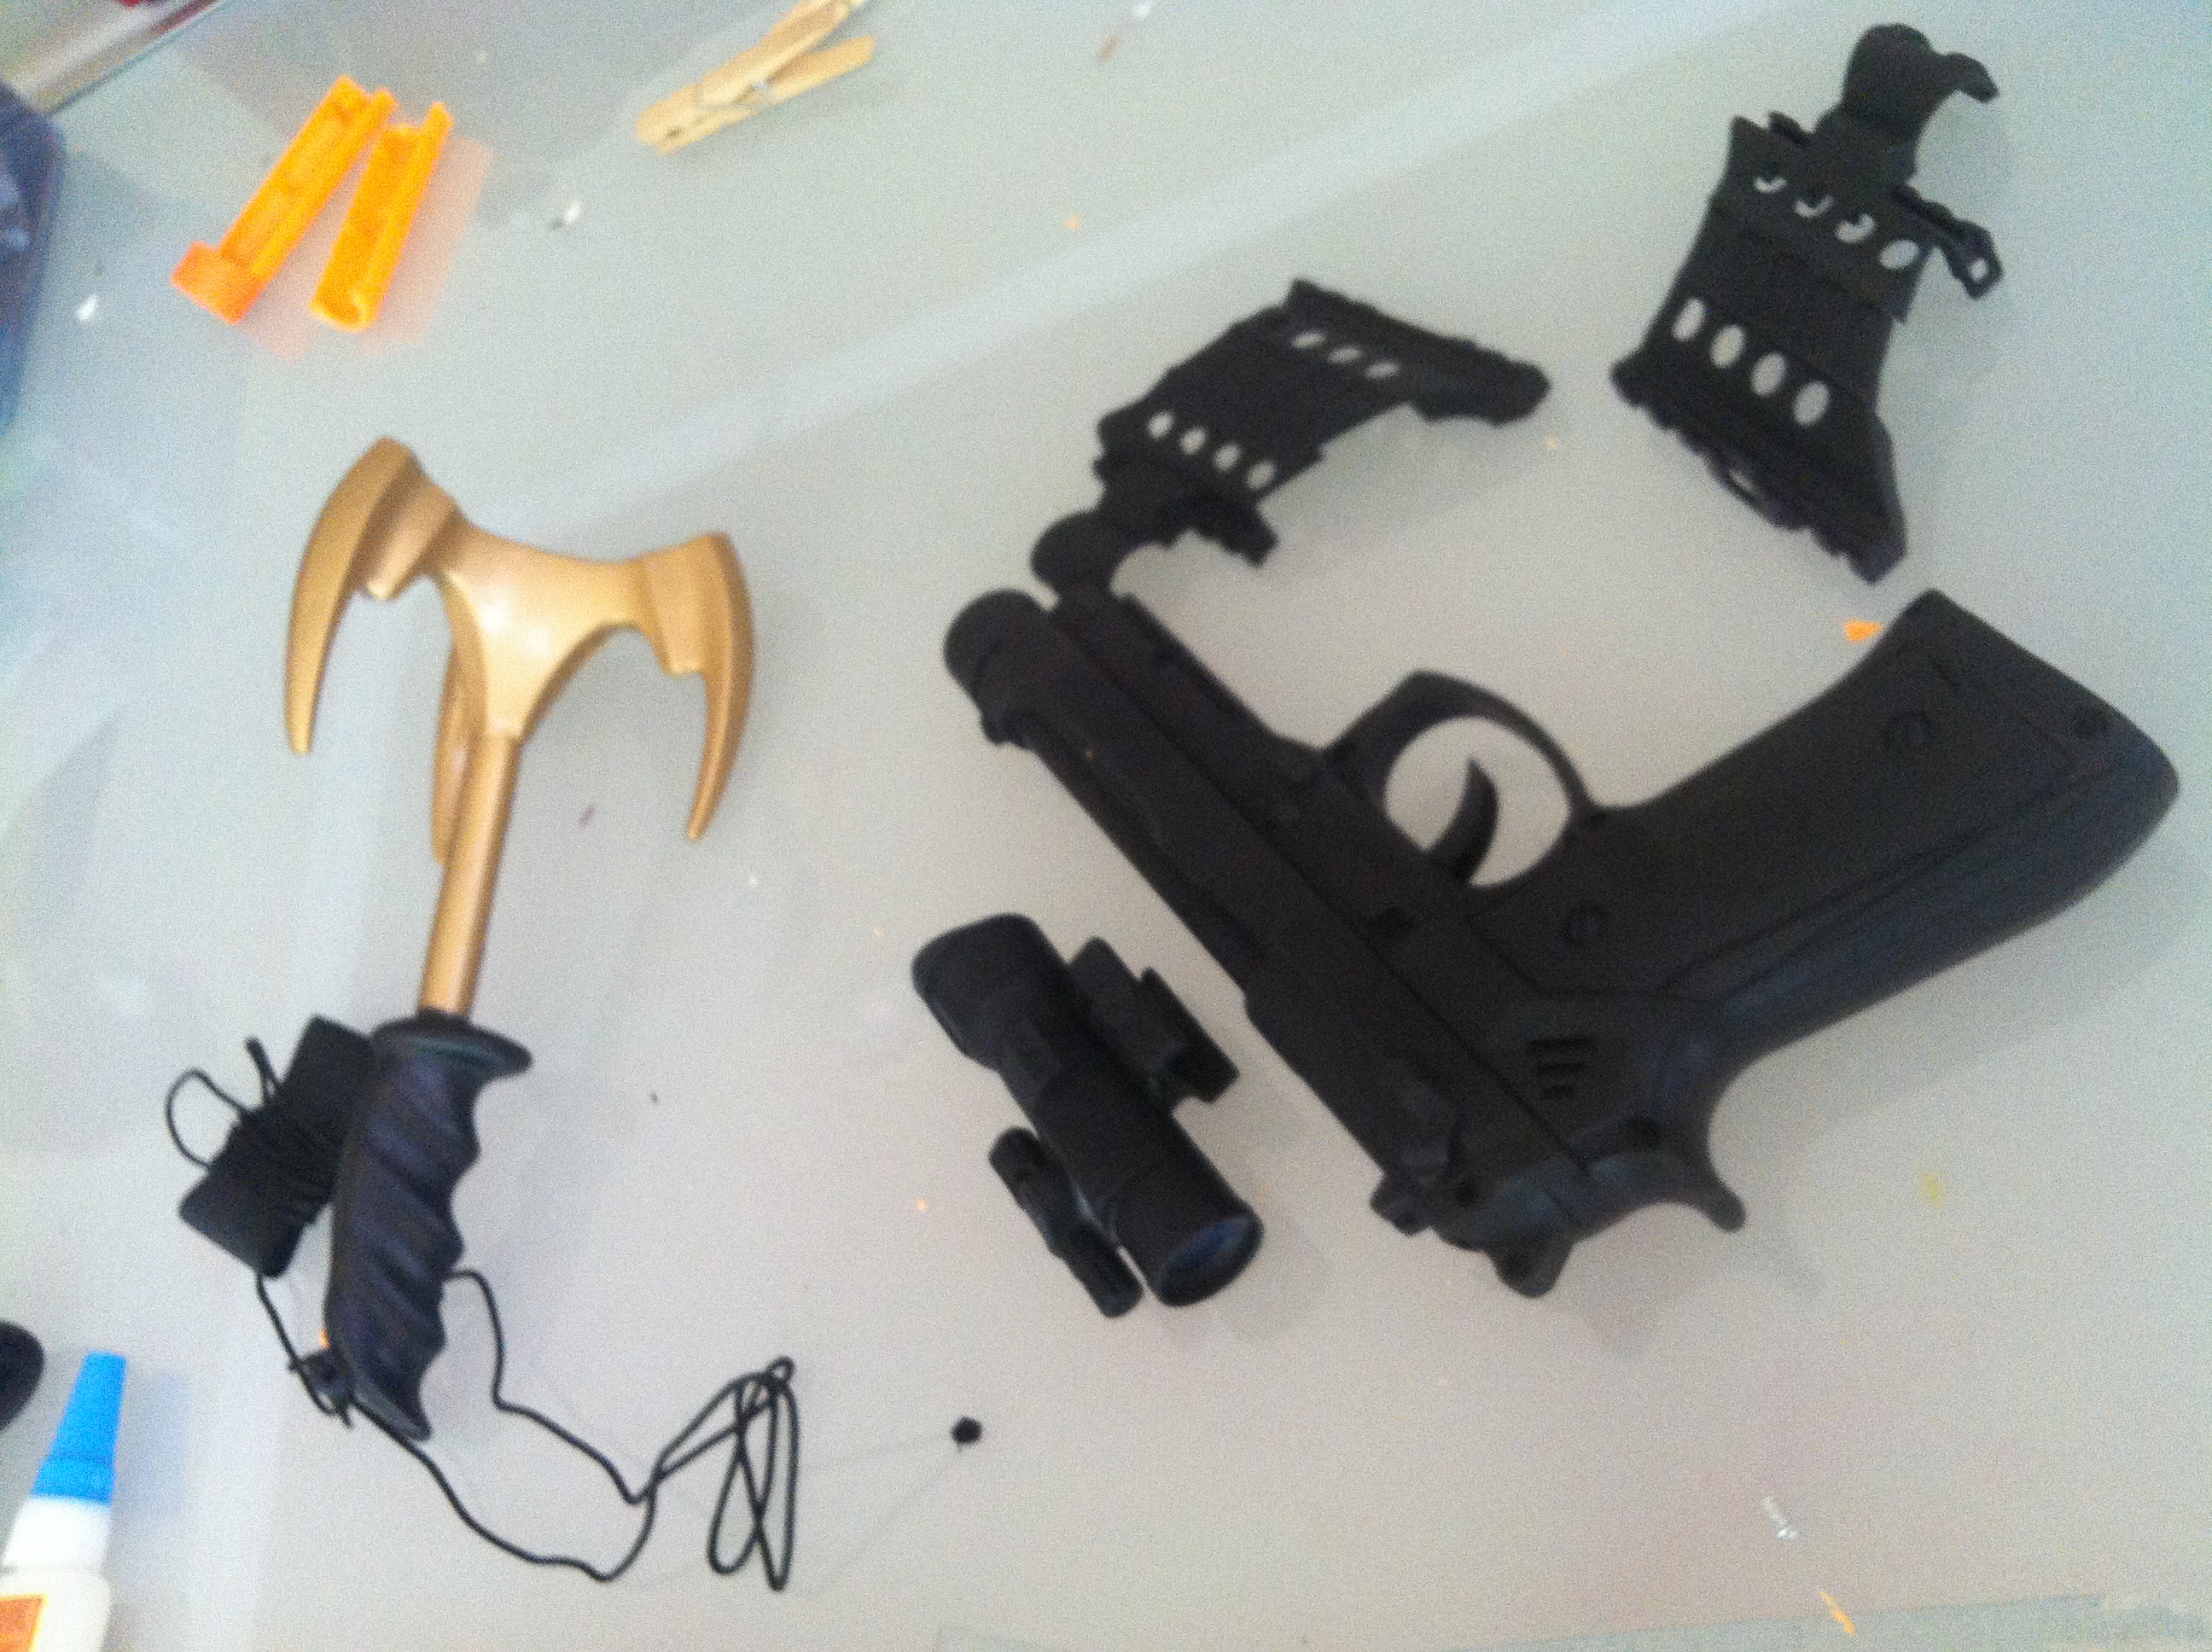
My gun ended up looking VERY modern and recognizable with the black primer on it. I was really worried by this point, but kept on going. Notice I painted all the parts just in case I decided to use them later. (The grappling hook is part of Step 5.)
Step Four: Metalize
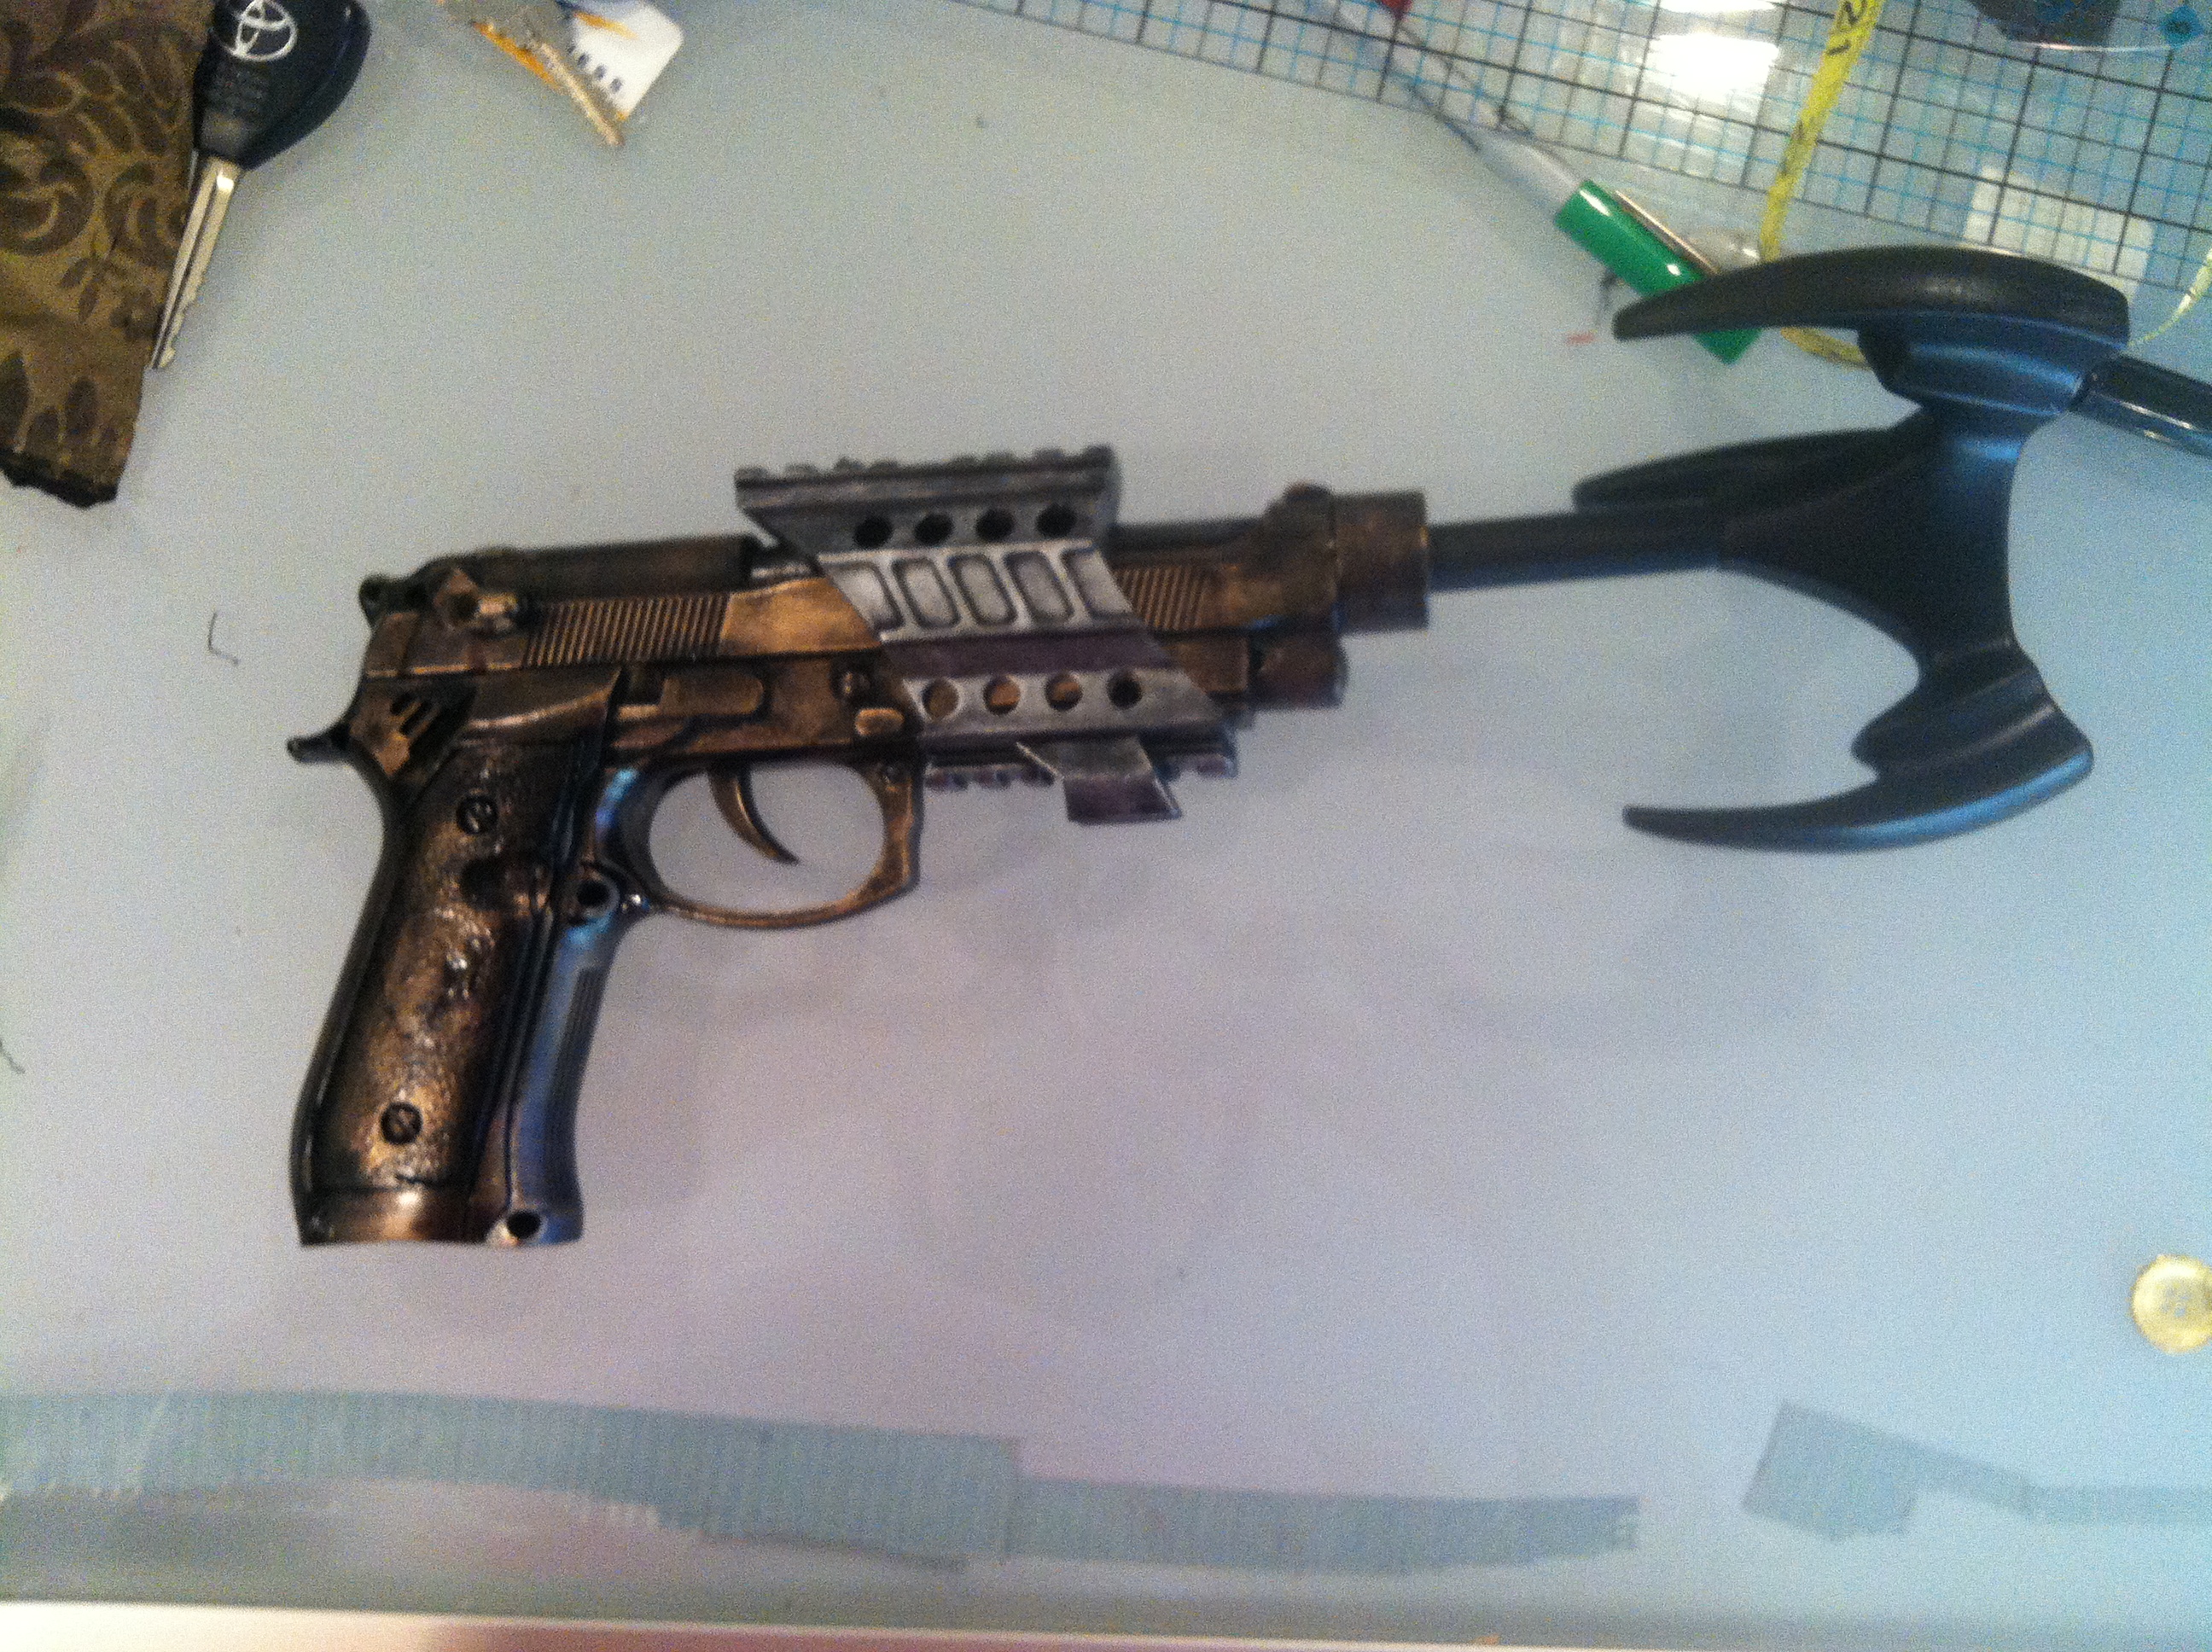 You will need an amazing substance called Rub-n-Buff to make the gun look metallic. It comes in small tubes, but don't let that fool you, a little goes a LONG way. It comes in tons of colors, I used the silver shade and the antique gold for my gun. Different metal looks all put together in one weapon really make something look steampunk, so don't hesitate to use two or three different colors on the different parts of your gun.
You are going to use the Rub-n-Buff to highlight the metal areas of your gun by hand. This of it more as a polish than a paint. Put a small dot of it on a smooth cloth, then carefully start applying it to your weapon. I HIGHLY suggest you practice on something else first to get a feel for it. Remember how you slowly added more and more primer paint to your gun in step three? Start with a tiny bit and then add more. I left a lot of black showing in the crevices of my gun to make it look grimy and old. As you "buff" your weapon, think about what parts of the gun's surface would get touched or rubbed against things the most. Those areas should be the brightest and the crevices should stay darker.
Let the Rub-n-Buff dry for a few hours. It is wax-based and rubs off on everything while wet, so be careful!
Step Five: Customize
This is where you get to let your creativity run wild! My steampunk weapon is a grapple gun, so I will tell you what I did to stylize my weapon in that manner, but don't limit yourself! Do a Google image search and get inspired.
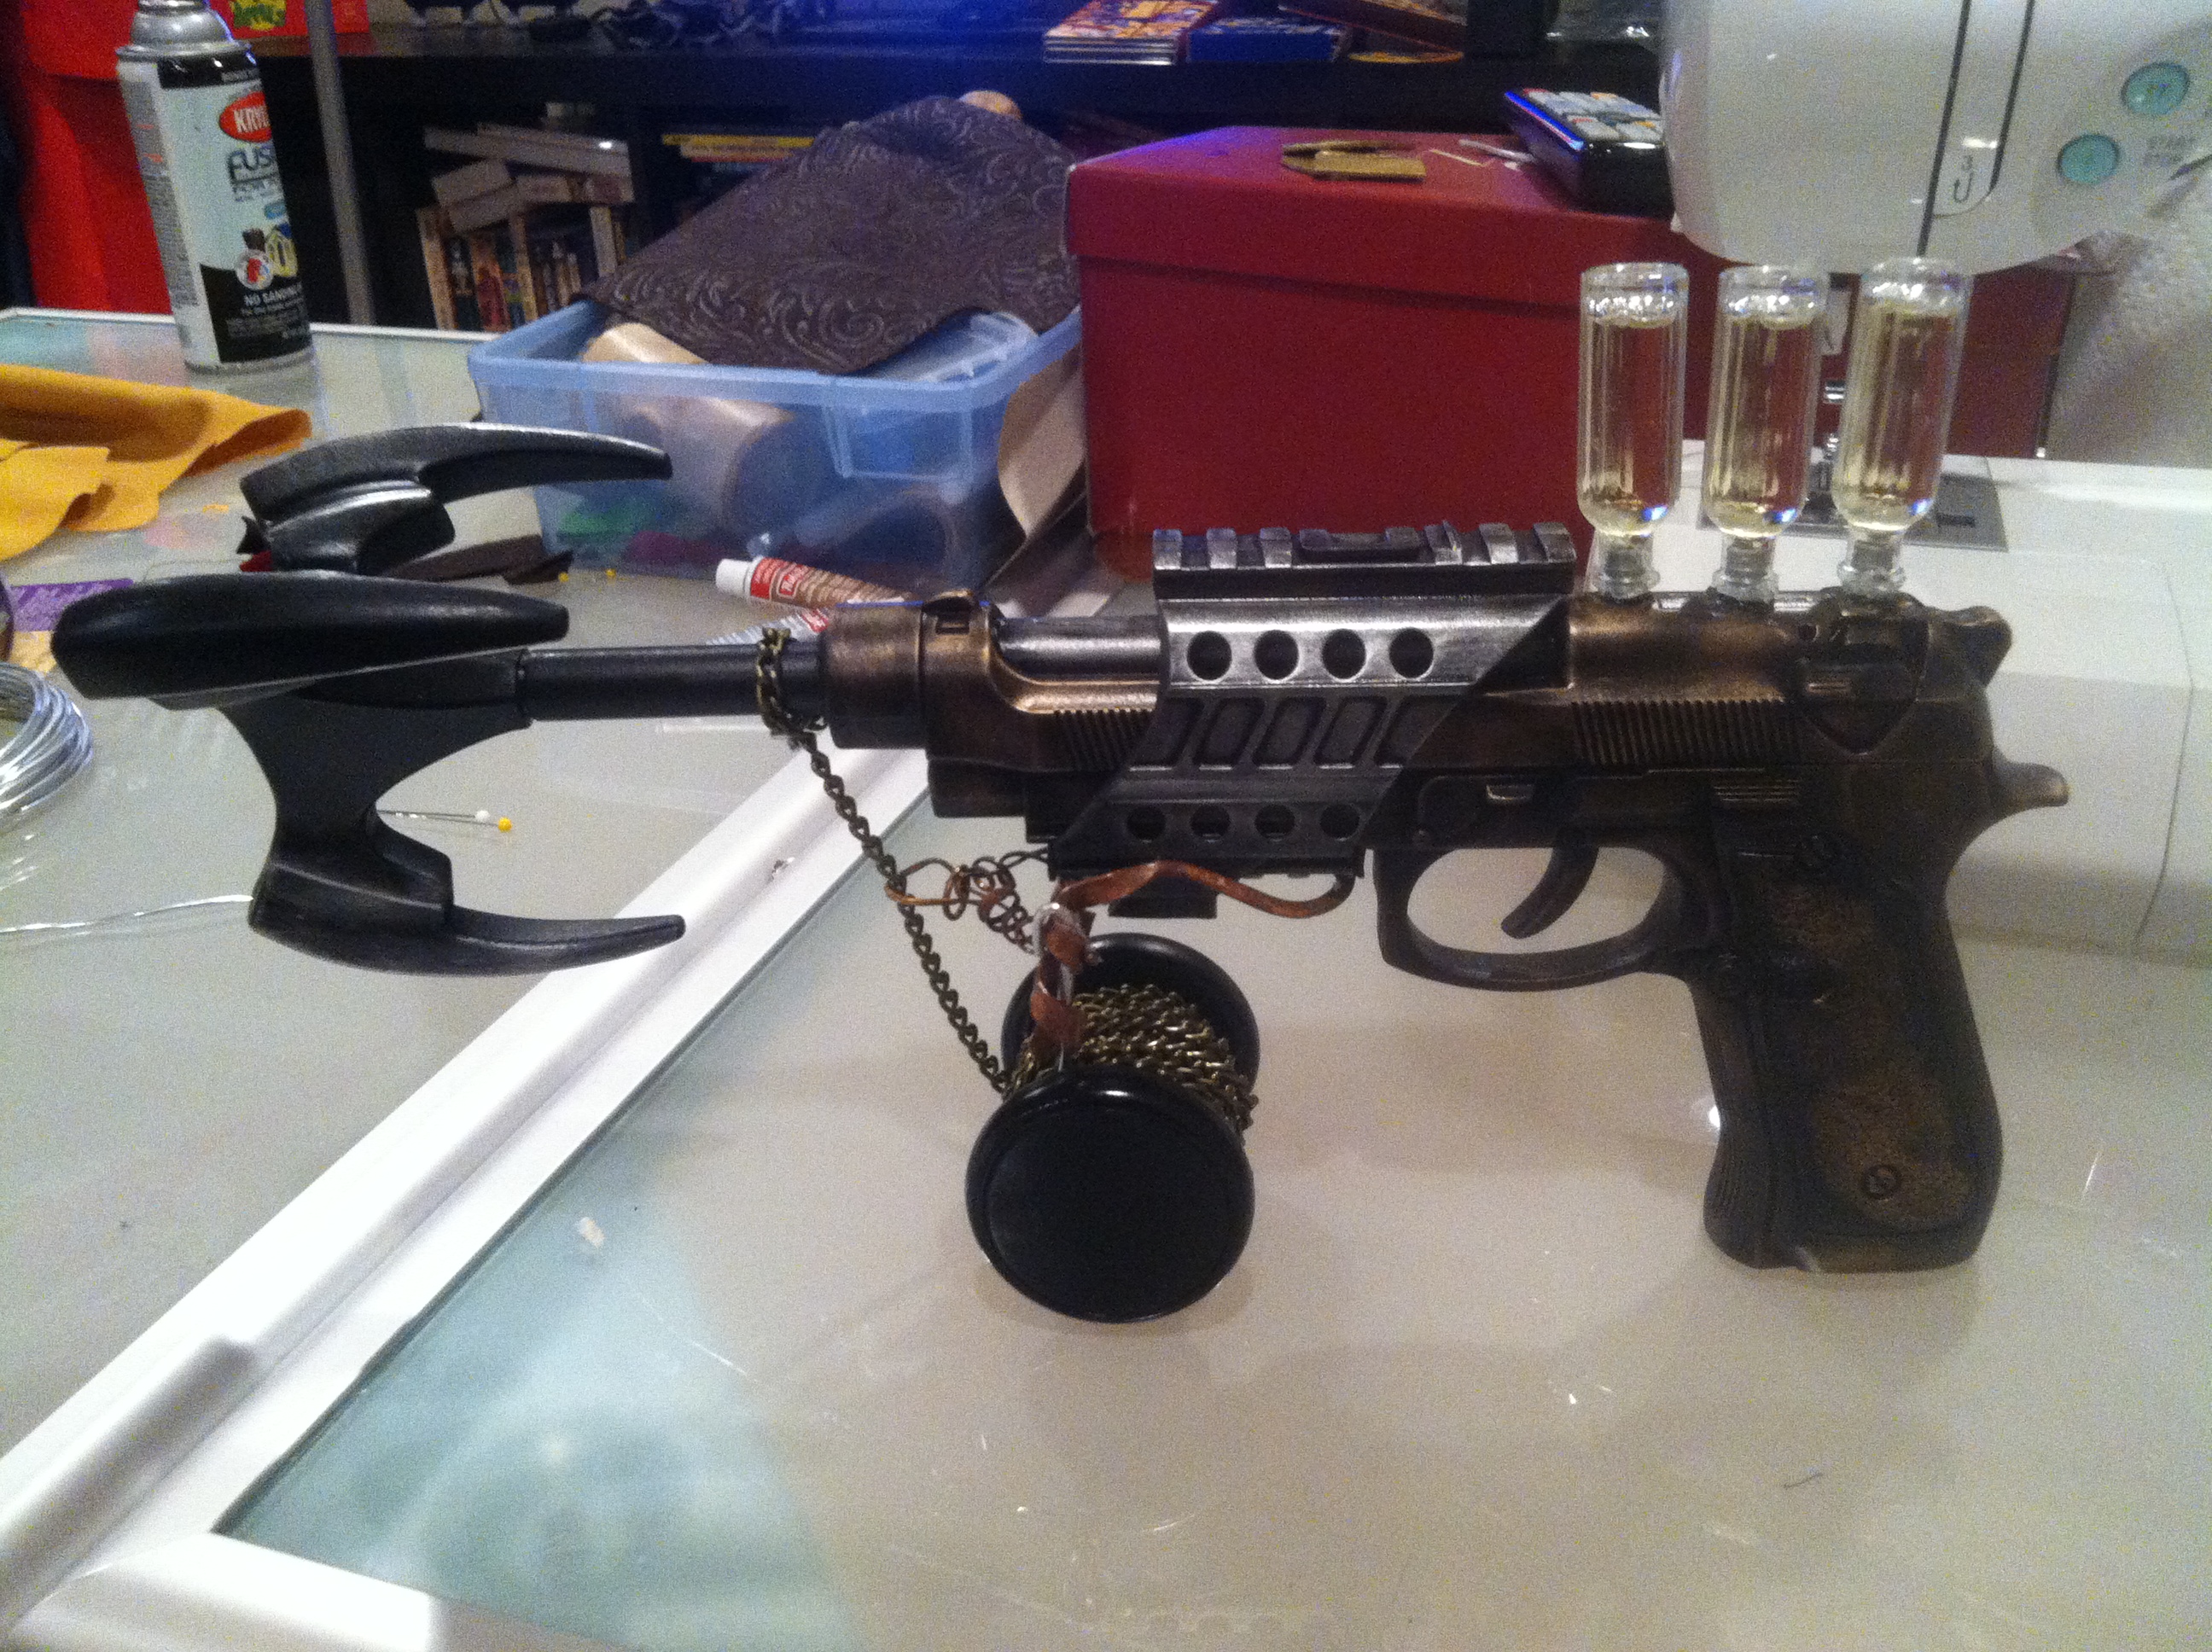 I bought a toy Batman grappling hook to go with my gun. I painted it black, using the same method described above, and then used a slight brush of Rub-n-Buff to give it a little bit of a metallic reflection. I cut off the handle of the grappling hook and glued it into the barrel of my gun. I lucked out and it fit perfectly. I attached very thin black chain (I think it was supposed to be used in jewelry making) to a Yo-Yo and wrapped it around until it looked like a convincing spool for a grapple gun. And finally I used thick copper wire to make a rigging to attach the yo-yo to the bottom of the gun.
I wanted my gun to have cool chemical chambers on it, so I started testing the cleaning liquids around my house in small bottles I bought at Micheal's. I ended up settling with Murphy's Oil (the kind you use to clean wood) because of its cool amber color and thick consistency. I filled three little perfume bottles with it, drilled three appropriately-sized holes in the top of my gun, and glued them into place. I was careful to glue them in such a way as to permanently seal the bottles as well. Sadly, there was a mishap in my workshop and one of the bottles ended up breaking. I still haven't found a matching bottle to replace it, so my grapple gun only has two canisters of super sticking liquid/super propellent on it.
Seriously, have fun with this last step. Wander around your local craft store or browse the internet and you will find some amazing things to work with! Lights, gears, piping, wood detailing, chemical chambers, moving parts, sound effects, and many other amazing things are possible, but you have to be brave enough to experiment a little.

Do-It-Yourself: Superhero Mask
 A good superhero mask can make or break a costume, whether it's for a kid's party, Halloween, or a convention. I use a very simple method to create my superhero masks, and with a few craft supplies and household items, you can create your own mask that will look great and be easy on your wallet!
Materials:
- Craft Foam - Packs run about $7 and individual sheets around $1.
- Styrofoam Wig Head - Found online or at wig shops for about $2 - $4.
- Scissors/ Xacto Knife/ razor blade
- Heat Gun / Hot Hair dryer
- Mod Podge (spray or brush on type)
- Masking Tape
- Spray Paint (optional)
Process:
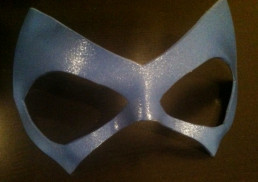
 Step 1: Decide what color and shape of mask you want. Get craft foam of the correct color (or as close as possible) and start sketching your shape lightly in pencil. The side you draw on will eventually become the back side of your mask, so don't worry about erasing mistakes perfectly. I use an Xacto knife or razor blade to cut my masks out because it's easier to get smooth edges on the foam. To insure that my masks are symmetrical, I usually draw one side, cut out almost all of it, then fold it over and trace it to make the other half of the mask.
 Step 2: Molding the foam mask to fit the contours of your face is very easy! Start by taping the mask in place on the foam wig head, making sure that the side with pencil marks becomes the back. Don't use pins because they can leave holes in the foam or will melt it if they heat up during this process. The tape might lose its grip if it gets too hot, but it will keep the mask in place for the beginning of the process.
Using a heat gun or a very hot hair dryer, start heating up the foam mask and gently pressing the mask into place. Be careful not to burn your finger or start melting the foam, especially if you are using a heat gun. If you smell something burning, STOP! I find that it works better to start in the middle of the mask near the nose since that area takes the most shaping, then move to the outer areas of the mask. Once you have the shape you like, let the mask cool completely before moving on to the next step.
 Step 3: If your mask is already the correct color, move on to step four, but if the foam is not the right color now is the time to paint your mask. Leave it on the Styrofoam head, re-taping it so that the tape is on the back of the mask only. Then carefully spray paint or paint the mask by hand. It's important to keep the mask on the head during this phase so that it keeps its new shape. I highly recommend testing your paint on a scrap of foam first because some paints will damage/melt foam. You will notice how messed up my Styrofoam head is in the pictures!
Step 4: After your mask is completely cooled and the paint is TOTALLY dry, you will seal your mask with a clear coat of Mod Podge. I usually use the spray on variety, which is available at craft stores, Wal-Mart and other places, but brushing it on can work as well. MAKE SURE THAT YOUR MASK IS STILL ON THE STYROFOAM HEAD WHEN YOU DO THIS and that the tape is attached to the back side. The Mod Podge will give your foam a shiny look and texture that resembles latex or leather. I recommend multiple coats of Mod Podge to give your mask more strength and to help it keep its shape. Let each coat dry completely before adding the next and leave the mask on the Styrofoam head for at least 24 hours after the last coat.
 Step 5: There are many methods to wear your new mask. You can punch holes on the sides of the mask and tie ribbon or string to it, then tie it behind your head. For the "superhero" look, I usually use spirit gum to attach it directly to my face. Spirit gum is pretty cheap and available at most costume stores. Be sure to buy it in a pack with the spirit gum remover. Trust me on that. I learned the hard way. I also recommend testing it out on a small spot on your before the event, just in case it irritates your skin. You don't want to show up to work on Monday with a raccoon mask rash!
This technique seems simple, but it can create amazing things! With practice, patience, and a little creativity, you will be able to create incredible masks and finish off even the most professional costumes!
Do-It-Yourself: Steampunk Bustle Skirt
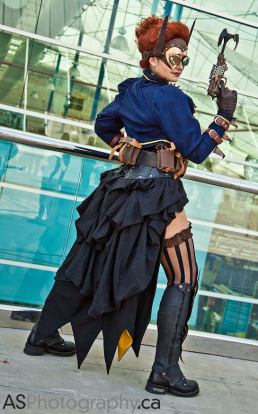
 The bustle skirt was my favorite part of my Steampunk Batgirl costume. I wanted to create an item that was a steampunk staple, but still hint at the traditional cape that Batgirl is famous for wearing. The skirt is a simple six-panel skirt that is just missing the front three panels. Don't know what that means? That's ok, keep reading and I will do my best to explain. (I simplified some steps in this process, but it will end up looking just like my skirt.)
Waistband
The first thing you need to figure out is the length of your waistband. Measure your TRUE waist, which should be the narrowest part of your torso, a little above your belly button. If you are going to wear the skirt under a corset subtract one inch from that measurement, otherwise add one inch to the measurement.
Example: Waist measurement: 28 inches
Under Corset: 27 inches
Not under corset: 29 inches
 This will end up being the length of your waistband, including seam allowances. The under corset length is smaller to accommodate the smaller waist size and avoid uncomfortable bunching under the corset. Measure and cut a rectangular strip if your fabric, using your adjusted waist measurement as the length and a width of 4 inches.
Take your waistband strip and iron some interfacing on the underside of it. You don't need heavy duty interfacing, just some regular weight stuff to give the waistband some structural strength. MAKE SURE THAT YOU BUY IRON-ON INTERFACING. It will make your life a LOT easier, so ask the store personnel if you are unsure. It's really easy to buy the wrong stuff, and we all hate the walk of shame back through the fabric store that you left 20 minutes ago.
 Before you start sewing, you will want to iron creases into your waistband because it will make things much faster. Fold it over length-wise and iron it until it holds the crease down the center, then fold half inch folds along each edge of the waistband and iron until they hold creases as well. These mark your seam allowances and the creases will make the sewing easier.
 Fold the waistband lengthwise, with the interfacing on the outside. This should be folded opposite of the ironed seam that you ironed earlier. You will then sew the ends closed on the half inch creases that you ironed earlier, but make sure that the lengthwise half inch seams are sewn in the folded position.
Now you are done prepping your waistband! You will turn it right-side out later, but for now we will move on to the panels!
Panels
 I traced my panels from a floor-length skirt onto large pieces of butcher paper (ok, so they were old DnD maps, sue me). Those panels are about 13 inches wide across the top, 34 inches wide across the bottom, and 42 inches long, but I added about 5 more inches on both sides and an extra foot to the length of my panel outline. The fuller you want your bustle, the more fabric you need to add to each panel. I used three enlarged panels to create my steampunk skirt. Remember, always trace an cut patterns length-wise according to the weave of the fabric, just like the picture to the right.
PLEASE NOTE: Only add extra inches of fabric to the panels that you are going to use for the bustle. You won't want to add as much/any extra fabric to the panel pattern for the front of the skirt or you will trip all over it.
 Then sew the panels together by matching the edges and stitching them together to form a circle or semi-circle, like the picture to the left. My skirt only used three panels since it only went half way around my body. Full skirts will usually use five or more panels. Make sure your seams are all facing the same direction on your skirt as you sew. After you sew your panels together, you will want to finish your edges on the underside of the skirt and hem the outer edges. This video shows you ways to do that.
Put it all Together
Now you will pin the panels to the waistband before you sew them. You will choose one of the lengthwise half-inch seam allowances and pin the panels to, and start by pinning the front edges of the skirt to the appropriate place on the waistband. For my skirt, I wanted the skirt to open right in front of my hip bones so that my bloomers and garters would show. The easiest way to do this is to safety pin the waistband on yourself, then pin the front edges of the skirt to where you want them on the waistband.

 Once the front pins are in place, you will need to make pleats to gather the rest of the skirt fabric to the waistband. You will basically fold the fabric over itself, then pin it into place. This it the most tedious part of making the skirt, but remember that the pleats do not have to be perfect.
Once you are done pinning the skirt, carefully sew the pleats in place on the side that you pinned. Iron the pleats flat after you sew them, then close the waistband (be careful that the other seam allowance is folded up inside), and then sew it shut across the bottom.
Bustling the Bustle
Now your basic skirt is finished, it's time to add the bustle. The easiest way is to put your skirt on the dress form and start pinning. There isn't really a magic formula, just start pulling spots and pinning them to higher places to give it the tiered appearance. Once you have everything looking good, hand stitch each spot where you pinned. Don't start sewing until your whole bustle is pinned, because you will probably change your mind... a few times.


Bat Wings
 The "bat" part of the skirt was actually designed to be a completely separate piece. It was made just like a cape, and is hand stitched into the waistband so that it can be detached and reattached very easily. I did that to give the skirt more versatility as a costume piece. I can now wear it with my
 steampunk batgirl, or remove it to be just steampunk!
I measured and drew the desired shape on butcher paper (another old DnD map) and traced one on the black and one on the yellow fabrics. I then carefully cut them out and pinned them together, starting with the point of each bat wing shape to be sure they lined up correctly. I then stitched them together and turned it inside out to hide the edges, just like a simple cape design. Originally, I had planned to add interfacing to give the wings some stiffness and shape, but I really liked how the material flowed without it. Then I simply closed up the top of the "wings" and hand stitched it into the waistband of the skirt, underneath the already finished bustle.


Have questions? Need clarification? Post a reply or email me at Kimi@goldenlasso.net
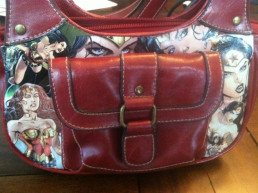
Do-it-Yourself: Comic Book Purse
 This is a great technique called decoupage, which has been around for a LONG time. I had seen it done, but it took the geek powers of @amy_geek, @ArkhamAsylumDoc, @TheStephThorpe, and all the other amazing girls in our crafting group to get me to try it. This was my first decoupage project!
Materials:
Purse
Think about what you want to do with your purse, and choose an appropriate style and color. For example, I wanted to make a Wonder Woman themed purse so I chose red leather to match Wonder Woman's outfit. Ideally, you want to decorate areas that bend and flex as little as possible. Purses with stiffer sides are better than bag- types. I found mine at the Goodwill store for $7.
 Mod Podge & Paint Brush
This wonderful substance is similar to Elmer's Glue and is available at most craft stores, but I found mine at Walmart. It comes in multiple sizes and usually costs less than $10. I chose the gloss finish type, but there are other choices. While you're there, buy a cheap paintbrush to apply the Mod Podge. I prefer the finer bristle ones because it's easier to apply the Mod Podge smoothly and they are less likely to mess up the pictures. Don't spend a lot of money though because, if you forget to wash it quickly enough, the Mod Podge will ruin your brush.
Pictures
Actually, any paper product will do, but pictures are the most interesting and easy for other people to recognize. I bought some used Wonder Woman comics at my local shop. I suggest comic books from the last few years due to their higher printing quality and vibrant colors, but anything will work. If you don't want to cut up comics, you can make color Xerox copies of them to use for your project instead.
PRO TIP: If you are buying comics for this project, look through them before you buy them! It's amazing how little a character can show up in their own comic!
Process:
Step 1: Stuff the purse with a towel so that it doesn't give when you put pressure on it, then wipe off the purse with a damp paper towel and maybe some mild soap. I don't recommend  cleaners because you never know how they will affect the Mod Podge or the purse. Once the purse is totally dry, move on to the next step.
Step 2: Decide what area of the purse you'd like to start working on and choose a picture that will fit there. Cut the picture out in a square-ish shape with lots of extra around it but be careful not to mess up other pictures you might use. It is easier to trim away extra when you start applying it to the purse than to try to fill in gaps in your collage. Hold the picture up to the DRY purse, then trim away the extra so that it fits the space. If you'd like, you can use a light pencil or your fingernail to mark the edges before you trim them.
Step 3: With your paint brush, apply a medium layer of Mod Podge to the area you intend to place your first picture. It shouldn't be dripping, but you should be able to see the white coloring. CAREFULLY place the picture on the Mod Podged area and smooth it out with your fingers. The now-wet paper will rip if you pull on it too much.
 Step 4: Spread a thin layer of Mod Podge over your image with your paint brush. This layer should be pretty thin and clear when applied, and will dry completely clear. Be sure to add extra to the cut edges of your picture and flatten them with your paintbrush. You don't want any edges or seams sticking up. If wrinkles appear, smooth them with your brush or the tips of your fingers. This might be a sign that you didn't stuff your purse enough, so add more stuffing!
Step 5: Repeat steps 2 - 5 with other pictures until the purse is covered to your liking! You do not have to wait for the Mod Podge on one picture to dry before starting on the next. Don't be afraid to overlap them!
Step 6: After the bag is done being decorated, add more thin layers of Mod Podge on top of the decorated areas to keep them protected. Wait at least 48 hours before using your purse. You can always add another layer of Mod Podge if you see areas becoming worn!
Congrats! You now have a custom piece of accessory artwork to enjoy!


Do-It-Yourself: Merida Wig (from Brave)
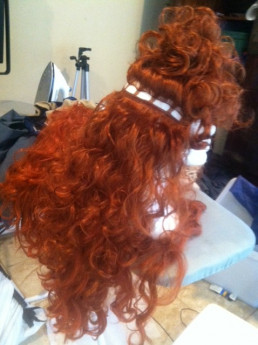
 Merida is the high-spirited new princess from Disney/Pixar's new movie, Brave. One of her defining features is her amazing curly red hair. It took Pixar artists over three years to perfect the program that created Merida's trademark locks. It's the single most identifiable part of any Merida costume, and a huge challenge to create.
The biggest challenges for the wig were the specific shape and size, color and highlights, varied textures, and movement. After doing lots of internet shopping I decided that a single, store-bought wig would never achieve the look I wanted. As always, cost was a factor and I was not willing to buy a custom wig for my Merida cosplay, so I started researching and figuring out how to make one of my own.
I decided that combining multiple wigs would be the best course of action. I specifically bought three different wigs so that the hair wouldn't match perfectly. Normal hair has different texture and coloration throughout, and I hoped to mimic this look. In the end this was very successful and the final product ended up looking much more lifelike (other than it's crazy size) due to the variety in it. One was a very high quality wig (they will usually cost between $40 and $60 depending on where you shop) and the other two were cheaper costume wigs (usually around $20). Look for sales, used wigs, or outlet stores to save more money. You want the colors to match very closely, but if there is a shade or two difference between them it will still appear natural. ")
Step 1: Take the cheaper wigs apart. This is a mind-numbingly repetitive and slow process. Basically you use a seam ripper to carefully detach the strands of hair from the headpiece. As you can see in the picture to the right, the hair in most wigs is attached in rows. Clip most of the wig up on top of the foam head and start removing these rows from the back neckline. Be careful to keep these rows as intact as possible so it is easier to restitch them back onto the main wig. You just want to remove the stitches that attach the rows to the elastic/skull cap, not the stitches that keep the row of hair together.
PRO TIP: Start at the bottom back and stack the rows of hair neatly as you go. Then you will be able to sew them onto the same area on the new wig and the will be about the right size row and length.
") Step 2: Sew the hair, by hand, onto the higher quality wig. It's important to use a higher quality wig for the base so it is comfortable and fits well. It will stay on your head more easily and look more realistic. The cheaper hair will look better if it is mixed in with high quality hair. Sewing hair to a wig is very similar to removing it. Use a hair clip to pile most of the hair on top of the foam head, and start reattaching hair at the back neckline. As you can see in the picture to the right, the higher quality wigs have more elastic in them so they can adjust more precisely. You want the hair to be straight between each strip of elastic, but don't pull it tight. If it's too tight, the wig will not stretch properly to fit on your head. Just stitch it where it lays naturally on the foam head. You will stitch the hair to the elastic strands in the wig, NOT TO THE OTHER HAIR!
Step 2: Sew the hair, by hand, onto the higher quality wig. It's important to use a higher quality wig for the base so it is comfortable and fits well. It will stay on your head more easily and look more realistic. The cheaper hair will look better if it is mixed in with high quality hair. Sewing hair to a wig is very similar to removing it. Use a hair clip to pile most of the hair on top of the foam head, and start reattaching hair at the back neckline. As you can see in the picture to the right, the higher quality wigs have more elastic in them so they can adjust more precisely. You want the hair to be straight between each strip of elastic, but don't pull it tight. If it's too tight, the wig will not stretch properly to fit on your head. Just stitch it where it lays naturally on the foam head. You will stitch the hair to the elastic strands in the wig, NOT TO THE OTHER HAIR!
When you are done stitching, try it on to make sure that it still fits. If it doesn't, you will have to remove the hair you added and try again. Seriously, don't sew it on too tight.
Step 3: Styling the huge wig. This is the most stressful part because you can really mess up wigs if you aren't careful. NEVER STRAIGHT BRUSH A CURLY WIG. You can really mess it up. Carefully shake it or bounce it up and down to give it life or use your fingers to remove tangles carefully. Wig spray can be very helpful to keep tangles down since it reproduces the natural oils that we make for our hair. It also makes the hair look more shiny and real.
 To get the volume and shape of Merida's hair, I had to do a lot of teasing around the sides of the head. Teasing hair is very counter-intuitive, because you are basically creating strategic tangles in the hair to make it stand farther from the scalp. Again, clip the hair at the very crown of the wig up and out of the way, you only want to tease hair that will be hidden by it later. Take a small section of the remaining and pull it straight up from the wig, then brush BACKWARDS from the about half way up the strand towards the roots. Use a round bristle brush and lots of hairspray to make it easier. Short, quick strokes are best. This obnoxious YouTube video can show you much better than I can describe it, but just watch the first 30-40 seconds of it to get the idea. With a curly wig, the most important thing is to make sure you put the teased areas UNDER non-teased hair, so plan well! You don't want it to show and you can't just brush the hair smooth like you can with real hair. You might want to practice on a cheap wig or your own hair before you try on your main wig.
Curling wigs is a pain. If possible, always buy wigs already curled the proper amount. You cannot use curling irons or any heated hair styling tools on most wigs. The wigs I purchased were pretty curly, but there were a few strands that were sticking out oddly when I finished teasing. To amend this, I used old-fashioned plastic curlers (the ones that have foam and then clip shut) to wrap these strands and then CAREFULLY dipped them in boiling water for about thirty seconds. Be very careful to not dip non-curler hair in the water because it will straighten it, and don't burn yourself! After dipping them, carefully run just the curler hair under cold water. Having a second  person to hold the wig head and extra hair is very helpful if you try this method of curling. Once the curlers have been dipped in cold water, carefully unwind them from the curlers and let them dry. Once they are dry, hairspray the heck out of them! I chose to use a few different sizes of curlers to give the same variety of curl size that Merida's hair has, and you may want to use the same trick if you are trying to recreate natural curls.
Step 4: Wear it! I was very happy with the final product, but I may add even more hair to it before next time! I saw a LOT of Merida cosplayers at San Diego Comic-Con and the wigs were what really set the good ones apart. In cosplay, size does matter.
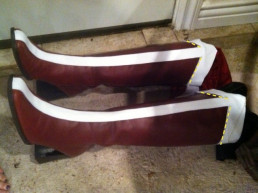
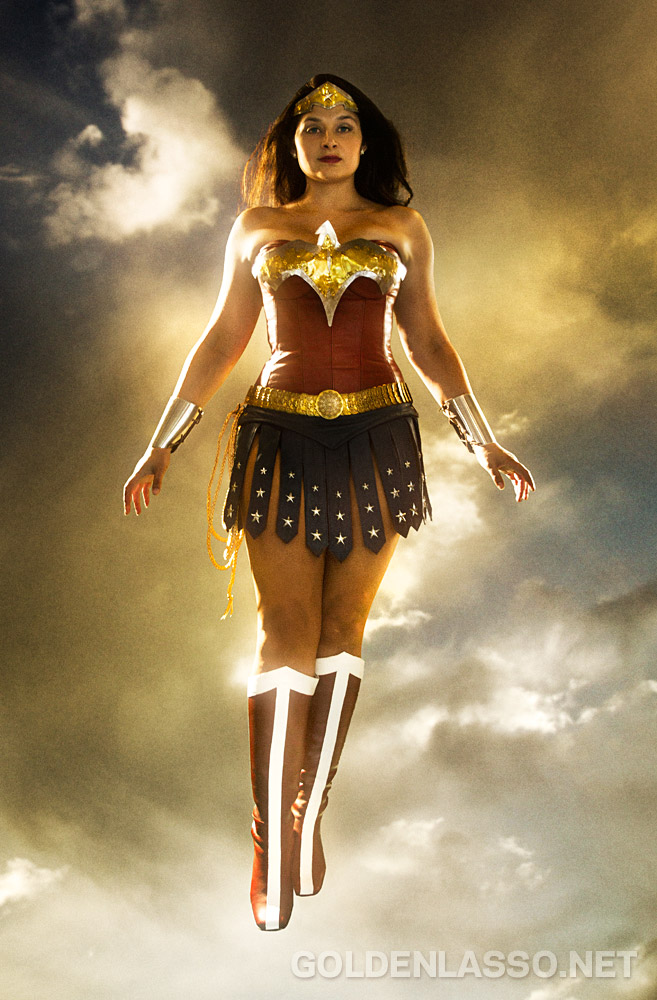
Do-It-Yourself: Wonder Woman Boots
 When I first designed my Wonder Woman cosplay, I wanted to make something that would be a believable real-world interpretation of Diana. That did not include the white and red go-go boots that are part of Wonder Woman's trademark costume, so I chose to go for the more Amazonian look of greek sandals and lace-up steel greaves. Since then, I have wanted the more traditional boots so I can be more easily recognized at cosplay events... because people seem to think I'm a patriotic Xena. Go fig.
There are a lot of affordable Wonder Woman boots for sale, however, my unique costume made things difficult because the shiny, bright red boots available online wouldn't match my muted, matte leather look. This limited me to two options, have them custom made or make them myself. My teacher salary and common sense made me choose the latter.
Step one, find boots. This step was very difficult for me, but I had an incredibly specific set of requirements and I was not willing to compromise... or pay over $50. I did weekly searches of Ebay, Etsy, and my local used clothing stores to find the perfect pair. Ebay eventually resulted in the perfect pair of tall leather burgundy boots in my size, for a price that I was willing to pay. With shipping, they put me back about $30. I had leftover white leather from my Sif cosplay, so it worked out perfectly.
 The next step is to make the pattern. I highly suggest that you get a friend to help you with this because you have to be wearing the boots to get an accurate measurement. I used white interfacing that I cut in strips and taped in place with scotch tape to create my pattern. The interfacing has similar properties to the leather, and was already laying around my workshop. I started with the stripe at the top of the boot, being careful to cut it in a triangle based shape that would peak in the front and then meet behind my calf. I then measured a long strip to run down the front of the boot.
When I got the mock-up fitting exactly right, I carefully pulled these pieces  off the boot (careful to keep them together as one piece) and traced them onto the back of the white leather. I used a pencil to insure that it wouldn't show later and CAREFULLY cut them out. Make sure that you cut one for the right and one for the left, they should be mirror images of each other. If you get two identical pieces, you did it wrong. After I cut them out I stitched white thread along the edges of the white to give it texture. It will also make it look like the stripes are sewn on, when they will (mostly) just be glued on.
PRO TIP: Cut slowly and don't use the full length of the scissor blades. This will insure you get smooth lines without those annoying jagged spots.
Once the pieces are cut, you should TAPE the stripes in place on the boot using masking or painters tape. Pins will leave little puncture marks in the leather, so avoid them. You should be wearing the boots for this step because the intended center of the boot and where the center of the boot is on your calf may be two different things. Trust me, I learned that the hard way. Double and triple check that you like the way the boots look and that they match each other. Pay special attention to the high point at the top of the boot and if the front stripe lands in the same place on both boots. Once they match you are ready to start attaching them!
 I wanted to make sure my boots were super strong, so I sewed the top stripe to the top of the boot. (The yellow dotted lines in the picture to the left show exactly where I did the sewing.) You can usually use a normal sewing machine for this unless the boots aren't made of dress leather. Once this part is sewn together you should stuff your boots (with newspaper, extra cloth, etc) until they hold their shape themselves. You will then use Barge cement to glue down the stripe in the front and to finish attaching the stripe at the very top of the boot. Follow the application directions on the can to get the best hold. This glue needs 24 hours minimum of undisturbed drying time to get it's full hold, so don't wear the boots for this step.
Wait at least 24 hours before messing with the boots. Seriously. This is the hardest part for me, but learn from my mistakes and don't move the boots around until they have dried for at least 24 hours. Once the boots are completely dry, you should remove the tape and try them on and see if everything turned out the way you wanted! If there are any small spots that aren't glued down around the edges you can add tiny drops of Barge with a toothpick or small paintbrush.
Congratulations! You can now make your own unique pair of custom Wonder Woman boots on a budget!
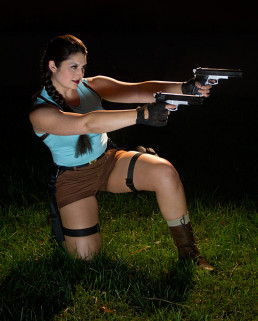
Bringing Lara to Life
 Lara Croft has always be an idol of mine. I was just entering adolescence when the first Tomb Raider game was released, and had just started to play video games. There was controversy over her sexy clothing and the rumors of a "Tomb Raider Nude Code" for every Tomb Raider release. People claimed that she was just a way to market to geek boys, but she was my gateway into loving video games as well. Lara was empowered and could kick some serious ass, but was always a lady at the same time. Classic Lara had used her considerable talents and wealth to chase her (very dangerous) dreams. It was her desire that drove her, and the love and respect she had for her father. She was one of the only female fighters who became a hero by choice, not because of a traumatic experience where they were victimized. (They have since changed this for the new Tomb Raider game, and it makes me very sad.) Also, she had major curves, was 5'9", and had really long dark hair. Talk about a girl I could relate to!
I was invited to participate in a cosplay event for E3, but I needed to wear a video game costume. At first I refused, due to my complete lack of video game cosplays. Then it dawned on me... LARA! I did a rough Lara costume a few years ago, but had a lot of work to do (in about a week and a half) to bring it up to the standards of my other cosplays. Now, LOTS of people do Lara cosplays. They are easily recognizable, even with small mistakes and inconsistencies. Wonder Woman without armor looks odd, but people don't really notice if Lara is missing her backpack, or if her boots are the wrong color. If you wear a aqua colored shirt, shorts, gun holsters, and braid your hair, you're set! However, I thought it would be a disservice to my favorite archeologist (sorry Indy!) if I didn't pay attention to the small details in classic Lara's outfit.
Boots
Lara's classic boots are brown. This is one of the details that most often gets overlooked because it is so easy to find black boots that approximate the design of Lara's. I don't make boots, so these were the first step in this cosplay process because I needed them to arrive in less than a week. They had to look rugged and utilitarian enough to be useful climbing through tombs. After extensive searching, I ended up getting these boots from Amazon.com.
 Shorts
Reference pics differ slightly on the color of Lara's shorts, but most are either a dark Khaki color or a variation chocolate brown. Since I had some Khaki shorts that fit well already, I decided to customize them to fit Lara's style. The first step was getting them the right color. The shorts were dyed them with a combination of brown dyes to get the balance that looked the most like the reference pic to the left. I present the before and after pictures:


The dye actually wasn't absorbed into some of the thread of the shorts, which gave them some great (unplanned) texture and detail. After dying them, I shortened and hemmed them within an inch of their lives!
Shirt
Getting Lara's shirt to look right is all about tailoring. No shirt fits that well over a pair of large breasts without a few nips and tucks. I started with a Bella women's short sleeve shirt in seafoam blue, and basically remade it. I removed the sleeves and opened the neck more to imitate Lara's tank top. This gave it a pretty good fit, but it was still too loose around the waist and the arm holes had gaps due to the super-bra I was wearing (don't judge). I ended up adding darts to the front of the shirt to make sure it fit around the breasts well, and took in about a half inch around the waist area on each side. This gave it a much more fitted look that matched Lara's. I will have to be very careful with this shirt because any stretching will undo the work I put into fitting it perfectly.
 Other Accessories
If you're still reading this, you must be planning your own Lara cosplay... or are hoping for some sexy finished cosplay pics. The rest of the pieces of the outfit I bought, mostly on Amazon and Ebay. I highly suggest looking in military surplus for brass belt buckles for a more realistic, but still classic Lara look. I found mine, and the leather backpack on Ebay. The backpack was actually a purse which required some alteration of the straps and a removal of a loop handle. The guns were the most difficult thing to find. I pieced them together off of Amazon finds, but have since found a great deal for Lara guns and holsters. These are almost exactly like what I ended up with, but actually are cheaper! I had to remove the upper leg strap on my holsters (just like with the pair I linked to above) in order to match Lara's classic look.
PRO TIP: Make sure your holsters have clips/ties/straps/etc that keep the guns in the holsters. There is nothing less Lara-like than sitting down and having your guns crash to the floor.
 Styling
Last but not least, the famous Lara braid. I am very lucky to have incredibly long, dark hair. However, mine is layered and does not have the thick full look that Lara's does when braided. My solution was to buy a bag of weave hair at my local wig store. They usually run about $3, but you have to be careful that it matches your hair color well enough to look natural. It's not good quality hair, so it's not good for styling, but it worked well to braid in with my natural hair. I just attached it to some banana clips by folding it over and using tiny elastic bands. On the night of the event, I french braided my own hair and slowly clipped in the home-made extensions in with my own. It worked very well and matched perfectly.
I'm just starting to learn about makeup, and so (like all my cosplays) I did a youtube search for the type of look I wanted. I wanted her eyes to stand out a lot, just like in the games. I used the eye styling from this youtube video, but didn't use any of the other tips. Yes, it says it's styled after Kim Kardashian. Just ignore that, because the eyes look cool when they are finished.
And... you've got Lara Croft!

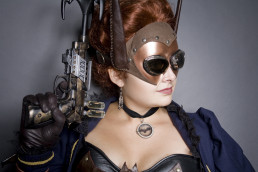
Steampunk Batgirl Mask
I am creating an unnamed (*cough*) steampunk superhero costume for San Diego Comic-Con. I have never attempted a steampunk outfit before, so I knew there would be a bit of a learning curve. The mask was going to be the most difficult piece of the outfit for me, and a make-it or break-it piece for the cosplay, so I started off my project with that piece. It was a major lesson in patience for me. While not all of my costumes go perfectly, this is the first time that something has gotten ruined and I had to restart from scratch.
Plan A:
 My plan was very simple, I would create the mask out of InstaMorph, then paint and cover parts of it with leather. Easy right? Nope.
The formation of the mask went well enough. InstaMorph is my go-to substance when I have to create something from scratch. It's very easy to work with, but also very strong. Fiberglass will be a big step up, but for now, this works very well. The only drawback is the low melting point, which is around 150 degrees. Do not make something out of this material and then leave it in the car.
Anyway, the formation went very well and I was thrilled with the initial fit and look of the mask. It had amazing potential, but the edges were a little uneven. I sanded these down to get a flatter edge since I eventually wanted it to resemble metal. It sanded easily, but ended up getting a fuzzy texture on the areas I sanded it. Here is the turning point. What I should have done was boil the plastic one more time to smooth this out. Opps. Instead I thought the paint would cover the fuzz and it would end up with a rough metal look. This didn't happen. My mask ended up looking almost furry, and since it had already been painted, I couldn't go back an reform the Instamorph into another shape. Bye bye Plan A!
Plan B:
I was not going to spend hours forming a mask from scratch again, especially because I now doubted that I could get the finished texture that I wanted, so Plan B started with a trip to Michael's. I found surprisingly sturdy white all-face masks for around $5. They were plastic, but had texture and thickness enough to be the base for my alterations. I brought one home and started creating my masterpiece. Plan A was a black mask with leather accents, but my plan changed a lot after the initial failure.
 The shape was actually very easy to get. I simply drew the shape I wanted on the back (just in case the pencil would leave marks), and then cut it with strong scissors. I then rubbed it down with mineral spirits to remove any excess oils or anti-mold coating on the plastic, and sprayed a few base coats of black Krylon Fusion spray paint. I always use the Fusion as a base coat on plastics because it (supposedly) bonds with plastics. It seems to work pretty well for all my projects so far. I used black because it gives a great base to metallic paints, and it looks better than white if the metallic chips for some reason. I used Krylon Copper Metallic spray paint after letting the black dry for a few days. (I've been testing a lot of metal-imitating spray paints and will be doing a blog post to compare them in the future!)
I wanted the mask to look like molded metal, so it was a VERY slow process. To get it smooth you have to do lots of thin layers, but not too thin or you never get rid of the texture. If you spray too thickly, you will start getting drips. PRO TIP: Let each layer dry COMPLETELY before you add on the next one.
Once again, I was too enthusiastic and handled the mask after only a few hours of drying. There are now a few TINY marks on it, but nobody can see them unless they are less than a foot away. Please, don't make my mistake! Let your creation dry for a few days before you move on to  adding rivets, leather, goggles etc. I knew better, but just got too excited!
Next I measured and cut the leather. I glued the edges under so that it would appear smooth and then glued the leather to the mask. After that I used a leather punch to make holes through the leather and mask. The rivets are purely decoration, and were glued in place through those holes. Actually setting the rivets with a hammer (like I did on my Sif costume) would have damaged the mask.
Finally, I added the ears and strap. I cut the ears from Plan A's mask and wrapped them in leather, gluing them in place and using a whip stitch to close the edge. This also added a cool steampunk look to them. I sewed and glued them and the strap in place. All of the leather and straps were taken from a $4 purse that I bought at the thrift store. The last thing I did to the mask was glue on the goggles, which were purchased on Amazon for $7 and dismantled so I could attach them correctly.
 (The ears will lay flat against my head when I wear it.)
Overall, I am much happier with the final outcome than I was with my original design. I think this looks much more "steampunk" and will actually be more comfortable to wear, mostly because of its lighter weight.
Stay tuned for more updates on this very educational cosplay experience!
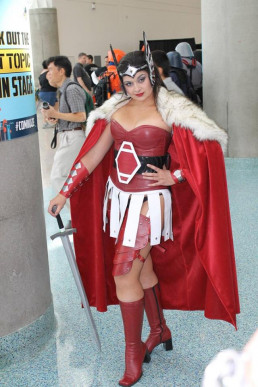
WonderCon Countdown: Sif's Belt and Skirt
WonderCon has arrived in Southern California! While this has caused many Northern California people sorrow, I am happy to have an event before SDCC to debut my Sif cosplay! There is only one problem... it's not done yet. I have made a lot of progress and will be able to finish tonight, but sleep may be sacrificed. Everything is looking great and I am very excited!
Belt
Sif's belt is a trademark of her costume. No matter how many times she is redesigned, she almost always has a prominent, geometric belt buckle in the center of her abdomen. I started with a faux leather corset belt that I got on Ebay for $6.99. I really liked the pattern the sections made and how it added texture. Plus, it's stretchy without being spandex. Bonus points! The biggest problem is that I wanted the pattern in the belt to accent and frame the Sif buckle, which meant I had to move the buckles already on the belt. I removed them with a seam ripper and restitched them on the opposite side of the belt which would be on my back. I stitched the front together to prep it for the Sif buckle.


 The buckle was actually much easier than I expected. I measured and cut the basic shape out of an old teaching poster I had. It was stronger than poster board, but not as thick as cardboard... plus I already had it. I'm not planning on teaching Kindergarten again anytime soon, so it's not a huge loss. I cut up the rest of the red leather purse that I used to make straps for my leg armor, and covered the polygon (see? I'm such a teacher...) by gluing it and then stitching the edges. I was happy that my new sewing machine could handle the laminated poster board and leather.

The white boarders on the belt were the most time consuming piece, just because they needed to be perfect. I traced the finished, red leather polygon on the back of my white leather hide and measured out the designs. Then I carefully cut out each section so the lines would be perfect and keep the geometric look. Once it was cut I sewed white stitches 1/8th inches from the edges of the white. These served no structural purpose, but added texture and gave the illusion that the white was stitched onto the red. Then I carefully used barge cement to glue the white onto the red. This was the most stressful part, because if I messed up I'd have to start ALL over again. I also had to glue the white leather on perfectly so the lines and angles would stay straight. Luckily, non of the leather had stretched, and it ended up looking great.
Skirt

The skirt was fairly simple, but time consuming. Lots of measuring and cutting very straight lines. I had it basically put together, but realized that it looked like cheap plastic from even just a few feet away. I decided that adding metal studs would give the leather a little more weight and help give it more texture. I carefully added them to each strip of the skirt. This is pretty challenging since the leather was very prone to wrinkling under the studs and the wrinkles showed up a lot on the white. Once this was finished, I put the waist band on over my corset, inside out. I than taped (you don't want to use pins on leather because they leave holes) each strip in place to get the desired look. It's important to do this with the corset on, because the measurements will be very off otherwise. Finally, I sewed everything down and added Velcro to close it at the top. I'd usually use laces to close a leather skirt, but it's not going to show and I wanted it to stay as flat as possible under the corset.
To Do
I still need to finish the garter belt that will hold up my leg armor, and my sword belt tonight. My first try at making a cosplay sword ended in a very unremarkable, heavy sword that flakes paint at every turn, so I will be wearing my backup LARP sword this weekend. It's very lightweight and doesn't distract from the outfit. The armor will be the most difficult part, so I hope the concept for the garter belt works. Wish me luck!
I'll be posting pictures from WonderCon and from the Merry Wives' St. Patrick's Day concert this weekend, so check out my facebook page or twitter feed to see them!

Lady Sif's Cape
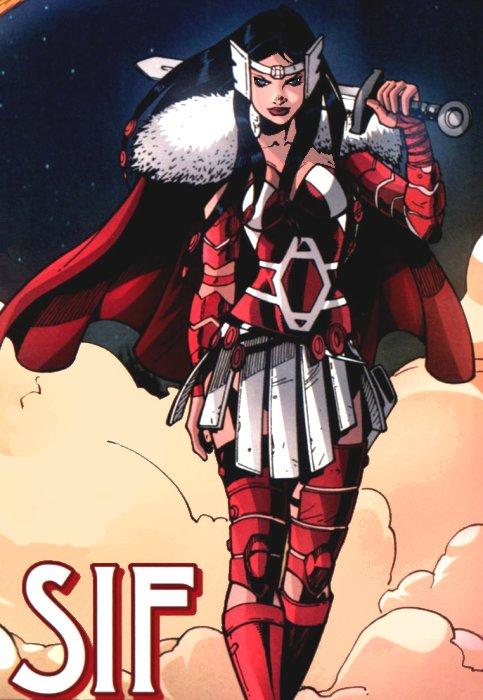 Sif is an Asgardian goddess in Marvel comics, and is based on a beautiful (blond!) goddess in Norse myth. Her current costume pays tribute to this with a red cape adorned with large amounts of white fur.
As with all my cosplays, I wanted to make her cape as realistic and functional as possible. This meant changing it into a cloak so that it could actually do some good in the frigid Norse climate where her myth originated. It also meant finding a use for the furry shoulder pads, which seem very functional but would keep the wearer much warmer if they were located on the inside of the cloak. Once again, I fell back on historical costuming for the answer.
The Kinsale Cloak is a traditional design that originated in Ireland. It is very popular with historical reenactors because of it is a very attractive garment and is incredibly functional. It is a lined cloak that will keep you very warm, but its trademark piece is the hood that hangs down around the shoulders when not covering the wearer's head. I decided that I'd get the desired Sif look by lining the Kinsale cloak hood with fur, then wearing it around my shoulders.Plus, I already had the pattern. Huzzah!
I am very happy with the results... ignore my exhausted face and pajama pants.


This was the first time I had worked with (fake) fur. It was challenging, but I was lucky enough to get some pointers from very experience friends.
- Cutting - Don't cut through all the hair! It will ruin the texture and make your edges look bad. Flip it over and make shallow cuts to the fabric at the base of the hairs.
- When sewing, pin the hairs flat away from your seam allowances before you pin pieces together. Yes, this takes a LOT of pins, but it keeps you from sewing the hairs into your seams and messing up the cool look of your fur. It may seem time consuming, but it will save you a lot of time later and really improve the look of the whole garment.
The fur will get EVERYWHERE, but once you finish off your garment it *should* stop shedding since it should only be losing hair around the edges where you cut. Be sure you have a good quality lint roller on hand to clean up your garment after you finish.
I have about a month until WonderCon, and I still have to finish Sif's belt, skirt, and sword. Those are all fairly simple pieces that are very similar to previous projects, so I might actually be done early. Amazing!