Empowering Players
 We all have seen players completely take their GM by surprise. Usually, the GM has planned one or two specific ways for the players to handle a challenge... and the players try something completely different. This creates a crossroad for the game. Is the GM willing to consider alternative solutions to the problem?
The answer should be "yes."
I'm not saying that the GM should always give in to what the players want, but they SHOULD be open to considering logical solutions other than the ones they planned. When the players' options are allowed, the game changes from the general mice in a maze scenario to a game where players are empowered. The players can stop looking for the "right answer" and really approach the problem from their character's point of view. The mere possibility of creative success supports the role-playing aspect of a game.
 As a GM, there are some important things to keep in mind with this concept. Mainly, just because you let the party try something, DOESN'T mean it has to work. Maybe their logic is off, maybe there are some factors they aren't aware of, or maybe they just roll badly. Let them try it, and let them pay the consequences if they fail. However, if their logic is sound and they roll well, they should be rewarded with success. They shouldn't fail just because it's a different solution than you planned.
I saw a great example of this in a recent Pathfinder game. The party was on a pirate ship and planning a mutiny, but they wanted to take out as much of the enemy crew as possible quietly. They decided poison was the best way, but none was available on the ship. They came up with the idea of summoning a viper and milking it for its venom. Although the summoned creature only materialized for a short period of time, they rationalized it by citing the rules that stated anyone poisoned by the viper would stay poisoned after the animal dissipated, thus, the poison didn't dissipate with the creature. The surprised (and delighted) GM ruled in their favor, and a bunch of cruel pirates died mysteriously after their nightly ration of rum.
Keeping your game off "rails" will really benefit the players and the GM. It will encourage the players to explore the world that you create, and to deeply embrace the character that they are playing. The GM gets to enjoy watching the players revel and fully explore the universe they created.
(This article was originally posted on CharismaBonus.com)
Dealing with Player Ignorance

I have GMed many convention games, but I ran into a new problem a few months ago. One of the players in my game had a fundamental misunderstanding of a pretty simple scientific principle. I will not go into specifics because I do not wish to embarrass that player or narrow down which game I am discussing.
The players were engrossed in the game and having a blast trying to come up with a solution to my challenge. They were all great people and it was a very positive game, however suddenly one of them suggested an action that defied the laws of physics. Two other players jumped on board, and the remaining players looked at me with their eyebrows raised.
I casually asked for clarification, hoping they'd catch the mistake themselves. No luck, so I very politely questioned their logic, asking if that was really what they meant to say. Surely, their basic elementary school knowledge was just a little rusty, right? Wrong. They defended their position, restating their faulty understanding of earth science. The logic behind their actions was sound, they just didn't state the right materials to do what they wanted. I was at a crossroad, do I impose my scientific understanding on the game to insure it's correct and risk embarrassing the player, or roll with it and prioritize fun over academic correctness?
Against ever instinct in my teacher body, I rolled with it. Why? Well there were two main reasons.
First, I didn't want to penalize the characters for the players' ignorance. They had found a good solution, but simply did not have the scientific background to choose the right materials to make it work, even though the materials were available to them. Often we play characters with knowledge or qualities different than our own. Shy players can roll skills to give speeches and technology dummies can roll to hack computers, so it didn't seem fair to kill their creative idea when their character would have known exactly the right material to choose.
More importantly, I didn't want to kill the fun. It was a one shot game with people I didn't know well. If it had been my normal gaming group, I might have argued the point and then bought the player a beer. I didn't know these players well enough to push them. They might have gotten mad and walked away, or been perfectly polite but not enjoy the rest of the game. We were all there to have a good time and it seemed pointless to risk that over a small mistake in their plan. That said, if this had been a campaign I would have pressed the point because I wouldn't want the physical laws of my universe to be altered long term, but again, I would know players in a campaign game enough to debate it with them.
Did I make the right choice? I still ponder that question. The game finished smoothly and everyone seemed to enjoy themselves, but maybe they would have enjoyed themselves if their plan had failed. It really boils down to an individual's personal goals for the game. Mine was for my players to enjoy themselves, and I succeeded, but I might not make that same choice again.
Oh, and after the game I casually brought it up to the player privately and suggested they look it up when they got home. The teacher side of me couldn't give up completely.
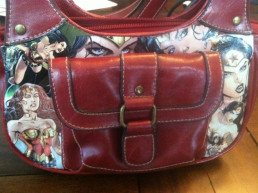
Do-it-Yourself: Comic Book Purse
 This is a great technique called decoupage, which has been around for a LONG time. I had seen it done, but it took the geek powers of @amy_geek, @ArkhamAsylumDoc, @TheStephThorpe, and all the other amazing girls in our crafting group to get me to try it. This was my first decoupage project!
Materials:
Purse
Think about what you want to do with your purse, and choose an appropriate style and color. For example, I wanted to make a Wonder Woman themed purse so I chose red leather to match Wonder Woman's outfit. Ideally, you want to decorate areas that bend and flex as little as possible. Purses with stiffer sides are better than bag- types. I found mine at the Goodwill store for $7.
 Mod Podge & Paint Brush
This wonderful substance is similar to Elmer's Glue and is available at most craft stores, but I found mine at Walmart. It comes in multiple sizes and usually costs less than $10. I chose the gloss finish type, but there are other choices. While you're there, buy a cheap paintbrush to apply the Mod Podge. I prefer the finer bristle ones because it's easier to apply the Mod Podge smoothly and they are less likely to mess up the pictures. Don't spend a lot of money though because, if you forget to wash it quickly enough, the Mod Podge will ruin your brush.
Pictures
Actually, any paper product will do, but pictures are the most interesting and easy for other people to recognize. I bought some used Wonder Woman comics at my local shop. I suggest comic books from the last few years due to their higher printing quality and vibrant colors, but anything will work. If you don't want to cut up comics, you can make color Xerox copies of them to use for your project instead.
PRO TIP: If you are buying comics for this project, look through them before you buy them! It's amazing how little a character can show up in their own comic!
Process:
Step 1: Stuff the purse with a towel so that it doesn't give when you put pressure on it, then wipe off the purse with a damp paper towel and maybe some mild soap. I don't recommend  cleaners because you never know how they will affect the Mod Podge or the purse. Once the purse is totally dry, move on to the next step.
Step 2: Decide what area of the purse you'd like to start working on and choose a picture that will fit there. Cut the picture out in a square-ish shape with lots of extra around it but be careful not to mess up other pictures you might use. It is easier to trim away extra when you start applying it to the purse than to try to fill in gaps in your collage. Hold the picture up to the DRY purse, then trim away the extra so that it fits the space. If you'd like, you can use a light pencil or your fingernail to mark the edges before you trim them.
Step 3: With your paint brush, apply a medium layer of Mod Podge to the area you intend to place your first picture. It shouldn't be dripping, but you should be able to see the white coloring. CAREFULLY place the picture on the Mod Podged area and smooth it out with your fingers. The now-wet paper will rip if you pull on it too much.
 Step 4: Spread a thin layer of Mod Podge over your image with your paint brush. This layer should be pretty thin and clear when applied, and will dry completely clear. Be sure to add extra to the cut edges of your picture and flatten them with your paintbrush. You don't want any edges or seams sticking up. If wrinkles appear, smooth them with your brush or the tips of your fingers. This might be a sign that you didn't stuff your purse enough, so add more stuffing!
Step 5: Repeat steps 2 - 5 with other pictures until the purse is covered to your liking! You do not have to wait for the Mod Podge on one picture to dry before starting on the next. Don't be afraid to overlap them!
Step 6: After the bag is done being decorated, add more thin layers of Mod Podge on top of the decorated areas to keep them protected. Wait at least 48 hours before using your purse. You can always add another layer of Mod Podge if you see areas becoming worn!
Congrats! You now have a custom piece of accessory artwork to enjoy!


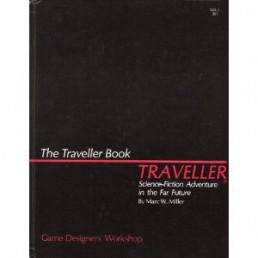
System Spotlight: Traveller
Are you a fan of Firefly? Do you love the idea of gunslingers on the edge of civilized space? Traveller might be the game for you! In fact, Firefly is so similar to the Traveller universe that I would bet money that Joss has played in a campaign or two.
Traveller (yes, it's spelled like that) was first published in 1977 by Game Designers Workshop. It's a d6 system, but the dice mechanics vary slightly from edition to edition. I suggest the Mongoose version of Traveller, which is a 2d6 system where you usually want to roll high.
Originally, Traveller had no specific setting and was meant to be a generic system for all types science fiction gaming. It can still be used that way, but modern Traveller also has one of the most developed settings in the RPG world. There are THOUSANDS of complete star systems already designed and mapped out. People have not wasted time since 1977! Each of the tens of thousands of planets is planned out to include the important physical, social, and economic information about that planet. Check out travellermap.com for a fully functional map of the universe that can easily be used in your game.
 The Official Traveller Universe is the "Third Imperium", a human-dominated feudalistic society of worlds. Everything in the Empire is run by a class of nobles, but as you get farther and farther from the center of the Empire, things become less civilized and much more wild west! There are multiple races, but it is a human-centric game. The most interesting tidbit about the setting is that while ships can travel pretty quickly through systems, the center of the Empire is many months or even years away from some of the outlying systems... and communication cannot go faster than the ships. If you are out of range to contact someone via communicator, you have to send them a message via a courier ship, also known as an X-boat. This may seem like a big damper on the sci-fi aspect, but it adds so much to the game. This is what lets the outer reaches of the Empire be a pretty wild and lets your crew avoid arrest by staying one jump ahead of the arrest warrant, or make some good money if you end up on a good X-boat. (See? I told you it was like Firefly...)
 Without a doubt, everyone's favorite thing about Traveller is the character creation system. The player gets to make choices during creation, but everything really comes down to die rolls. It's almost a separate game unto itself and gives players a skeletal back story for their character, including ties to other members of the party and skills they have learned along the way. The dice determine that you left military service with PTSD, but it's up to the player to flesh out the story. Are you devoted to another player because they saved your life? Do you hate the Navy for sending you to die? If you approach it with an open mind you can get an incredible character that you would never have created without the help of the dice.
The Traveller Core Rulebook is all you really need to run a game, although there are other Traveller books available if you end up wanting more options. Try it! It rocks!
(This article was originally posted on CharismaBonus.com)
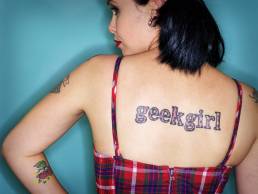
The Geek Girl Problem
 The problem with the geek girl subculture is the unrelenting expectation of uniformity.
I have seen countless articles and posts about the problems with the geek girl subculture. Some are written by geek girls and some are simply commenting on us. Many cast stones at select groups of female geeks for a huge variety of transgressions. Girls are too sexy, not sexy enough, too specialized in their interest, not specialized enough, too fake, too judgmental, too obsessed, not obsessed enough, too mainstream, too antisocial, too popular, not popular enough, and on and on and on. Somehow, people have the idea that if geek girls took their specific advice, we will become a unified army of geekdom.
Are you flipping kidding me? REALLY? Despite our different backgrounds, ethnicities, body types, religions, knowledge, skills, and interests, we are expected to share the same point of view because we have vaginas?
Geek girls are free to dress up as Wonder Women at every convention they can get tickets to, and other geek girls are free to think that they are disrespecting themselves by showing off so much skin. Who has the right to judge others for their opinions? You did no share their excitement at getting a Wonder Woman lunchbox in 2nd grade, or their deeply religious upbringing in a small town. Hopefully both sides behave themselves and respect the other geek's freedom of choice, but neither is better or worse for their opinions, and neither should be expected to change their minds due to peer pressure.
 This uniformity expectation also applies to geek knowledge. We keep banging our heads against the misogynistic opinion that there are only a few "real" geek girls, and the rest of us are using geekery to get male attention. Once again, in spite of our innumerable differences, women are all expected to be experts in every aspect of geek culture to PROVE that they are geeks. I have seen it time and time again, especially at public events and conventions. Usually, it's in the form of a seemingly innocent question about a geeky topic. If the girl fails to answer correctly, *POOF* there goes all her credibility. Suddenly, the woman who spent 74 hours sewing a cosplay outfit, 9 hours in line for a panel, four days writing a Dr. Who blog post, $200 a month on comic books, or maybe is just visiting her very first convention, is lowered to the level of attention-seeking "fake" in the mind of the quizzer (who can be male or female).
Our knowledge on any subject, geek or not, is going to be as varied as our skin color or favorite foods. I hate to break it to everyone, but there aren't merit badges for knowing more nerd trivia than everyone else. Go ahead and whip out your geek fanboy (or fangirl) penis and prove it's the biggest in the room. It's the geek version of driving an inconveniently huge truck or car, everyone knows you're compensating. Judgmental showing off only drives people away from the culture. Ask yourself honestly, is that your goal?
There is no problem with geek girls, the problem is with geek girls not being accepted and respected for who they are as individuals. People desperately want to belong to a group. Sadly, the easiest way to do that is to exclude others. As geek culture rapidly becomes pop culture, we have to embrace the diversity that inevitably comes with a surge in population. Old stereotypes have to change to accommodate new faces, new interest levels, and new ways of expressing one's passion.
If Whovians, tabletop gamers, video gamers, comic readers, Trekkies, Potter Heads, Guildies, LARPers, and so much more are considered "geek," than surely there is room for a huge diversity of women to be considered "geek girls". We ALL have the right to march in the geek parade, even if we don't all march to the same drum... or trumpet... or tuba... or baton... or agree there is a parade at all...
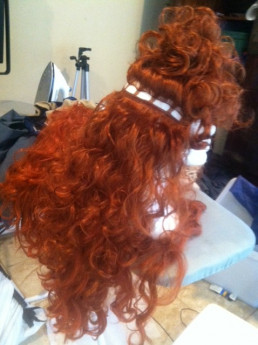
Do-It-Yourself: Merida Wig (from Brave)
 Merida is the high-spirited new princess from Disney/Pixar's new movie, Brave. One of her defining features is her amazing curly red hair. It took Pixar artists over three years to perfect the program that created Merida's trademark locks. It's the single most identifiable part of any Merida costume, and a huge challenge to create.
The biggest challenges for the wig were the specific shape and size, color and highlights, varied textures, and movement. After doing lots of internet shopping I decided that a single, store-bought wig would never achieve the look I wanted. As always, cost was a factor and I was not willing to buy a custom wig for my Merida cosplay, so I started researching and figuring out how to make one of my own.
I decided that combining multiple wigs would be the best course of action. I specifically bought three different wigs so that the hair wouldn't match perfectly. Normal hair has different texture and coloration throughout, and I hoped to mimic this look. In the end this was very successful and the final product ended up looking much more lifelike (other than it's crazy size) due to the variety in it. One was a very high quality wig (they will usually cost between $40 and $60 depending on where you shop) and the other two were cheaper costume wigs (usually around $20). Look for sales, used wigs, or outlet stores to save more money. You want the colors to match very closely, but if there is a shade or two difference between them it will still appear natural. ")
Step 1: Take the cheaper wigs apart. This is a mind-numbingly repetitive and slow process. Basically you use a seam ripper to carefully detach the strands of hair from the headpiece. As you can see in the picture to the right, the hair in most wigs is attached in rows. Clip most of the wig up on top of the foam head and start removing these rows from the back neckline. Be careful to keep these rows as intact as possible so it is easier to restitch them back onto the main wig. You just want to remove the stitches that attach the rows to the elastic/skull cap, not the stitches that keep the row of hair together.
PRO TIP: Start at the bottom back and stack the rows of hair neatly as you go. Then you will be able to sew them onto the same area on the new wig and the will be about the right size row and length.
") Step 2: Sew the hair, by hand, onto the higher quality wig. It's important to use a higher quality wig for the base so it is comfortable and fits well. It will stay on your head more easily and look more realistic. The cheaper hair will look better if it is mixed in with high quality hair. Sewing hair to a wig is very similar to removing it. Use a hair clip to pile most of the hair on top of the foam head, and start reattaching hair at the back neckline. As you can see in the picture to the right, the higher quality wigs have more elastic in them so they can adjust more precisely. You want the hair to be straight between each strip of elastic, but don't pull it tight. If it's too tight, the wig will not stretch properly to fit on your head. Just stitch it where it lays naturally on the foam head. You will stitch the hair to the elastic strands in the wig, NOT TO THE OTHER HAIR!
Step 2: Sew the hair, by hand, onto the higher quality wig. It's important to use a higher quality wig for the base so it is comfortable and fits well. It will stay on your head more easily and look more realistic. The cheaper hair will look better if it is mixed in with high quality hair. Sewing hair to a wig is very similar to removing it. Use a hair clip to pile most of the hair on top of the foam head, and start reattaching hair at the back neckline. As you can see in the picture to the right, the higher quality wigs have more elastic in them so they can adjust more precisely. You want the hair to be straight between each strip of elastic, but don't pull it tight. If it's too tight, the wig will not stretch properly to fit on your head. Just stitch it where it lays naturally on the foam head. You will stitch the hair to the elastic strands in the wig, NOT TO THE OTHER HAIR!
When you are done stitching, try it on to make sure that it still fits. If it doesn't, you will have to remove the hair you added and try again. Seriously, don't sew it on too tight.
Step 3: Styling the huge wig. This is the most stressful part because you can really mess up wigs if you aren't careful. NEVER STRAIGHT BRUSH A CURLY WIG. You can really mess it up. Carefully shake it or bounce it up and down to give it life or use your fingers to remove tangles carefully. Wig spray can be very helpful to keep tangles down since it reproduces the natural oils that we make for our hair. It also makes the hair look more shiny and real.
 To get the volume and shape of Merida's hair, I had to do a lot of teasing around the sides of the head. Teasing hair is very counter-intuitive, because you are basically creating strategic tangles in the hair to make it stand farther from the scalp. Again, clip the hair at the very crown of the wig up and out of the way, you only want to tease hair that will be hidden by it later. Take a small section of the remaining and pull it straight up from the wig, then brush BACKWARDS from the about half way up the strand towards the roots. Use a round bristle brush and lots of hairspray to make it easier. Short, quick strokes are best. This obnoxious YouTube video can show you much better than I can describe it, but just watch the first 30-40 seconds of it to get the idea. With a curly wig, the most important thing is to make sure you put the teased areas UNDER non-teased hair, so plan well! You don't want it to show and you can't just brush the hair smooth like you can with real hair. You might want to practice on a cheap wig or your own hair before you try on your main wig.
Curling wigs is a pain. If possible, always buy wigs already curled the proper amount. You cannot use curling irons or any heated hair styling tools on most wigs. The wigs I purchased were pretty curly, but there were a few strands that were sticking out oddly when I finished teasing. To amend this, I used old-fashioned plastic curlers (the ones that have foam and then clip shut) to wrap these strands and then CAREFULLY dipped them in boiling water for about thirty seconds. Be very careful to not dip non-curler hair in the water because it will straighten it, and don't burn yourself! After dipping them, carefully run just the curler hair under cold water. Having a second  person to hold the wig head and extra hair is very helpful if you try this method of curling. Once the curlers have been dipped in cold water, carefully unwind them from the curlers and let them dry. Once they are dry, hairspray the heck out of them! I chose to use a few different sizes of curlers to give the same variety of curl size that Merida's hair has, and you may want to use the same trick if you are trying to recreate natural curls.
Step 4: Wear it! I was very happy with the final product, but I may add even more hair to it before next time! I saw a LOT of Merida cosplayers at San Diego Comic-Con and the wigs were what really set the good ones apart. In cosplay, size does matter.
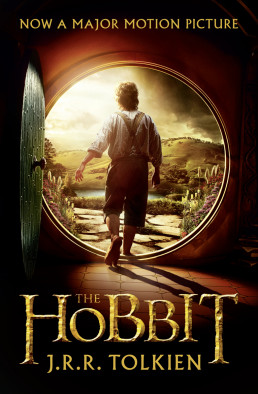
Framing The Hobbit
 The Hobbit is one of the most anticipated movies of all time. After the bar was set so high by the Lord of the Rings trilogy (except for the horrific abomination that is the battle of Helm's Deep... don't get me started) Tolkien fans are champing at the bit to see how this big-budget prequel turns out. With an amazing cast and proven source material, how could it fail? The answer may be held in a fraction of a second.
As all followers of The Hobbit movie know, Peter Jackson is pushing the film to be viewed in 48 frames per second. What does this mean? Well normal movies and TV shows are shown at 24 frames per second and our minds naturally fill in the missing bits. We don't even realize that it's happening. However, soap operas, home movies,  and other videos are shot at 30 frames per second. This is why you can instantly tell a soap opera or reality TV show from other programs just by looking at it for a few seconds. In general, our minds link video and high frame rates to low budget programs. Despite Peter Jackson's assurance that it will revolutionize movies, many fans are worried about him using The Hobbit as a guinea pig.
Jackson has been praising the new frame rate for months, claiming that it was "more attractive" and "more lifelike." He sings its praises and never fails to mention how it will improve the 3D experience for movie goers (how thrilling..not). In April, Jackson and Warner Bros debuted about 10 minutes of footage at CinemaCon. This footage was shown at 48 frames per second and was met with a resounding "Ugh" by pretty much everyone in attendance. The consensus seems to be that it looked TOO real. It looked like a home movie and wasn't "cinematic" enough. The level of detail and realism distracted people from the movie rather than adding to the experience. Even directors like Chris Nolan and Neill Blomkamp (considered by many to be Peter Jackson's protege) have gone on the record as hating footage shot in 48 frames per second.
Last week at San Diego Comic-Con, Jackson debuted twelve minutes of footage at The Hobbit panel. (No, I didn't wait in the ten hour line to see it in person, I had too much cosplay stuff planned this year and am uncomfortable sleeping overnight on public sidewalks.) This time the footage was shown at 24 frames per second and the crowed went crazy for it! Peter Jackson stated, "With our 48 frames per second presentation, negative bloggers are the ones the mainstream press runs with and quotes from. I decided to screen the Hobbit reel at Comic-Con in 2-D and 24 frames per second, so the focus stays firmly with the content and not the technical stuff. If people want 3-D and 48fps, that choice will be there for them in December."
Interesting. So now the big question, was it the frame rate or the people in the audience that made the difference? Would the CinemaCon critics have found problems with the unfinished footage no matter what? Would the hardcore Tolkien freaks have loved anything they were shown at ComicCon after being in the hot sun for 8+ hours, regardless of the frame rate? Just like 3D it will be a matter of personal taste. Jackson claims that 48 fps is the future and that once we get used to seeing such crisp, clear footage we will never want to watch 24 fps movies again.
Maybe Middle Earth is the perfect place to show at a higher frame rate, and I'm sure many fans (myself included) will see it both ways. We'll see how it goes. I have a Quenya-to-English dictionary on my desktop and have Elvish baby names picked out for my future children, but I seriously doubt that even Tolkien can make me like 3D.
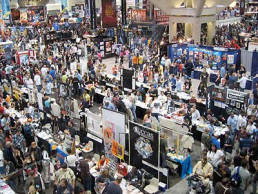
10 Convention Necessities for Cosplayers
 Cosplaying completely changes the convention experience. The crowds, schedules, lines, and costs are only more stressful once costumes are added to the mix. Here is a list of "must-haves" that will make your cosplay experience easier.
1) Emergency Repair Kit
This is a large kit that you keep in your car or hotel room for the length of the convention. It should include a sewing kit, duct tape, fashion tape, a hot glue gun, industrial glue, masking tape, permanent markers or touch-up paint in the colors of your costume and props, stain remover, and fabreeze. Crazy things happen at conventions and it's best to be prepared for anything.
2) Business Cards
These make a cosplayer's life a lot easier. Nobody wants to take time to spell out their Twitter handle or email address in the middle of the busy convention floor. You don't have to spend money on these. Even if you just write your contact info on a bunch of post-its ahead of time, photographers and other cosplayers will really appreciate it.
PRO TIP: Be careful not to put your personal phone number or full name on these cards, unless you are willing to deal with stalkers showing up at your house. Set up a cosplay email account if your email address includes your last name... or if you have a crazy complicated email address.
3) Pockets
Pockets are one of the most difficult things to build into a costume, especially women's costumes. A place to store your cell phone, your ID, and a credit card are worth more than gold when it comes to working the convention floor. Whether it's a hidden pocket glued into the top of your go-go boots, a small matching bag that you make out of extra fabric, or a significant other who is willing to follow you around with a backpack, it is vital that you have a way to transport your stuff. Make sure you at least have your ID somewhere on you in case something happens.
4) Floor Kit
This is the mini version of your emergency repair kit and should go with you around the convention. I highly suggest fashion/2-sided tape (the pre-cut strips are best), small tube of super glue, eyelash glue, and lipstick are the musts. If you have room in your bag or pockets, I also suggest masking tape.
5) 3 Different Poses
You will get asked to pose for pictures so put some thought into it before you arrive at the convention. Photographers will usually shoot a few pictures in a row, but they will lose interest faster if you stand frozen in the same pose for all of them. Try to hold a pose for a few seconds, then switch it up. Practice poses at home in front of a mirror, or have a friend shoot pictures of you. Most people at conventions are not professional photographers and they will do you no favors by setting up the shot or making you look good. Practice makes perfect!
6) A Posse
Conventions are big places where all manner of people are shoved into a high stress environment together. If you can, attend a convention with friends or other cosplayers. They will hold your props while you stand in the bathroom line, help keep an eye out for up-skirt camera pervs, and take pictures of you when you see your favorite celeb.
7) Snacks & Water
Dehydration and empty stomachs can ruin your day very quickly. It's easy to forget to take care of yourself when you are caught up in enjoying yourself. Suddenly you realize that you haven't eaten in six hours and the line for the nearest food is 45 minutes long. Have a granola bar hidden somewhere on your person. Water is harder to transport (and bathroom breaks are a pain in some costumes) so be sure you hydrate extra in the days leading up to the convention.
8) Gum or Mints
Conventions are crowded. Bad breath sucks. Enough said.
9) Costume Check List
These will help you get your entire costume to and home from the convention. Nothing sucks more than getting dressed and realizing that the amazing belt buckle that you made is still on your sewing table. It's even worse when you realize that you left a vital part of your cosplay at the hotel when you were in a hurry to head home. A check list makes sure every little bit stays with you. It's worth the extra effort.
10) A Plan
Conventions are becoming very popular. Parking, tickets, hotel rooms, and panel lines can be a real nightmare. Trust me, there is NOTHING worse than showing up for a convention in costume and figuring out that the only open parking is six blocks away. Do your research ahead of time. Know where the parking is and how much it costs, buy your tickets days or weeks before, and know the costume and prop rules for the event. It will save you a lot of time, stress, and disappointment in the end.
Comprehending Cross-Gender Characters
Cross-gender role-playing can be a controversial topic at the gaming table. Opinions are as varied as one could imagine and while some gaming groups are very open to cross-gender characters, other groups are flat out against it. So why is something that has been around since role-playing began such a big deal?
Women are partially to blame. The number of female tabletop gamers has been growing for many years and co-ed games can make people uncomfortable with portraying the opposite sex. After I posed the question on Twitter, one man likened it to faking a British accent with a British person at the table. The pressure to "do it right" can take a lot of the fun out of role-playing, even if the other players at the table aren't judging you. I was very worried about portraying a man "right" the first time I cross-gender role-played, and it showed. It was our third or fourth session before I really hit my stride and stopped second guessing myself before speaking. I've seen the same thing happen with men playing female characters. Social pressure can paralyze a person's creativity and role-playing ability.
Everyone worries about being judged by others, and good communication is the key to insuring that everyone enjoys your game. If you are worried about insulting a person in your game by portraying the opposite sex, warn them ahead of time. Please notice, I didn't say to ask permission, because only the GM should have the power to veto a character concept. Just give the other player a heads up, and if it's your first time playing a cross-gender character, maybe ask for some tips. In my experience, it doesn't matter if you screw up from time to time. If it's obvious you are really trying to create a cool character most people will be very supportive.
Sadly, there are those people who seem to play cross-gender characters just to make other players uncomfortable. I have seen this happen with players of both genders, but I think it's more common for women to be upset in this way. Usually, this happens when you are in a gaming group of people that you don't know well. Now, really insulting a normal, reasonable gamer is harder than you'd think. Playing an unintelligent woman who loves shoes isn't necessarily insulting to women (or original), but playing an unintelligent woman who trades sexual favors for shoes every time the party stops in town is something else. The difference is that the player is taking a specific action to demean the character in a way that relates to their gender. As a woman, I can forgive someone for playing a little bit of a stereotype. I cannot ignore someone treating a female character as a sausage wallet to satisfy their own sexual or misogynistic fantasies.
If you are uncomfortable in a game talk about it. Ninety-seven percent of gamers are great people who are not setting out to insult you. Usually if you can have a calm conversation they will try to fix things in future games. If you are not comfortable speaking directly to the other player or if the other player doesn't agree with you, speak with your GM. You are as important as any other player at the table and if someone's role-playing is making you uncomfortable, it's important that the situation is fixed. Be logical, non-judgmental, calm, and have the first conversation in private. Nobody likes to have their mistakes pointed out in front of their friends, so having the approaching them in private increases your chances of really being heard. Also, take action immediately when something unacceptable happens at the table. Get in touch with the player or GM after the session or when your group takes a dinner break. If you say nothing, you are setting the precedent that things of that nature are acceptable. It's sad that some boundaries need to be pointed out, but to be perfectly honest, some gamers need help with social cues and understanding that some actions aren't ok, even if they fit with their idea of a character. (Sheesh, there I go stereotyping...)
What is the most important thing to remember about playing with cross-gender players? Relax. Don't try to psychoanalyze them. It doesn't mean that they are homosexual, have penis/vagina envy, mommy issues, need to get laid, or anything else. Most players just try it as a change of pace or for a new challenge. If you aren't interested in playing a cross-gender character, fine, but be open minded with those who want to try it. The purpose of gaming is to enjoy ourselves. Some of us do that by playing characters very similar to our real selves, some of us love to try out completely different personalities for a few hours. Whatever your preference, the purpose is for everyone to have fun! It is a game after all.
(This article was originally posted on CharismaBonus.com)
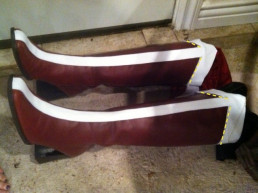
Do-It-Yourself: Wonder Woman Boots
 When I first designed my Wonder Woman cosplay, I wanted to make something that would be a believable real-world interpretation of Diana. That did not include the white and red go-go boots that are part of Wonder Woman's trademark costume, so I chose to go for the more Amazonian look of greek sandals and lace-up steel greaves. Since then, I have wanted the more traditional boots so I can be more easily recognized at cosplay events... because people seem to think I'm a patriotic Xena. Go fig.
There are a lot of affordable Wonder Woman boots for sale, however, my unique costume made things difficult because the shiny, bright red boots available online wouldn't match my muted, matte leather look. This limited me to two options, have them custom made or make them myself. My teacher salary and common sense made me choose the latter.
Step one, find boots. This step was very difficult for me, but I had an incredibly specific set of requirements and I was not willing to compromise... or pay over $50. I did weekly searches of Ebay, Etsy, and my local used clothing stores to find the perfect pair. Ebay eventually resulted in the perfect pair of tall leather burgundy boots in my size, for a price that I was willing to pay. With shipping, they put me back about $30. I had leftover white leather from my Sif cosplay, so it worked out perfectly.
 The next step is to make the pattern. I highly suggest that you get a friend to help you with this because you have to be wearing the boots to get an accurate measurement. I used white interfacing that I cut in strips and taped in place with scotch tape to create my pattern. The interfacing has similar properties to the leather, and was already laying around my workshop. I started with the stripe at the top of the boot, being careful to cut it in a triangle based shape that would peak in the front and then meet behind my calf. I then measured a long strip to run down the front of the boot.
When I got the mock-up fitting exactly right, I carefully pulled these pieces  off the boot (careful to keep them together as one piece) and traced them onto the back of the white leather. I used a pencil to insure that it wouldn't show later and CAREFULLY cut them out. Make sure that you cut one for the right and one for the left, they should be mirror images of each other. If you get two identical pieces, you did it wrong. After I cut them out I stitched white thread along the edges of the white to give it texture. It will also make it look like the stripes are sewn on, when they will (mostly) just be glued on.
PRO TIP: Cut slowly and don't use the full length of the scissor blades. This will insure you get smooth lines without those annoying jagged spots.
Once the pieces are cut, you should TAPE the stripes in place on the boot using masking or painters tape. Pins will leave little puncture marks in the leather, so avoid them. You should be wearing the boots for this step because the intended center of the boot and where the center of the boot is on your calf may be two different things. Trust me, I learned that the hard way. Double and triple check that you like the way the boots look and that they match each other. Pay special attention to the high point at the top of the boot and if the front stripe lands in the same place on both boots. Once they match you are ready to start attaching them!
 I wanted to make sure my boots were super strong, so I sewed the top stripe to the top of the boot. (The yellow dotted lines in the picture to the left show exactly where I did the sewing.) You can usually use a normal sewing machine for this unless the boots aren't made of dress leather. Once this part is sewn together you should stuff your boots (with newspaper, extra cloth, etc) until they hold their shape themselves. You will then use Barge cement to glue down the stripe in the front and to finish attaching the stripe at the very top of the boot. Follow the application directions on the can to get the best hold. This glue needs 24 hours minimum of undisturbed drying time to get it's full hold, so don't wear the boots for this step.
Wait at least 24 hours before messing with the boots. Seriously. This is the hardest part for me, but learn from my mistakes and don't move the boots around until they have dried for at least 24 hours. Once the boots are completely dry, you should remove the tape and try them on and see if everything turned out the way you wanted! If there are any small spots that aren't glued down around the edges you can add tiny drops of Barge with a toothpick or small paintbrush.
Congratulations! You can now make your own unique pair of custom Wonder Woman boots on a budget!