Review: Drinking Quest RPG
 I take my gaming and my drinking very seriously. You have to when you're on a podcast with the tagline, "Pursuing the RPG Hobby with Reckless Abandon... and beer." Perhaps because of this, I was recently sent a review copy of Drinking Quest, an RPG card game designed to be played while drinking. In fact, the mechanics require you to be drinking.
BEST CONCEPT EVER.
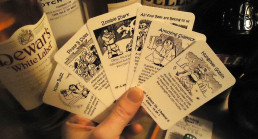
Drinking Quest is a very simple RPG by design, after all, they are expecting you to play while inebriated. The game is designed for two to four players. Everyone starts by choosing one of the four pre-generated character cards. These are all about equal power-wise, and have funny names and powers. I was a little disappointed that only one of the four characters is a very female character, but all the characters are very stereotypical to the point of being crude satire. The characters are really basic, with no armor, low stat numbers, and simple attacks. Again, I assume the designers were trying to keep the math simple for Drinky McDrinkerson and his buddies. After you kill off some enemies you can collect gold to buy some simple items to improve your defense or attacks.
There is no DM/GM, and each player draws a card to see what opponents or challenges they will  face. They player rolls against another player who represents the baddy if an opponent is drawn, or the player rolls all three dice if it's a stat challenge. Combats are simple and usually over in a few hits. It really reminds me of a simplified version of the DnD boardgames, like the Legend of Drizzt. It's a great little system that doesn't put responsibility on any one player. Everyone is able to just relax and enjoy themselves.
One thing that is lacking in Drinking Quest is a healing system. The game is designed to have your character die, then you chug your drink to get them alive and back to full health the next  turn. It sounds like it would be really fun, however it seems that characters almost never die in Drinking Quest. We played a few times and only a handful of chugging instances occurred. This seemed to be the main drinking component in the game, so we were a little disappointed that it happened so rarely.This isn't exactly a bad thing, especially if your just looking for something to play when your GM calls in sick, but if you're looking to get wasted this may not be your game. Try Beer Pong. My group ended up house ruling a healing mechanic that involved taking a big swig and getting a hit point back. (We just weren't getting drunk fast enough apparently!) This may only be a good idea if you are drinking beer, because a home brewed healing game with shots might kill someone.
The cards are clever and entertaining. They are some real zingers in there that will crack up the whole group. The challenges are amusing and it's nice that everything is drawn  randomly so that every time you play the adventure changes. I was very worried about the "sexual prowess" stat when I first looked at the character cards, but it's used in an amusing and not a gross way (phew!). The artwork, by Carole Nelan, is well done and perfect for the feel of the game. It requires three dice, the game cards, and character sheets. The game is very high quality, with professional level cards, disposable character sheets on a pad, and a color printed box. The package design is excellent, and all of these items fit into a slightly larger playing card box. Seriously, I have both Drinking Quest and Drinking Quest 2 in my purse right now. I really appreciate that type of compact design in my games and gaming books.
For $22 a pack the price is a little steep in my opinion. We had a good time with the game, and if you think you'd have the opportunity to play a lot, it could be worth the money to some gamers. If you will be playing with the same group over and over again, I'd suggest buying Drinking Quest 2 in addition to the original. It is a stand alone game, not an expansion, but you could mix up the adventures and PCs with the original Drinking Quest deck in order to keep things fresh. And, as always, I am fully behind home brewing the rules to customize the fun for your group.
You can learn more about drinking quest and buy it at drinkingquest.com. Please, drink responsibly... or crash on someone's couch.

Kimi's Cosplay Interview for Examiner.com
 I was interviewed by Examiner.com about cosplay, gaming, and how the two are linked. Read up to get the inside scoop on my upcoming cosplays, my dream cosplay, cosplay advice, my favorite alcoholic beverages, and more!
Special thanks to Claire Broderick, the gaming writer for Examiner.com who came up with such great questions!
Kimi's Cosplay Interview on Examiner.com
Justice League Dark: The Answer to DC's Movie Problem
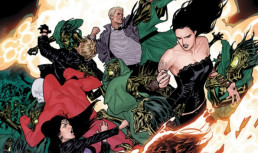
 News of a Justice League Dark movie emerged last week, linked with director Guillermo Del Toro. I have really enjoyed the Justice League Dark book (despite the lame title) since it was introduced with the New 52, and it includes some of my favorite characters, including John Constantine and Zatanna. They really have captured the disjointed team of misfits well, with love triangles, mistrust, temptation, and heroism. It is an occult team, drawing their power (and villains) from magic and religion rather than super strength or speed. It may also be the answer to DC's superhero team movie problem.
Guillermo Del Toro is the PERFECT director for this project. He is no stranger to comic book movies (Hellboy, Blade II), and he is a master with directing the supernatural (Pan's Labyrinth, The Devil's Backbone, Cronos). I think he would be able to balance the humor and sarcasm of the Justice League Dark team with the dark flavor of horror needed to put the audience in suspense. He is also really good at directing fight scenes. My only misgiving is his tendency to take on too many projects at once. If he sees the project through to the end, he will make it something worth our box office money.
 Obviously, this team is full of the B and C list characters in DC's lineup, but despite the lack of mainstream heroes this movie could be the perfect start to DC's superhero team movies. Yes, the Justice League is easily identifiable, but so were The Avengers. Marvel knew better than to just toss their audience into a full blown team of incredibly super-powered characters without taking the time (via other movies) to set the stage. Warner Bros and DC should use Justice League Dark as the introduction to their world, in much the same way that Marvel used Iron Man, Thor, and Captain America to set the stage for The Avengers. It will set up the universe's rules, and start us off with a team that the mainstream audience will have an easier time identifying with.
 The biggest advantage that Justice League Dark has is that all the characters are human. This may seem like a small matter, but when you are trying to get an audience to relate to your team, it can be a big deal. This team doesn't wear spandex (other than Deadman who wears his old circus uniform), and if they were walking down the street you probably wouldn't notice them (again, except for Deadman). They all deal with personal desires, flaws, and pain in every issue, and we can relate to all their emotions because they are feelings we all share. Superman, Wonder Woman, while more familiar, are harder for the normal audience to identify with because of their extreme powers and strange origin stories... and the crazy outfits. The Justice League Dark can tap into the super natural, but they also have to go to the supermarket if they want to eat or buy a pack of cigarettes. This team can gently introduce the mainstream audience to the DC Universe, setting us up for the more extreme spandex and cape wearing Justice League team we all know and love.
The timing may not work out, and Justice League may end up setting the stage for Justice League Dark, but I hope that both teams hit the big screen in coming years.
The Music Behind Batman: The Animated Series
![]() Batman:The Animated Series was a brilliant show that forever left its imprint on the Batman universe. With its film noir style, it was the gateway for a new generation to discover comics and the Caped Crusader. Each character was captured perfectly, from the Mark Hamill's brilliant rendition of The Joker to the re-imagining of Mr. Freeze's history (which was eventually adopted by the comics and movies)! And, let's not forget that this was the series that brought Ms. Harley Quinn into being!
Batman:The Animated Series was a brilliant show that forever left its imprint on the Batman universe. With its film noir style, it was the gateway for a new generation to discover comics and the Caped Crusader. Each character was captured perfectly, from the Mark Hamill's brilliant rendition of The Joker to the re-imagining of Mr. Freeze's history (which was eventually adopted by the comics and movies)! And, let's not forget that this was the series that brought Ms. Harley Quinn into being!
Stuart Balcomb is an accomplished movie score composer and was part of bringing Batman:The Animated Series series to life. He scored some of the most memorable episodes in the series, and I was lucky enough to interview him about his time working on the show.
Kimi: How did you join the Batman: The Animated Series team?
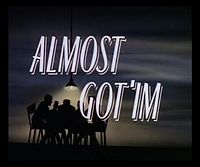
Stuart Balcomb: At the time, I was Supervising Copyist at the Universal Studios Music Library. My counterpart at Twentieth, Jo Ann Kane, recommended me to Shirley Walker, who at the time was assembling a team of composers for a new animated series. Shirley called and I went to her house for an interview. There were a LOT of people involved, and we all were given a few cues each to orchestrate for Shirley, who was already writing some shows. She had a very specific format we were to follow using very commonsensical procedures that I still use today. She liked my work, so I made the first cut. Next, she gave me a show (The Underdwellers) to split with Lars Clutterham. She evenly assigned cues to each of us to write. When I had written a few cues, I drove to her house and she'd play through them on the piano, making suggestions if needed. She was very hands-on in that manner. I'd go back, make the fixes and then send the score to Warners. Shirley conducted that session while Lars and I read the scores in the booth. She again liked my work to then give me a full show of my own (Appointment in Crime Alley). I really liked the Main Title I wrote, which consists of rising and falling sequences of sixths. If I remember correctly, she conducted the first half and I, the second. I scored one more episode, my favorite (Almost Got 'Im), which I conducted. That was a real treat because all Batman's enemies were in a nightclub, talking about how each almost got him, so each time the scene cut back to the club, they needed some jazz music playing. Being from a jazz background, I was in my element. At the session, we saved all those cues for last. Shirley had hired a real jazz bass player and we had a ball. One musician remarked, "Geez, we're getting PAID for this?"
K: Were there any musical themes that you had to include or stay away from in your compositions?
SB: I was given some established character themes to use if I wanted. When I did use a theme, I indicated on the score what percentage should be credited to that composer. I actually came up with my own Bat Mobile theme in "Crime Alley," which I really liked. I've since wanted to expand on it, but it's the property of Warner Bros., so what's the point?
K: What was it like working with Bruce Timm, who has been involved in nearly all the DC animated projects?
SB: Bruce was great. Very friendly, very astute, and right on the money when it came to where music should go, where music should not be. I don't remember whether it was Bruce or Shirley, but it was decided that we all should stay completely clear of explosions. Build the music right up to it and stop dead about a heartbeat or two before. Let that little silent vacuum suck you right into the massive sound effect. It worked brilliantly. Since then, I've been acutely aware of the error of so many scores that bludgeon us over the head with crash cymbals, massive bass drum, and the works, on top of all the mayhem that the sound department so skillfully crafted.
K: You conducted your own scoring sessions for Batman: The Animated Series. Was that your choice, and if so, why do you prefer to conduct your own compositions?
SB: I do love to conduct. It is an art, and I feel that a good conductor almost paints pictures with the hands. I conducted a church choir for ten years, and I really appreciate the ability to "shape" a sound with even an intimate gesture. Because of that, I would almost rather conduct an orchestra with no baton. I remember one famous Hollywood conductor who did a lot of A-list film sessions, and he was simply a human metronome—no expression, no entrance cues—he just mechanically waved the baton with the click track with his head buried in the score. That's not conducting!
K: How did you keep each episode fresh and still use the recognizable themes for each character?
SB: ... I have never found it a problem to come up with new ideas. Sure, we all recycle ourselves from time to time, but our musical language is who we are. Motifs evolve, are reborn, and emerge sometimes as cousins of previous material. Frank Zappa said that he only ever wrote one piece. He considered that his entire output over his lifetime, from beginning to end, was really just one continuous piece of music.
K: From start to finish, could you walk us through the process of creating the score for a single episode?
Every TV show and film starts with the spotting session. I met with Bruce and Shirley and the music editor, Tom Milano. We viewed the raw episode (sometimes there were placeholders because the animation wasn't finished), discussed where music should start and stop, and sometimes the musical nature of each scene. Tom took notes which he later mailed to me, listing each cue and its timings. It was up to me to  translate all those into notes on a score that would support the scene ... I wrote out the score by hand. Yup, those days were still pencil on paper. I still really just compose in my head and write down what I hear, with an occasional reference to a keyboard.
As I would finish a few scores, I'd call Warners and tell them to send a courier to pick up what I had done. The music library could copy the parts and bind the scores for the session, then the next day I'd send more in.
I had worked for about a week on "Almost Got 'Im," and it was about midnight before the recording session. All the other scores had been delivered to Warner Bros., the parts copied and booked up for the players, and I had only one last cue to write. The problem was that I was completely drained. Exhausted and creatively spent, I could not go any further. I stared at the empty score pages that I had prepared and wondered what to do. I briefly entertained the idea of running away, booking a flight somewhere.
It then suddenly hit me that A.) the earth turns and tomorrow will come, and B.) at 10:00 tomorrow I will be standing on the podium in front of an orchestra with a baton in my hand, ready to give a downbeat, and all those pages will be filled in, black with notes. I visualized the future. It was tomorrow and the task was done. All I had to do was get from here to there. And at that moment all the ideas started to flow. That visualization made the process much easier, and I've used it ever since—I even once applied it to weeding the lawn...
Well, that was another digression, but very key to my experience with that particular episode. To continue, after a session, perhaps a week later, I'd get a call to attend the dubbing session in which dialog, sound effects, and music tracks are all mixed for the final output. It's very important for the composer, or someone who has the composer's interests at heart, to attend the session, because sometimes it's important to speak up for oneself and say that such-and-such music theme must remain on top of the mix at a certain moment where maybe the sound effects editor is keen on pumping a sound that someone had worked a week to create, thus burying an important musical moment. A fine balance must be maintained so that the maximum service is done to the film, be it music, a spoken phrase, a sound effect, or even silence. The music editor and mixer were very good, though, because only once did I have to chime in and say that the music was a bit too low at that point, to which everyone agreed.
K: I know that your son was a huge fan of Batman: The Animated Series, were you a Batman fan before you started composing for the show?
SB: No, I was not necessarily a Batman fan. [My son] Sam was a comic collector—in fact, we both bought the first Youngblood that came out ...We also collected the Spawn comics from the very beginning. After awhile, I think Sam stopped but I continued, and eventually stopped at #100. For Christmas one year I gave him all 100 issues. But I digress.... Tim Burton had put out two films by the time the Animated Series came around, so I had seen those. I wasn't thrilled with the over-the-top, almost slapstick violence, especially with the absurd fight between Batman and the Joker on the top of that bell tower. I did, however, like Danny's score.
I'd like to thank Stuart for taking the time to indulge my fangirl questions. I truly credit Batman: The Animated Series for introducing me to the world of comic books, and it was an honor to quiz him on a topic so near and dear to my heart.
Visit www.stuartbalcomb.com to hear samples of his work from Batman:The Animated Series and his other incredible projects.
Do-It-Yourself: Superhero Mask
 A good superhero mask can make or break a costume, whether it's for a kid's party, Halloween, or a convention. I use a very simple method to create my superhero masks, and with a few craft supplies and household items, you can create your own mask that will look great and be easy on your wallet!
Materials:
- Craft Foam - Packs run about $7 and individual sheets around $1.
- Styrofoam Wig Head - Found online or at wig shops for about $2 - $4.
- Scissors/ Xacto Knife/ razor blade
- Heat Gun / Hot Hair dryer
- Mod Podge (spray or brush on type)
- Masking Tape
- Spray Paint (optional)
Process:
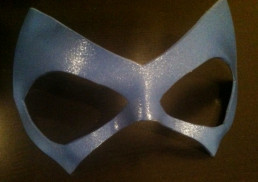
 Step 1: Decide what color and shape of mask you want. Get craft foam of the correct color (or as close as possible) and start sketching your shape lightly in pencil. The side you draw on will eventually become the back side of your mask, so don't worry about erasing mistakes perfectly. I use an Xacto knife or razor blade to cut my masks out because it's easier to get smooth edges on the foam. To insure that my masks are symmetrical, I usually draw one side, cut out almost all of it, then fold it over and trace it to make the other half of the mask.
 Step 2: Molding the foam mask to fit the contours of your face is very easy! Start by taping the mask in place on the foam wig head, making sure that the side with pencil marks becomes the back. Don't use pins because they can leave holes in the foam or will melt it if they heat up during this process. The tape might lose its grip if it gets too hot, but it will keep the mask in place for the beginning of the process.
Using a heat gun or a very hot hair dryer, start heating up the foam mask and gently pressing the mask into place. Be careful not to burn your finger or start melting the foam, especially if you are using a heat gun. If you smell something burning, STOP! I find that it works better to start in the middle of the mask near the nose since that area takes the most shaping, then move to the outer areas of the mask. Once you have the shape you like, let the mask cool completely before moving on to the next step.
 Step 3: If your mask is already the correct color, move on to step four, but if the foam is not the right color now is the time to paint your mask. Leave it on the Styrofoam head, re-taping it so that the tape is on the back of the mask only. Then carefully spray paint or paint the mask by hand. It's important to keep the mask on the head during this phase so that it keeps its new shape. I highly recommend testing your paint on a scrap of foam first because some paints will damage/melt foam. You will notice how messed up my Styrofoam head is in the pictures!
Step 4: After your mask is completely cooled and the paint is TOTALLY dry, you will seal your mask with a clear coat of Mod Podge. I usually use the spray on variety, which is available at craft stores, Wal-Mart and other places, but brushing it on can work as well. MAKE SURE THAT YOUR MASK IS STILL ON THE STYROFOAM HEAD WHEN YOU DO THIS and that the tape is attached to the back side. The Mod Podge will give your foam a shiny look and texture that resembles latex or leather. I recommend multiple coats of Mod Podge to give your mask more strength and to help it keep its shape. Let each coat dry completely before adding the next and leave the mask on the Styrofoam head for at least 24 hours after the last coat.
 Step 5: There are many methods to wear your new mask. You can punch holes on the sides of the mask and tie ribbon or string to it, then tie it behind your head. For the "superhero" look, I usually use spirit gum to attach it directly to my face. Spirit gum is pretty cheap and available at most costume stores. Be sure to buy it in a pack with the spirit gum remover. Trust me on that. I learned the hard way. I also recommend testing it out on a small spot on your before the event, just in case it irritates your skin. You don't want to show up to work on Monday with a raccoon mask rash!
This technique seems simple, but it can create amazing things! With practice, patience, and a little creativity, you will be able to create incredible masks and finish off even the most professional costumes!
Herding Dragons: My Wild Talents Con Game
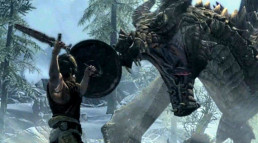
 I love adding a unique twist to my convention games, and my Wild Talents game for Gateway 2012 was no exception. Months earlier I had been inspired to set my game in the world of Skyrim (mostly because I was playing it every waking moment), but I wanted to give my players a completely unique experience. A major role reversal was in order.
When my players arrived, they were greeted by my trademark gaming table. I've had other GMs scoff at my admittedly overdone layouts, but I  find that players really appreciate the amount of preparation and it starts everything on a very positive note. Folders were laid out on the table, each one labeled with a symbol that represented the character that lay within. I never let players see the character sheets before a game, so these symbols were the only clue they had to choose their folder. I find that this forces players out of their usual go-to roles and really ends up stretching their creativity during the game. It also negates the show-up-early-to-get-the-best-character strategy.
I gave a brief description of the setting, carefully avoiding giving away the big surprise I had in store for the players. Skyrim is a typical fantasy setting with a bit of Viking flavor thrown in for good measure. Wizards and warriors are commonplace, and dragons are the enemy of mankind. Many of my players were very familiar with the video game and had a very set image of what they were expecting from this game. Boy, were they in for a big surprise! After my explanation, I let them open their folders to see the portraits of their characters.
") The reaction was amazing. The players were shocked, delighted, and a little thrown by the dragons that greeted them when they opened the folders. Each dragon had a unique "thu'um", a magical phrase in the language of the dragons, that gave them thier powers and the dragon's name was translated from Skyrim's dragon language to reflect their powers.
The reaction was amazing. The players were shocked, delighted, and a little thrown by the dragons that greeted them when they opened the folders. Each dragon had a unique "thu'um", a magical phrase in the language of the dragons, that gave them thier powers and the dragon's name was translated from Skyrim's dragon language to reflect their powers.
- Fendufyn, “The Devouring Bane”, was the biggest of the dragons and had a thu'um that turned his skin to stone.
- Qorohgol, “The Raging Lightning”, had skin that became electric, and electricity is VERY dangerous in Wild Talents.
- Haslovaas, “Song of Health”, was the most intelligent of the dragons, and had the ability to turn ethereal and heal through his thu'ums.
- Strunduving, “Storm-wing Devourer”, was the smallest and fastest of the brethren, with a thu'um that gave him super speed.
- Yolvolun, “Fiery Night”, was another of the bigger dragons and had a ranged thu'um that shot fire at any unlucky targets.
- Lizinjot, “The Icy Maw”, was designed as the counterpart to Yolvolun, with capable physical stats and an ranged ice thu'um.
I explained that they were young dragons who had hatched together, but had never seen any other dragons, including their parents.
One of my important GM strategies is to leave personality information off the character sheets. Yep, I don't tell them who they are. I specify important connections to other PCs (family relationships, similarities, past history, etc), list their stats and powers, but I let the player assemble all this information into their character's personality. Most players are totally thrown when they sit down at one of my convention games for the first time, but I find that it actually increases the role-playing at the table. Instead of forcing a square peg into the round hole I created, the player is able to form a peg they are comfortable with and that fits in the hole that the party creates. Players are incredibly creative and come up with great ideas that would never have occurred to me. This also increases the player's personal investment in their character and the game as a whole.
Now this game could have gone one of two ways. The choice that many players would have gone with would be the majestic, wise, and ancient dragon route. My players shunned that for the more quirky, Looney Tunes meets The Three Stooges style game. They decided they were all adolescent brother dragons and immediately started beating on each other and looking for girl dragons. Yep, they rolled initiative and started wrestling in true brotherly fashio") n. Although it was unplanned, it served as the perfect introduction to the Wild Talents combat system and really started the game off with a bang.
n. Although it was unplanned, it served as the perfect introduction to the Wild Talents combat system and really started the game off with a bang.
The Wild Talents system ended up being a perfect fit for this game. I was able to create powers that actually matched the dragon thu'um powers in Skyrim, as well as give the dragons stats that were appropriate for their species. It also worked to create the HUGE number of NPCs that the dragons eventually fought. WOW, do six teenage dragons plow through human NPCs! As always, the players ended up really enjoying the Wild Talents combat system. I did learn that I need to color code the NPS sheets for the next time a run an overpowered game like this, to make managing the large number of them easier! Better living through office supplies!!
As we moved through the story, I was absolutely floored by the level of role-playing in this game. My games are all very open, "sandbox" type worlds that encourage lots of role-playing and player empowerment, but this group took it to the next level. I was  basically just along for the ride. Without pre-generated personalities to confine them, each player came up with an amazingly vibrant and unique personality for their adolescent dragon that matched perfectly with their stats and abilities. They fought with each other constantly (what else would teenage brother dragons do?), but were also very protective of one another when danger threatened. There was never a dull moment, and watching the players revel in being the dragons and not the bite-sized humans for once was a delight.
All the role-playing did take a lot of time though, and there is no time to waste in a convention game. Taking the advice of the Happy Jack's RPG podcast crew, I had designed my game in modules to provide more flexibility in the story. There were five total parts or scenes to the story. Scenes one and three were vital to the story, but scenes two and four could be skipped if we were running short on time. I had multiple plans and NPCs prepared for the finale (scene five) so that the scene could be quickly adjusted to fit the remaining time in our convention game. This high level of flexibility takes more prep time, but it allows the game to run seamlessly during the convention and lets the players resolve the game in the allotted time. It also allows the GM to run the game again and enjoy a completely different experience. Even with all the freedom the players had in this game we ended almost exactly on time.
I could tell the game was a huge success because everyone left the table as friends, and many of them were actually tweeting to each other in character for many days after. It was an amazing experience and I was truly honored that Fray, Stephen, Will, Kurt, Matt, and Sam all chose to be part of my game. They are incredible gamers and I hope to see them at my table many times in the future.
If you'd like to read the play-by-play of this game from a player's perspective, read Matt's blog post about the it at Monkey in the Cage.
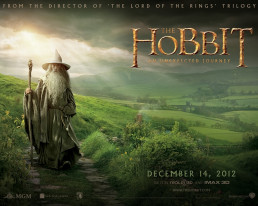
The New Hobbit Trailer
 The new trailer for The Hobbit movie was released last week, just in time for the 75th anniversary of The Hobbit. I'm currently reading the book with my middle school English classes, so I've been spending even more time than usual contemplating Middle Earth. We just finished the "Riddles in the Dark" chapter, and the kids are loving it. The first trailer was wonderful and the dwarven music gave me goosebumps. This time, I was only left with worry lines in my forehead. Maybe it's my students' new-found delight in these characters as they are written, or perhaps it is just that the story is so fresh in my mind, but the trailer seemed to stray from the book a bit too much for my liking.
 While The Hobbit is a much more lighthearted book than The Lord of the Rings, it worries me that some of the scenes with the dwarves seem to be inspired by The Three Stooges. They are the principle heroes in The Hobbit, and I really hope they are treated with the respect they deserve. It's bad enough that Gimli ended up being comic relief for much of the trilogy, do all the dwarves have to be goofy? It seems that only Thorin is treated with any respect. These are capable warriors from a noble race of artisans, and while there should be comedic moments in The Hobbit, they shouldn't simply be comic relief.
 Another thing that is worrying me is the amount of obvious CGI in the trailer. I realize that it was a hug part of the LOTR movies too, but when combined with miniatures it was usually very seamless (other than a few very annoying green screen shots). Some of the shots in both trailers look very fake. The one moment that made me cringe in the first trailer was when Bilbo held up Sting, and it was very obviously a CGI sword instead of a real one. Perhaps they are not finalized effects yet, or maybe they will look better when they are all in context. A girl can hope, right?
The amount of content that has been added has always been something I was worried about. There were a lot of scenes that seemed to be drastically different than the book, or flat out created for the movie in spite of the book. I realize that some adjustments have to be made when a book is brought to life on film, but I've been nervous since I heard they were going to turn it into three movies. They brought all three books of The Lord of the Rings to life in three movies. Why are they taking three movies to recreate The Hobbit when it's only one book and a more simple story?
I'm holding out hope and reminding myself of a bit of wisdom from the man himself. "Do not be too eager to deal out death in judgement. For even the very wise cannot see all ends.” ― J.R.R. Tolkien, The Fellowship of the Ring

The Legend of Drizzt Board Game
 I don't know anything about Drizzt, so when my friends pulled out The Legend of Drizzt board game at a recent tabletop night, I was a bit clueless. I didn't know anything about the characters or the setting, but it didn't matter. I ended up having a great time.
The game is basically a GM-less dungeon crawl. Each player takes a turn playing their character, but then they play the dungeon. To do this, they draw tiles from a pile which randomly add on to the dungeon and change the layout. The player also has to draw from a pile of challenges that will make moving through this new tile challenging, usually this is in the form of a trap. This leads to surprisingly challenging encounters, and although it doesn't lead to the most creative game, the random elements add a lot of excitement to the game.

The characters are well balanced, and there are even pregame power choices that make them somewhat customizable. I played an archer, and chose a really powerful shot that blew the target into another dungeon tile. It really became a valuable asset during the big fight at the end, and the game would have played out very differently if I had selected another power. Ever the advocate of player empowerment, I was delighted and surprised by this addition to a board game. There isn't really a role-playing aspect to the game, despite its DnD inspired theme. My usually RP-heavy gaming group did almost none, only occasionally thinking about their characters loyalties when deciding who to aid first in combat. This game is basically an old fashioned dungeon  crawl, with a simple objective, a series of deadly rooms, and a boss lurking somewhere up ahead.
I'm definitely planning on buying this game for myself when I pickup my next paycheck. It was great for an impromptu game night. It would also be a great backup for any gaming group in case the GM misses a session or isn't able to prepare an adventure one week. I plan on taking it to future conventions to fill empty time if I don't get into games. Since everything is based on random selection, you can never play the same exact game twice! It also comes with many different ways to run the game to keep it fresh. The Legend of Drizzt board game doesn't match the fun of a real RPG session, but it captures the RPG flavor without any prep time.
You can get a copy of The Legend of Drizzt at Amazon for about $50.
(This article was originally posted on CharismaBonus.com)
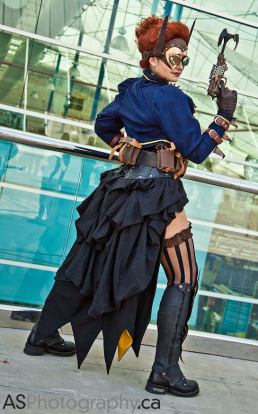
Do-It-Yourself: Steampunk Bustle Skirt
 The bustle skirt was my favorite part of my Steampunk Batgirl costume. I wanted to create an item that was a steampunk staple, but still hint at the traditional cape that Batgirl is famous for wearing. The skirt is a simple six-panel skirt that is just missing the front three panels. Don't know what that means? That's ok, keep reading and I will do my best to explain. (I simplified some steps in this process, but it will end up looking just like my skirt.)
Waistband
The first thing you need to figure out is the length of your waistband. Measure your TRUE waist, which should be the narrowest part of your torso, a little above your belly button. If you are going to wear the skirt under a corset subtract one inch from that measurement, otherwise add one inch to the measurement.
Example: Waist measurement: 28 inches
Under Corset: 27 inches
Not under corset: 29 inches
 This will end up being the length of your waistband, including seam allowances. The under corset length is smaller to accommodate the smaller waist size and avoid uncomfortable bunching under the corset. Measure and cut a rectangular strip if your fabric, using your adjusted waist measurement as the length and a width of 4 inches.
Take your waistband strip and iron some interfacing on the underside of it. You don't need heavy duty interfacing, just some regular weight stuff to give the waistband some structural strength. MAKE SURE THAT YOU BUY IRON-ON INTERFACING. It will make your life a LOT easier, so ask the store personnel if you are unsure. It's really easy to buy the wrong stuff, and we all hate the walk of shame back through the fabric store that you left 20 minutes ago.
 Before you start sewing, you will want to iron creases into your waistband because it will make things much faster. Fold it over length-wise and iron it until it holds the crease down the center, then fold half inch folds along each edge of the waistband and iron until they hold creases as well. These mark your seam allowances and the creases will make the sewing easier.
 Fold the waistband lengthwise, with the interfacing on the outside. This should be folded opposite of the ironed seam that you ironed earlier. You will then sew the ends closed on the half inch creases that you ironed earlier, but make sure that the lengthwise half inch seams are sewn in the folded position.
Now you are done prepping your waistband! You will turn it right-side out later, but for now we will move on to the panels!
Panels
 I traced my panels from a floor-length skirt onto large pieces of butcher paper (ok, so they were old DnD maps, sue me). Those panels are about 13 inches wide across the top, 34 inches wide across the bottom, and 42 inches long, but I added about 5 more inches on both sides and an extra foot to the length of my panel outline. The fuller you want your bustle, the more fabric you need to add to each panel. I used three enlarged panels to create my steampunk skirt. Remember, always trace an cut patterns length-wise according to the weave of the fabric, just like the picture to the right.
PLEASE NOTE: Only add extra inches of fabric to the panels that you are going to use for the bustle. You won't want to add as much/any extra fabric to the panel pattern for the front of the skirt or you will trip all over it.
 Then sew the panels together by matching the edges and stitching them together to form a circle or semi-circle, like the picture to the left. My skirt only used three panels since it only went half way around my body. Full skirts will usually use five or more panels. Make sure your seams are all facing the same direction on your skirt as you sew. After you sew your panels together, you will want to finish your edges on the underside of the skirt and hem the outer edges. This video shows you ways to do that.
Put it all Together
Now you will pin the panels to the waistband before you sew them. You will choose one of the lengthwise half-inch seam allowances and pin the panels to, and start by pinning the front edges of the skirt to the appropriate place on the waistband. For my skirt, I wanted the skirt to open right in front of my hip bones so that my bloomers and garters would show. The easiest way to do this is to safety pin the waistband on yourself, then pin the front edges of the skirt to where you want them on the waistband.

 Once the front pins are in place, you will need to make pleats to gather the rest of the skirt fabric to the waistband. You will basically fold the fabric over itself, then pin it into place. This it the most tedious part of making the skirt, but remember that the pleats do not have to be perfect.
Once you are done pinning the skirt, carefully sew the pleats in place on the side that you pinned. Iron the pleats flat after you sew them, then close the waistband (be careful that the other seam allowance is folded up inside), and then sew it shut across the bottom.
Bustling the Bustle
Now your basic skirt is finished, it's time to add the bustle. The easiest way is to put your skirt on the dress form and start pinning. There isn't really a magic formula, just start pulling spots and pinning them to higher places to give it the tiered appearance. Once you have everything looking good, hand stitch each spot where you pinned. Don't start sewing until your whole bustle is pinned, because you will probably change your mind... a few times.


Bat Wings
 The "bat" part of the skirt was actually designed to be a completely separate piece. It was made just like a cape, and is hand stitched into the waistband so that it can be detached and reattached very easily. I did that to give the skirt more versatility as a costume piece. I can now wear it with my
 steampunk batgirl, or remove it to be just steampunk!
I measured and drew the desired shape on butcher paper (another old DnD map) and traced one on the black and one on the yellow fabrics. I then carefully cut them out and pinned them together, starting with the point of each bat wing shape to be sure they lined up correctly. I then stitched them together and turned it inside out to hide the edges, just like a simple cape design. Originally, I had planned to add interfacing to give the wings some stiffness and shape, but I really liked how the material flowed without it. Then I simply closed up the top of the "wings" and hand stitched it into the waistband of the skirt, underneath the already finished bustle.


Have questions? Need clarification? Post a reply or email me at Kimi@goldenlasso.net
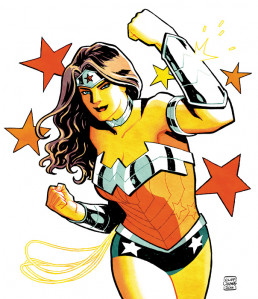
DC's New 52: Who is Wonder Woman?
 DC can't seem to make up its mind about Wonder Woman. It took their artists a few months to unify her costume design across all their titles, and it seems like Wonder Woman and Justice League take place in completely different universes, but that isn't my biggest problem with the rebooted Amazon princess. My biggest problem is that Justice League can't seem to give Diana any personality at all! As someone who has been a die-hard Justice League fan (Europe, America, International, all of them) since I was a kid, it's really pissing me off.
Now, it can be argued that there are problems with a lot of the newly rebooted characters in Justice League, however at least they are stand alone characters. Justice League's Wonder Woman is completely defined by her male relationships, starting with Steve Trevor. At first, she was an ignorant meat-head looking for a fight and eating ice cream. Only Steve was able to keep her from smashing everything Hulk-style, despite the fact that none of the other heroes need a handler. Why does a character as smart as Diana (should be) need a man to constantly remind her that it's not ok to go wandering around swinging a sword in public? Even after growing up on Paradise Island, she should be able to figure that out after a few days. Somehow they managed to make her vastly powerful and completely dependent on a non-super-powered man, all at the same time.
 Unlike the Diana in Brian Azzarello's Wonder Woman run, the Justice League Wonder Woman seems to be completely lacking in emotional depth. Azzarello shows us an edgy Diana who likes to hang out at rock concerts, is bitter about being teased as a child, cares deeply for her companions, and bravely faces the gods to protect the innocent. The only thing we have seen from her in Justice League is a sudden, desperate concern for Steve in Issue #11, which seems to come out of nowhere despite their prior relationship. Diana has shown almost no emotion on the matter up to this point, unlike Steve, who has been driven to drink because of their breakup. Why is it that a side character without powers, and who has been in significantly fewer panels than Diana, has so much more emotional depth? We have gotten more personality information out of Green Lantern's one liners than from all of Diana's lines combined, but we are CONSTANTLY reminded that all the men in the world envied Steve for being Wonder Woman's boyfriend. Her defining characteristic, and certainly her most mentioned attribute, seems to be her hot body.
 Now she is hooking up with Superman. The relationship makes sense from an outside standpoint, but it has completely baffled many people who are actually following the comic. A few panels before the now-infamous kiss, Diana was desperately trying to save Steve, then decided to put even more distance between them to keep him safe. There have been hints that she cares about Steve and that she only left him to protect him from her dangerous lifestyle, but this tiny bit of character development is thrown out the door. BAM! The same night that they get home and Steve is laying in the hospital, Diana ends up making out with Superman on a rooftop. Can we say "pathetic PR stunt?" I'm not against a Superman/Wonder Woman relationship. I LOVED them in Kingdom Come, however this time they didn't bother with the character development to back it up. We've all suspected they'd become an item since the reboot because they were both suddenly single, but there should be flirtations, hesitations, lingering glances, emotional commonalities... SOMETHING to back it up. A two page conversation about how they are different than normal people because of their powers, which I believe is the first one-on-one conversation between them since the reboot, and then a dramatic final panel kiss is just lazy writing and bad character development. But DC got tons of press, so who the hell cares about the characters, right?
 I think the worst part of the Justice League reboot (yes, worse than the only female character's complete lack of personality or ping-ponging her from man to man) is that this Diana is so inconsequential. She is completely reactionary, like so many female comic book characters before her, and seems to serve little or no purpose other than being the token woman of the group. She never comes up with ideas or shares opinions. She doesn't stand up for the weak, or worry about the civilians when the team is busy leveling cities to take out bad guys. She hasn't displayed any powers or characteristics that are indispensable to the team, and, despite devoting her life to warrior training, Batman still makes all the tactical decisions. There was a time when Diana was an undeniable part of DC's trinity, but now even I, a life-long Wonder Woman fan, have to admit she'd be the first one I'd cut if I ran the team. Azzarello's Diana faces the gods single-handedly, and you really believe that she could win. He even threw in some new powers to match with her electrifying new back story. Like the changes or not, at least she is bad ass enough to stand on her own.
 I am constantly surprised by Azzarello's Wonder Woman run, and although I don't like all the changes he has made, am really enjoying the unexpected darkness of his universe. His Wonder Woman is an edgier Diana, who has some surprises up her sleeves... or bracelets! She is smart, complex, and proactive. Even without mentioning her powers, she is an interesting character. I hope that the Justice League writing team takes their cues from Wonder Woman and starts to rethink their approach to the most famous female character in comics.